Stihl MS 162 Instruction Manual - Page 28
Tensioning the Saw Chain
 |
View all Stihl MS 162 manuals
Add to My Manuals
Save this manual to your list of manuals |
Page 28 highlights
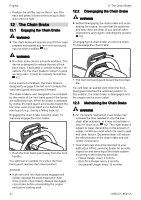
English 10.3 Tensioning the Saw Chain 10.3.1 Tensioning the Chain WARNING ■ To reduce the risk of severe personal injury from chain derailment, check chain tension frequently, 5.6. At operating temperatures, the chain stretches and sags. New chain tends to stretch more than used chain. Tension the chain so that the drive links cannot come out of the groove on the underside of the guide bar. To properly tension the chain: ► Shut off the engine, 15.1. 1 a 2 ► Loosen the nut (1). ► Disengage the chain brake, 12.2. ► Lift the guide bar tip. ► Turn the side chain tensioner (2) clockwise to tighten the chain. The chain is properly adjusted when the dis‐ tance (a) between the underside of the guide bar and the chain is within 0.04 in. (1 mm) and 0.08 in. (2 mm) and can still be pulled easily along the bar by hand. Always wear gloves when handling the chain. ► If the chain cannot be moved along the guide bar, it is too tight. - Reduce the tension by turning the side chain tensioner counter-clockwise until the chain can move freely along the guide bar. - Ensure that the drive links remain in the groove and that the distance (a) between the underside of the guide bar and the chain is within 0.04 in. (1 mm) and 0.08 in. (2 mm). ► Once the chain is properly tensioned, lift the guide bar tip and tighten the nuts to secure the chain sprocket cover. ► Finally, ensure that the distance (a) between the underside of the guide bar and the chain is within 0.04 in. (1 mm) and 0.08 in. (2 mm). 0000097422_001 0000097423_001 10 Assembling the Chain Saw NOTICE ■ Always release tension on the chain after fin‐ ishing work. The chain contracts as it cools down. If it is not slackened, it can damage the drive shaft and bearings. Properly re-tension the chain before using the saw again. 10.3.2 Tensioning the Chain (Quick Chain Adjuster) WARNING ■ To reduce the risk of severe personal injury from chain derailment, check chain tension frequently, 5.6. At operating temperatures, the chain stretches and sags. New chain tends to stretch more than used chain. Tension the chain so that the drive links cannot come out of the groove on the underside of the guide bar. To properly tension the chain: ► Shut off the engine, 15.1. 2 a 1 ► Raise the handle of the wingnut (1). ► Turn the wingnut counterclockwise twice or until the chain is loose. ► Disengage the chain brake, 12.2. ► Lift the guide bar tip. ► Turn the adjusting wheel (2) clockwise to tighten the chain. The chain is properly adjusted when the dis‐ tance (a) between the underside of the guide bar and the chain is within 0.04 in. (1 mm) and 0.08 in. (2 mm) and can still be pulled easily along the bar by hand. Always wear gloves when handling the chain. 28 0458-200-8621-A
-
 1
1 -
2
-
3
-
4
-
5
-
6
-
7
-
8
-
9
-
10
-
11
-
12
-
13
-
14
-
15
-
16
-
17
-
18
-
19
-
20
-
21
-
22
-
 23
23 -
 24
24 -
 25
25 -
 26
26 -
 27
27 -
 28
28 -
 29
29 -
 30
30 -
 31
31 -
 32
32 -
 33
33 -
34
-
35
-
36
-
37
-
38
-
39
-
40
-
41
-
42
-
43
-
44
-
45
-
46
-
47
-
48
-
49
-
50
-
51
-
52
-
53
-
54
-
55
-
56
-
57
-
58
-
59
-
60
-
61
-
62
-
63
-
64
-
65
-
66
-
67
-
68
-
69
-
70
-
71
-
72
-
73
-
74
-
75
-
76
-
77
-
78
-
79
-
80
-
81
-
82
-
83
-
84
-
85
-
86
-
87
-
88
-
89
-
90
-
91
-
92
-
93
-
94
-
95
-
96
-
97
-
98
-
99
-
100
-
101
-
102
-
103
-
104
-
105
-
106
-
107
-
108
 |
 |
