Thermador PRD48JDSGU Use and Care Manual
Thermador PRD48JDSGU Manual
 |
View all Thermador PRD48JDSGU manuals
Add to My Manuals
Save this manual to your list of manuals |
Thermador PRD48JDSGU manual content summary:
- Thermador PRD48JDSGU | Use and Care Manual - Page 1
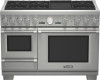
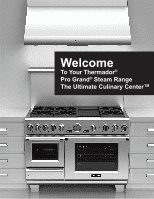
Welcome To Your Thermador® Pro Grand® Steam Range The Ultimate Culinary Center™ - Thermador PRD48JDSGU | Use and Care Manual - Page 2
- Thermador PRD48JDSGU | Use and Care Manual - Page 3
Welcome to Your THERMADOR® Pro Grand® Steam Range, The Ultimate Culinary Center™ . . .1 About This Manual 2 Safety 3 Important Safety Instructions 3 Safety Practices to Avoid Personal Injury 5 Getting Started with Your Range 11 Introduction 13 Model and Parts Identification 13 Before - Thermador PRD48JDSGU | Use and Care Manual - Page 4
- Thermador PRD48JDSGU | Use and Care Manual - Page 5
Welcome To Your Thermador® Pro Grand® Steam Range The Ultimate Culinary Center™ Congratulations on your recent THERMADOR® purchase! Whether you are a dedicated chef or simply a connoisseur of the art of cooking, owning a THERMADOR® kitchen is the ultimate expression of personal style, good taste, - Thermador PRD48JDSGU | Use and Care Manual - Page 6
" section describes how to clean and maintain your appliance. The "Before Calling For Service" section includes troubleshooting tips and your Warranty. Before using your appliance, be sure to read this manual. Pay special attention to the Important Safety Instructions located at the beginning of the - Thermador PRD48JDSGU | Use and Care Manual - Page 7
of gas for which it is certified. All models are certified for use with natural gas. Field conversion of the appliance for use with propane gas supply will require a conversion kit. Make certain your range and gas type are the same. Refer to the product rating label which can be located as indicated - Thermador PRD48JDSGU | Use and Care Manual - Page 8
separately and utilized when there is less than a 12" (305 mm) horizontal clearance. Before using the range, insure that it is equipped with a proper back guard. Refer to the Installation Instructions accompanying this appliance for more information. Electrical Rating: 240/208 volts, 60 Hz., 50 Amp - Thermador PRD48JDSGU | Use and Care Manual - Page 9
appliances, basic safety precautions must be followed, including the following: Read this Use and Care Manual carefully before using your new range, to reduce the risk of fire, electrical shock, or injury to persons. Insure proper installation and servicing. Follow the installation instructions - Thermador PRD48JDSGU | Use and Care Manual - Page 10
• A risk of tip-over may exist if the appliance is not installed in accordance with these instructions. • If the range is pulled away from the wall for cleaning, service, or any other reason, ensure that the Anti-Tip Device is properly reengaged when the range is pushed back against the wall. In the - Thermador PRD48JDSGU | Use and Care Manual - Page 11
they do not extend over adjacent work areas, cooking areas, or the edge of the range's cooktop. Hold the handle of the pan parts to corrode. When using the ovens DO NOT touch the broiler element, the interior surfaces of the ovens or the exterior area immediately surrounding the door. Interior oven - Thermador PRD48JDSGU | Use and Care Manual - Page 12
after self cleaning the oven. 3. Operating the unit according to the instructions in this manual. DO NOT store or use corrosive chemicals, vapors, flammables or nonfood products in or near this appliance. It English 8 is specifically designed for use when heating or cooking food. The use of - Thermador PRD48JDSGU | Use and Care Manual - Page 13
door gasket clean and contact a THERMADOR® Service Technician to replace if necessary. The oven cavity is made of high quality stainless steel. Improper care may result in corrosion of the oven cavity. Follow the care and cleaning instructions provided in this manual. Remove food residue and spills - Thermador PRD48JDSGU | Use and Care Manual - Page 14
English 10 - Thermador PRD48JDSGU | Use and Care Manual - Page 15
Your Range Getting Started with Your Range - Thermador PRD48JDSGU | Use and Care Manual - Page 16
- Thermador PRD48JDSGU | Use and Care Manual - Page 17
THERMADOR PROFESSIONAL® ranges are freestanding units available in a number of configurations. This PRO GRAND® dual-fuel range features a cooktop with six gas STAR® burners and an electric griddle, a professional size, self-cleaning, electric convection oven with broil capability, a steam oven - Thermador PRD48JDSGU | Use and Care Manual - Page 18
Model and Parts Identification 1 5 6 2 8 7 3 1 Large Electric Oven Interior 1. Oven Interior Lights (2) 2. Broil Element 4 3. Oven Temperature Sensor 4. Temperature Probe Outlet 5. Rack Guides 6. THERMADOR® Full Access™ 5 Gliding Oven Rack (3 included, 1 shown) 7. Bake Element (hidden) - Thermador PRD48JDSGU | Use and Care Manual - Page 19
Oven 1 STAR® Burner Caps 6 Burner Grates 3 Control Knobs 9 Coated Aluminum Griddle 1 Leg Cover Assemblies 4 Product Registration Card 1 Handy Hints Guide 1 Flush Island Trim* 1 LP Conversion Kit 1 Installation Instructions 1 Use and Care Manual 1 Sponge 1 *The range is - Thermador PRD48JDSGU | Use and Care Manual - Page 20
rail guides. Push the rack into the oven, lifting the rack stops over the front of the rail guides. Slide oven. 5. THERMADOR® Full Access™ Gliding oven racks are standard on all models. Each gliding oven rack can be pulled out and pushed back into the oven with minimal effort - even while supporting - Thermador PRD48JDSGU | Use and Care Manual - Page 21
created during any high heat cooking whether it is a manufacturing residue burn off or food so it is recommended that birds are removed from the kitchen area. Before using the steam oven for the first time, clean it using the STEAM mode for 20 minutes following the instructions on page 51. English - Thermador PRD48JDSGU | Use and Care Manual - Page 22
English 18 - Thermador PRD48JDSGU | Use and Care Manual - Page 23
Using the Cooktop Using the Cooktop - Thermador PRD48JDSGU | Use and Care Manual - Page 24
- Thermador PRD48JDSGU | Use and Care Manual - Page 25
Base The cooktop features six gas surface STAR® burners; each rated at 18,000 BTU / HR (15,000 BTU / HR using propane). The STAR® burners are mounted on STAR® burner control knob identifies the STAR® burner position on the range cooktop. Left Rear Center Rear Right Rear Griddle The two left and - Thermador PRD48JDSGU | Use and Care Manual - Page 26
/ HR • XLO® is equivalent to 375 BTU / HR ExtraLow® STAR® Burners The controls for the two left and two right STAR® burners, front and rear, have flame settings even lower than the standard SIM settings. Fig. 12 shows that the control knob has an additional range between the SIM and XLO® settings - Thermador PRD48JDSGU | Use and Care Manual - Page 27
the STAR® burner bases for the cooktop to function properly. If the STAR® burner cap is not properly placed, one or more of the following problems may occur. • Burner flames are too high. • Flames shoot out of burners. • Burners do not ignite. • Burner flames light unevenly. • Burner emits gas odor - Thermador PRD48JDSGU | Use and Care Manual - Page 28
sound associated with gas combustion and ignition. This is normal. • On cooktops using propane (LP) gas, a slight "pop" sound may be heard at the STAR® burner ports a STAR® burners can be lit manually. If a STAR® burner fails to ignite, refer to "Before Calling For Service" on page 90. English 24 - Thermador PRD48JDSGU | Use and Care Manual - Page 29
size and material of pan being used; 2) food being cooked propane (LP) gas, installer or agency to ensure proper combustion. 2) Ensure proper ventilation with an open window or use a ventilation fan or hood when cooking with Gas. 3) ALWAYS operate the unit according to the instructions in this manual - Thermador PRD48JDSGU | Use and Care Manual - Page 30
injury, damage to appliance or cookware, please dry. This can damage your pan and the cooking surface. • Professional quality pans with metal handles are recommended because size as the pan base or slightly smaller. Oversize or undersize pans sacrifice cooking performance. A 51/2" (140 mm) base size - Thermador PRD48JDSGU | Use and Care Manual - Page 31
be used on all models. Round bottom woks must be used with a support ring. The porcelain-coated cast iron wok support ring must be Support Ring Standard Size Water Bath Canner 21 - 22 quarts (2.0 - 21 liters), with an 11" - 12" (280 - 305 mm) base and a 9" - 11" (229 - 279 mm) depth. Standard Size - Thermador PRD48JDSGU | Use and Care Manual - Page 32
Surface STAR® Burner Cooking Guide Use the following chart guide. The settings you use will vary not be a change between the two STAR® burner settings. The ExtraLow® setting can be either a cooking or a holding setting. Raise or lower the flame setting gradually. Allow time for the pan and - Thermador PRD48JDSGU | Use and Care Manual - Page 33
STAR® Burners Same as for Standard STAR® Burners Same as for Standard STAR® Burners Same as for Standard STAR® Burners XLO® - to hold To finish cooking XLO® - to simmer slowly XLO® - to hold, cover Same as for Standard STAR® Burners Same as for Standard STAR® Burners Same as for Standard STAR - Thermador PRD48JDSGU | Use and Care Manual - Page 34
sized to fit on top of the surface when the griddle is not being used. The coated-aluminum grill plate accessory is designed to replace the griddle plate. See the instructions the griddle plate installed. NEVER use griddle in a manner that is not prescribed by the Use and Care Manual. Figure 25: - Thermador PRD48JDSGU | Use and Care Manual - Page 35
, the installer is responsible for leveling the product. The griddle plate should be washed with warm soapy water, then rinsed with clear water prior to use.The griddle may be used without any butter, margarine, or oil. However, a very small amount may be used to flavor foods. Griddle Cooking Guide - Thermador PRD48JDSGU | Use and Care Manual - Page 36
on the Griddle 1. Turn the knob to the appropriate cooking temperature to preheat the griddle. 2. Preheat until the griddle light goes off. Add butter, margarine, oil or shortening if desired. Figure 27: Grease Tray Clean - Thermador PRD48JDSGU | Use and Care Manual - Page 37
Using the Convection Oven Convection Oven - Thermador PRD48JDSGU | Use and Care Manual - Page 38
- Thermador PRD48JDSGU | Use and Care Manual - Page 39
timer can be used whether the oven is in operation or not. Note: The steam oven kitchen timer can only be used when the steam oven is off. Cook Timer The Cook Timer is intended to mechanically shut the oven off when the desired cooking time is complete. The Cook Timer function is available for all - Thermador PRD48JDSGU | Use and Care Manual - Page 40
the cooktop are still fully functional during Sabbath Mode. • For double oven models, Sabbath Mode is available for both ovens, but not at the same time. • Sabbath Mode is only available when the range is not already in another active cooking mode or SelfClean. • When the timer reaches "0:00", the - Thermador PRD48JDSGU | Use and Care Manual - Page 41
recipe. • Store the broiler pan(s) outside the oven. An extra pan without food, affects the browning and cooking. • The type of pan used affects the side may affect the baking time. • The 36" and 48" (914 mm and 1219 mm) ovens will hold a full-sized commercial baking sheet (18" x 26") (457 mm x - Thermador PRD48JDSGU | Use and Care Manual - Page 42
+ CANCEL 350 300 400 250 450 200 100 500 BROIL CLEAN electronic control OVEN LIGHT > Kitchen Timer Cook Timer ENTER - + CANCEL PANEL LIGHT Figure 31: 48" Dual Fuel Control Panel To Set the Oven 1. Place oven rack in desired position. 2. Set the Mode Selector Ring (which surrounds the - Thermador PRD48JDSGU | Use and Care Manual - Page 43
170°F (75°C) 170°F (75°C) Figure 32: Roasting Recommendations Convection Cooking with Convection There are many advantages to cooking with convection. In the convection system, a fan in the back of the oven moves heated air evenly around the oven. The moving air provides even heat so foods can be - Thermador PRD48JDSGU | Use and Care Manual - Page 44
cooking. High Altitude Baking When baking at high altitudes, in either Bake or Convection Bake, recipes and baking times vary. For accurate information, write the Extension Service racks can also be used for a large oven meal. - Three-Rack Baking • When several sheets or professional cooking utensils - Thermador PRD48JDSGU | Use and Care Manual - Page 45
- DO NOT use the Warming Mode for cooking food. The warming oven mode is not hot enough to cook foods at safe temperatures 1. When keeping cooked food warm, allow time for the oven to preheat before placing the item in the oven. • Warm mode temperatures range from 140° - 150°F (60 - 65°C) • Food - Thermador PRD48JDSGU | Use and Care Manual - Page 46
addition to providing perfect temperatures for baking and roasting, the oven can be used at low temperatures to keep hot, cooked foods at serving temperature and to warm plates. Hot cooked foods can be kept at serving temperatures. Set the oven to bake and use the temperature suggested on the chart - Thermador PRD48JDSGU | Use and Care Manual - Page 47
(38 mm) thick. • Turn foods over only once, after half the total cooking time. It is not necessary to turn very thin foods (ham slices, fillets of oven at desired rack position as referenced on this page. 6. The door should be closed throughout the broil cycle. • Your THERMADOR PROFESSIONAL® Range - Thermador PRD48JDSGU | Use and Care Manual - Page 48
Broiling and Roasting Guide All meats are placed on the broiler pan included with the range. FOOD ITEM BEEF Ground Beef Patties, 1/2" (12.7 mm) thick T-Bone Steak Flank Steak Rib Roast RACK NUMBER OVEN MODE CONTROL TEMPERATURE SETTING 4 Broil or Broil or Conv Broil Conv Broil 4 Broil or - Thermador PRD48JDSGU | Use and Care Manual - Page 49
Using the Steam Convection Oven ConvectionOven - Thermador PRD48JDSGU | Use and Care Manual - Page 50
- Thermador PRD48JDSGU | Use and Care Manual - Page 51
Extended Cooking Functions Steam Oven Modes Controls and Display Screen The steam oven in your new THERMADOR® range offers steam, convection, and modes that combine steam and convection. Using EasyCook's automatic programming, you can prepare dishes ranging from steamed vegetables to pot roast to - Thermador PRD48JDSGU | Use and Care Manual - Page 52
COOK PROOF STEAM/CONVEC STEAM Function of Each Setting Turns oven ON and OFF Sets automatic programming Operates as a convection oven, with no steam Gently reheats cooked foods Defrosts frozen foods for cooking or protective liners to line any part of the oven, especially the cavity bottom. Using - Thermador PRD48JDSGU | Use and Care Manual - Page 53
Tables and Tips" section, starting on page 60). The following steam oven accessories come with your range: Wire rack (CSRACKH) Use for support during baking. Perforated cooking pan full-size (CS2XLPH) 1-5/8" deep Ideal for steaming fish or large quantities of vegetables, extracting juice from - Thermador PRD48JDSGU | Use and Care Manual - Page 54
any oven mode can be run At this point, steam cooking resumes. The display shows preheating (If needed), after which the Cook Timer resumes counting down. Oven can ensure that the steam oven automatically adjusts to your new location, reset the range to its factory settings and retest water hardness ( - Thermador PRD48JDSGU | Use and Care Manual - Page 55
Many of these features should be adjusted during installation or after a move to a new location. For more information on these initial settings, see "Steam Oven Settings", page 54. Descale and steam clean are part of your routine care of the steam oven. They are described in detail in the "Care - Thermador PRD48JDSGU | Use and Care Manual - Page 56
temperature, which will depend on the mode on the second. If you select the minimum cooking time of "0:00", and keep pressing the "-" button, the display will not roll 5. Once you have set the desired time, press ENTER. The oven will begin preheating. The display will show the "Preheating" phase - Thermador PRD48JDSGU | Use and Care Manual - Page 57
(100°C) Notes on Using the Temperature Control Knob TRUE CONVEC can use the full range of oven temperatures If you rotate the knob below 225°F (105°C), the display will show (or within 95% of it), the oven will go directly to cooking. The "Cook Timer" and the remaining countdown time will be - Thermador PRD48JDSGU | Use and Care Manual - Page 58
is set to OFF. Review the SETTINGS when you begin using the oven. Steam Oven Settings Several oven features can be adjusted by selecting the SETTINGS menu from the initial options on the display screen. Many of these features should be adjusted when the oven is first installed or after a move to - Thermador PRD48JDSGU | Use and Care Manual - Page 59
oven are provided in the "Care and Maintenance" section of this manual starting on page 79. FACTORY RESET: This feature will restore all settings to these default values: Country Code: USA Temperature Units: Fahrenheit Weight Units: Pounds Calibration: On Water Hardness: 3 - Medium Kitchen cooking - Thermador PRD48JDSGU | Use and Care Manual - Page 60
the preset weight range. • Cooking results may vary depending on the amount and quality of the food. • You can change the cooking time during the food groupings level (Vegetables, Rice, etc.), pressing CANCEL will cause the oven to beep. The screen will show that same menu until another button is - Thermador PRD48JDSGU | Use and Care Manual - Page 61
in preheat, heating will resume and the preheating bars will show on the display. If the oven was past preheat, then "Cook Timer" and the countdown time will continue to display. The cook timer will now begin counting down from that automatic time to 0:00 in the same manner as all the other - Thermador PRD48JDSGU | Use and Care Manual - Page 62
Read the instructions before using lbs. (of equal size) (0.5 kg) 0:16:00 3.2 oz. (0.1 kg) 4.4 lbs. (2 kg) 0:13:00 0:16:00 Green asparagus (of equal size) 1.1 lbs. (0.5 0:47:00 Cereals and Grains Weigh out the food to be cooked and add the correct amount of water: Rice1:1.5, Coucous 1:1 Enter - Thermador PRD48JDSGU | Use and Care Manual - Page 63
12 Wire rack + baking pan (level 2) Beef Pot roast 2.2 lbs. (1 kg) 1:40:00 2.2 lbs. (1 kg) 3.3 lbs. 1:40:00 (1.5 kg) 1:52:00 Baking pan (level 2) Sirloin, medium, 2.2 lbs. slow cook (sear (1 kg) before cooking select pieces that are approximately the same size. Whole fresh fish 1.3 lbs. - Thermador PRD48JDSGU | Use and Care Manual - Page 64
use aluminum foil or protective liners to line any part of the appliance, especially the oven bottom. Installing these liners may result in risk of electric shock or fire. Accessories Cooking Times and Quantities When steaming, the cooking times are based on the size of the piece, not on the entire - Thermador PRD48JDSGU | Use and Care Manual - Page 65
the appliance Size Whole at level 2 Oven Mode Steam Steam Steam Steam Steam Steam Temperature 210˚F (100˚C) Cooking Time 30 - 35 min. 210˚F (100˚C) 30 (100˚C) 4 - 6 min. 210˚F (100˚C) 8 - 10 min. 210˚F (100˚C) 7 - 12 min. 210˚F (100˚C) 10 - 15 min. 210˚F (100˚C) 2 - 3 min. 210˚F ( - Thermador PRD48JDSGU | Use and Care Manual - Page 66
Ratio/ Information Medium size Quartered - 1:2 1:2 1:1.5 1:1.5 1:2 1:2 Accessories Perforated (level 3) + baking pan (level 1) Perforated (level 3) + baking pan (level 1) Baking pan (level 2) Cooking pan Cooking pan Cooking pan Cooking pan Cooking pan Cooking pan Oven Mode Steam Steam Steam - Thermador PRD48JDSGU | Use and Care Manual - Page 67
Accessories Oven Mode Chicken pan (level 2) Combination Turkey, whole, unstuffed** 12 - 14 lbs. Wire rack + baking pan (level 180˚C) 320 - 360˚F (160 - 180˚C) 320 - 360˚F (160 - 180˚C) 285 - 320˚F (140 - 160˚C) Cooking Time 15 - 25 min. 20 - 35 min. 60 - 80 min./ 15 - 20 min. 10 - 15 min. - Thermador PRD48JDSGU | Use and Care Manual - Page 68
(1.5 kg) Bone-in with rind 3.5 lbs. (1.5 kg) Accessories Oven Mode Wire rack + baking pan (level 2) Wire rack + baking pan 160 - 180˚C) 175 - 185˚F (80 - 85˚C) 175 - 195˚F (80 - 90˚C) 175 - 195˚F (80 - 90˚C) Cooking Time 50 - 70 min. 20 - 25 min. 40 - 50 min. 20 min. 75 - 120 min. 40 - 60 min. - Thermador PRD48JDSGU | Use and Care Manual - Page 69
Food Amount/ Weight Accessories Oven Mode Trout, whole per 0.5 lbs. (0.2 kg) Perforated (level 3) + Sear first ** Use baking pan 1 5/8" deep (see Additional Accessories) Temperature 175 - 195˚F (80 - 90˚C) Cooking Time 12 - 15 min. 175 - 195˚F (80 - 90˚C) 10 - 14 min. 210˚F (100˚C) 8 - 10 - Thermador PRD48JDSGU | Use and Care Manual - Page 70
very moist and is tender. Place the baking pan in the combination oven and preheat the oven using Slow Cook mode. Sear the meat well on all sides on the cooktop. Place the meat in the preheated combination oven and continue to slow cook. After it is done, arrange it on preheated plates and add - Thermador PRD48JDSGU | Use and Care Manual - Page 71
Oven Mode Temperature Yogurt Portion-sized and cooking time depend on the quantity and consistency of the dough. Temperature ranges are ˚C) 360 - 375˚F (180 - 175˚C) 300 - 320˚F (150 - 160˚C) Cooking Time 60 - 70 min. 30 - 45 min. 45 - 55 min. 12 - 16 min. 25 - 35 min. 40 - 50 min. 35 - 60 - Thermador PRD48JDSGU | Use and Care Manual - Page 72
Strudel, sweet Accessories Oven Mode Baking pan (200 - 220˚C)/ 300 - 320˚F (150 - 160˚C) 375 - 390˚F (190 - 200˚C) 340 - 360˚F (170 - 180˚C) Cooking Time 40 - 60 min. 30 - 40 min. 15 - 20 min./ 20 - 25 min. 15 - 20 min./ 40 - 60 min. 20 - 30 min. 27 - 35 min. 12 - 17 min. 15 - 20 min. English 68 - Thermador PRD48JDSGU | Use and Care Manual - Page 73
stick a toothpick into the highest part of the cake. The cake is done when baking pan up against the back wall of the oven. Place it on the center of the rack ˚C) 340 - 360˚F (170 - 180˚C) Cooking Time 12 - 18 min. 12 - 15 min. 5 - 10 min. 6 - 8 min. 5 - 10 min. 8 - 12 min. 12 - 15 min. English 69 - Thermador PRD48JDSGU | Use and Care Manual - Page 74
cooking pan. This keeps the food from lying in the defrosted water and keeps the oven clean. Use the Defrost mode. If necessary, while the food is thawing, split it up or take pieces that have already thawed out of the appliance liquid. Food Chicken parts, bone-in Chicken parts, boneless Block- - Thermador PRD48JDSGU | Use and Care Manual - Page 75
cooking pan and place pan at rack level 3. To catch the juice, place the non-perforated cooking instructions on packaging. The specified cooking times apply to dishes placed in a cold oven cooking pan (level 1) Oven 195 - 205˚C) 175 - 210˚F (80 - 100˚C) Cooking Time 25 - 35 min. 18 - 22 min. 25 - - Thermador PRD48JDSGU | Use and Care Manual - Page 76
pan (level 1) Perforated (level 3) + cooking pan (level 1) Perforated (level 3) + cooking pan (level 1) Perforated (level 3) + cooking pan (level 1) Perforated (level 3) + cooking pan (level 1) Perforated (level 3) + cooking pan (level 1) Oven Mode Combination Steam Steam Steam Steam Steam Steam - Thermador PRD48JDSGU | Use and Care Manual - Page 77
Using the Warming Drawer Warming Drawer - Thermador PRD48JDSGU | Use and Care Manual - Page 78
- Thermador PRD48JDSGU | Use and Care Manual - Page 79
foil or protective liners to line any part of the warming drawer, especially the oven bottom. Installation of these liners may result in a pad for the desired temperature setting. 2. Allow the drawer to preheat. 3. Place cooked, hot food in the drawer. It is okay to leave food in the cookware it - Thermador PRD48JDSGU | Use and Care Manual - Page 80
if needed. Turning the Warming Drawer OFF Pushing the "OFF" button will turn off the warming element. The warming drawer will automatically shut off after 12 hours. English 76 - Thermador PRD48JDSGU | Use and Care Manual - Page 81
Care and Maintenance Maintenance - Thermador PRD48JDSGU | Use and Care Manual - Page 82
- Thermador PRD48JDSGU | Use and Care Manual - Page 83
fan or hood. • Keep pet birds out of the kitchen or other rooms where kitchen fumes could reach them. During self-clean, fumes are released that may be harmful to birds. Main Oven The self-cleaning mode of the large convection oven in your new range features pyrolytic self-cleaning. When set to the - Thermador PRD48JDSGU | Use and Care Manual - Page 84
open automatically when the oven is below 500°F ( appliance can be cleaned with hot sudsy water (except the various items specifically identified otherwise). When rinsing is required, rinse thoroughly. 5. ALWAYS wipe dry immediately to avoid water marks. CAUTION: Avoid cleaning any part of the range - Thermador PRD48JDSGU | Use and Care Manual - Page 85
Cleaning Recommendations PART/MATERIAL Brass STAR® Burner Base and Cast Iron Cap SUGGESTED CLEANERS IMPORTANT REMINDERS • Hot sudsy water; rinse and dry thoroughly. • Mild Abrasive Cleansers: Bon-ami®, • - Thermador PRD48JDSGU | Use and Care Manual - Page 86
Soft Scrub®. • NEVER flood a hot griddle with cold water. This can warp or crack the aluminum plate. • DO NOT clean any part of the grill or griddle in a selfcleaning oven. Igniters/Ceramic English 82 • Use a cotton swab dampened with • DO NOT use sharp tools to water, Formula 409® or Fantastik - Thermador PRD48JDSGU | Use and Care Manual - Page 87
PART well, and dry. Avoid using abrasive cleaning agents, steel wool pads, and oven cleaners. • Always wipe or rub in the direction of • None the grain used. Apply with a damp sponge or cloth according to the manufacturer's instructions. Rinse thoroughly and wipe dry with a soft cloth. • None • If - Thermador PRD48JDSGU | Use and Care Manual - Page 88
. See Self-Cleaning Instructions, page 79. Note: Due to the high temperature used for self-cleaning, the oven may develop fine hairlike lines or surface roughness. This is a common condition and does not affect either the cooking or the cleaning performance of the oven. See Steam Oven Cleaning and - Thermador PRD48JDSGU | Use and Care Manual - Page 89
PART/MATERIAL Oven Racks and Rack Guides Nickel Plated Note: The rack guides are removable, for cleaning using this procedure (see removal instructions on page 89). Doors Exterior, Frame, Handle, Heat Deflector Stainless Steel Interior Porcelain Enamel Seal Door Gasket CLEANING PRODUCTS/DIRECTIONS - Thermador PRD48JDSGU | Use and Care Manual - Page 90
the glass cover. Replacing the Light Bulb in the Steam Oven Heat-resistant 230V / 25 Watt halogen bulbs with seals can be purchased through retail stores or customer service. purchasing through customer service provide the appliance model and serial numbers. 5. Screw the glass cover with seals - Thermador PRD48JDSGU | Use and Care Manual - Page 91
lit manually. It is necessary to light each standard STAR® burner individually. If the range's Range is not properly grounded. • Refer to Installation Instructions. Have a qualified electrician ground the range properly. • Electrical power supply is incorrectly • Refer to Installation Instructions - Thermador PRD48JDSGU | Use and Care Manual - Page 92
oven by carefully following all instructions for wiping out the oven and running rinse cycles. Cleaner residues can bond to the glass in the oven door. They can also adversely affect the flavor of foods cooked in the steam oven out the partly dissolved food residues from the oven and the evaporator - Thermador PRD48JDSGU | Use and Care Manual - Page 93
recommended for this oven (BSH part number 573828; obtain from your retailer or order from http://www.thermador-eshop.com), kitchen sponge or brush to clean the rack rail frames. The rack rail frames can also be washed in the dishwasher. Installing the Rack Rail Frames Hang the back and front parts - Thermador PRD48JDSGU | Use and Care Manual - Page 94
from the data rating plate located in the gap created by the right side of the oven cavity and the range side panel. Keep your invoice for Warranty validation. Model Number Serial Number Date of Purchase Dealer's Name Dealer's Phone Number Service Center's Name Service Center's Phone Number - Thermador PRD48JDSGU | Use and Care Manual - Page 95
improper operation, failure to maintain, improper or negligent installation, tampering, failure to follow operating instructions, mishandling, unauthorized service (including selfperformed "fixing" or exploration of the appliance's internal workings). • Adjustment, alteration or modification of any - Thermador PRD48JDSGU | Use and Care Manual - Page 96
appliance, and acts of God. In no event shall THERMADOR parts; Products on which the serial numbers have been altered, defaced, or removed; service visits to teach you how to use the Product, or visits where there is nothing wrong with the Product; correction of installation problems THIS WARRANTY - Thermador PRD48JDSGU | Use and Care Manual - Page 97
kitchen. We are dedicated to supporting you and your appliance so that you have many years of creative cooking. Please don't hesitate to contact our STAR® Customer Support Department if you have any questions or in the unlikely event that your THERMADOR® appliance needs service. Our service team
-
 1
1 -
 2
2 -
 3
3 -
 4
4 -
 5
5 -
 6
6 -
 7
7 -
8
-
9
-
10
-
11
-
12
-
13
-
14
-
15
-
16
-
17
-
18
-
19
-
20
-
21
-
22
-
23
-
24
-
25
-
26
-
27
-
28
-
29
-
30
-
31
-
32
-
33
-
34
-
35
-
36
-
37
-
38
-
39
-
40
-
41
-
42
-
43
-
44
-
45
-
46
-
47
-
48
-
49
-
50
-
51
-
52
-
53
-
54
-
55
-
56
-
57
-
58
-
59
-
60
-
61
-
62
-
63
-
64
-
65
-
66
-
67
-
68
-
69
-
70
-
71
-
72
-
73
-
74
-
75
-
76
-
77
-
78
-
79
-
80
-
81
-
82
-
83
-
84
-
85
-
86
-
87
-
88
-
89
-
90
-
91
-
92
-
93
-
94
-
95
-
96
-
97
 |
 |

Welcome
To Your Thermador
®
Pro Grand
®
Steam Range
The Ultimate Culinary Center™