Thermador PRD48JDSGU Use and Care Manual - Page 42
Setting Bake & Convection Bake, Roast &, Convection Roast
 |
View all Thermador PRD48JDSGU manuals
Add to My Manuals
Save this manual to your list of manuals |
Page 42 highlights
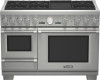
Setting Bake & Convection Bake, Roast & Convection Roast Steam Oven Selector Electric Oven Selector OVEN LIGHT > Kitchen Timer Cook Timer ENTER - + CANCEL 350 300 400 250 450 200 100 500 BROIL CLEAN electronic control OVEN LIGHT > Kitchen Timer Cook Timer ENTER - + CANCEL PANEL LIGHT Figure 31: 48" Dual Fuel Control Panel To Set the Oven 1. Place oven rack in desired position. 2. Set the Mode Selector Ring (which surrounds the Temperature Selector Knob) to Bake or Convection Bake, Roast or Convection Roast. 3. Place food in oven at desired rack position and shut the door. 4. Set the Temperature Selector Knob to desired temperature setting. • If using Convection Bake, set the Temperature Selector Knob 25°F (14°C) below the temperature suggested in the recipe. No variation in temperature setting is necessary if roasting meats or poultry. 5. After the desired mode and temperature have been set, the display will show "Preheating [| ...]" on the first line with the selected cooking mode (for example, "Bake") and the desired temperature ("350°F (180°C)"). • The preheating bars suggest how far away from the set point the oven cavity temperature is. For example, if the set temperature is 400°F (205°C) and the oven has reached a temperature of 375°F (190°C) and the user turns the Temperature Selector Knob back down to 250°F (120°C), the number of preheating bars will decrease because even though the oven is hotter than the desired temperature, the difference between 250°F (120°C) and 400°F (205°C) is greater than the previous differences. So the oven now has to 'preheat' from 375°F (190°C) down to 250°F (120°C), and the number of bars will increase the closer it gets to that temperature as the oven cools down. 6. The temperature indicator will start to move toward the temperature setting. The temperature indicator reflects the temperature setting. • The needle of the temperature indicator will move to the new selected temperature setting if the temperature setting is increased or decreased. The gauge is for reference only. • As the oven cools down, the temperature indicator will reduce, to reflect the cooling oven temperature. Roast Roast has more top heat than traditional Bake. This additional top heat is for conventional open roasting when drippings are desired or for covered-dish roasting. Roast Mode Tips • Roast mode is excellent for less tender meats or poultry when meat is braised and a covered dish is used. • Use a high-sided roasting pan or cover dish with a lid or foil to roast meats and vegetables. • Add liquids, such as water, juice, wine, bouillon, or stock for flavor and moisture. • Roasting bags are suitable to use in this mode. • When roasting whole chickens or turkey, tuck wings behind back and loosely tie legs with kitchen string. English 38
-
 1
1 -
2
-
3
-
4
-
5
-
6
-
7
-
8
-
9
-
10
-
11
-
12
-
13
-
14
-
15
-
16
-
17
-
18
-
19
-
20
-
21
-
22
-
23
-
24
-
25
-
26
-
27
-
28
-
29
-
30
-
31
-
32
-
33
-
34
-
35
-
36
-
 37
37 -
 38
38 -
 39
39 -
 40
40 -
 41
41 -
 42
42 -
 43
43 -
 44
44 -
 45
45 -
 46
46 -
 47
47 -
48
-
49
-
50
-
51
-
52
-
53
-
54
-
55
-
56
-
57
-
58
-
59
-
60
-
61
-
62
-
63
-
64
-
65
-
66
-
67
-
68
-
69
-
70
-
71
-
72
-
73
-
74
-
75
-
76
-
77
-
78
-
79
-
80
-
81
-
82
-
83
-
84
-
85
-
86
-
87
-
88
-
89
-
90
-
91
-
92
-
93
-
94
-
95
-
96
-
97
 |
 |
