Thermador PRD48JDSGU Use and Care Manual - Page 56
Operating Your Steam Oven
 |
View all Thermador PRD48JDSGU manuals
Add to My Manuals
Save this manual to your list of manuals |
Page 56 highlights
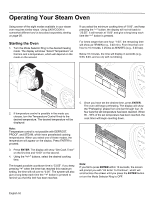
Operating Your Steam Oven Using seven of the eight modes available in your steam oven requires similar steps. Using EASYCOOK is somewhat different and is described separately starting on page 56. Starting the Oven 1. Turn the Mode Selector Ring to the desired heating mode. The display will show "Select Temperature" on first line and a temperature, which will depend on the mode on the second. If you select the minimum cooking time of "0:00", and keep pressing the "-" button, the display will not roll back to "23:55". It will remain at "0:00" and give a long beep each time the "-" button is pressed. For times longer than one hour "1:00", the remaining time will show as HR/MIN (e.g., 2:40 min). From less than one hour to 10 minutes, it shows as MIN/SEC (e.g., 5:40 sec). Below 10 minutes, the time will display in seconds (e.g., 9:53, 8:45, and so on) with no blinking. HI OFF OFF OVEN LIGHT E>NTKCS3Ee5ioRl0toe°ckchtTe-inameTriempeerrature + CANCEL 300 250 350 400 200 450 100 500 electronic control CLEBARNOIL 2. If temperature control is possible in the mode you choose, turn the Temperature Control Knob to the desired temperature. The desired temperature will be displayed. Note: Temperature control is not possible with DEFROST, PROOF, and STEAM, which have preselected cooking temperatures. When you select one of these modes, the temperature will appear on the display. Press ENTER to proceed. 3. Press ENTER. The display will show "Set Cook Timer" on the first line and "0:00" on the second. 4. Using the "+/-" buttons, select the desired cooking time. The longest possible countdown time is "23:55". If you keep pressing "+" when the timer has reached this maximum setting, the time will roll over to "0:00". The system will also give a long beep each time the "+" button is pressed to remind you that this limit has been reached. E>NTKCS9Eioe:Rto5ck3hCeTo-niomkTeirTmiemrer 30 250 200 + CANCEL 100 5. Once you have set the desired time, press ENTER. The oven will begin preheating. The display will show the "Preheating" phase from one bar through four. At four bars the set temperature has been reached. When 90 - 95% of the set temperature has been reached, the cook timer will begin counting down. E>NT2KCPE0iorR:toe0ckh0heeTanitmiTenirgm|e| |r 30 250 - 200 + CANCEL 100 Note: If you fail to press ENTER within 10 seconds, the screen will prompt you with "Hit Enter To Continue", which will scroll across the screen until you press the ENTER button or turn the Mode Selector Ring to OFF. English 52
-
 1
1 -
2
-
3
-
4
-
5
-
6
-
7
-
8
-
9
-
10
-
11
-
12
-
13
-
14
-
15
-
16
-
17
-
18
-
19
-
20
-
21
-
22
-
23
-
24
-
25
-
26
-
27
-
28
-
29
-
30
-
31
-
32
-
33
-
34
-
35
-
36
-
37
-
38
-
39
-
40
-
41
-
42
-
43
-
44
-
45
-
46
-
47
-
48
-
49
-
50
-
 51
51 -
 52
52 -
 53
53 -
 54
54 -
 55
55 -
 56
56 -
 57
57 -
 58
58 -
 59
59 -
 60
60 -
 61
61 -
62
-
63
-
64
-
65
-
66
-
67
-
68
-
69
-
70
-
71
-
72
-
73
-
74
-
75
-
76
-
77
-
78
-
79
-
80
-
81
-
82
-
83
-
84
-
85
-
86
-
87
-
88
-
89
-
90
-
91
-
92
-
93
-
94
-
95
-
96
-
97
 |
 |
