Thermador PRD48JDSGU Use and Care Manual - Page 19
Before You Begin - lp conversion
 |
View all Thermador PRD48JDSGU manuals
Add to My Manuals
Save this manual to your list of manuals |
Page 19 highlights
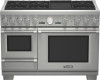
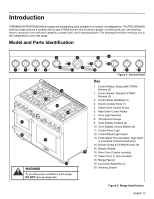
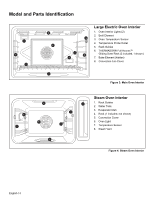
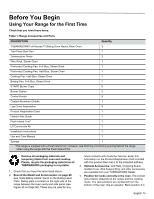
Before You Begin Using Your Range for the First Time Check that you have these items: Table 1: Range Accessories and Parts DESCRIPTION Quantity THERMADOR® Full Access™ Gliding Oven Racks, Main Oven 3 Two-Piece Broil Pan 1 Temperature Probe 2 Wire Rack, Steam Oven 1 Perforated Cooking Pan, Full-Size, Steam Oven 1 Perforated Cooking Pan, Half-Size, Steam Oven 1 Cooking Pan, Half-Size, Steam Oven 1 Baking Pan, Full-Size, Steam Oven 1 STAR® Burner Caps 6 Burner Grates 3 Control Knobs 9 Coated Aluminum Griddle 1 Leg Cover Assemblies 4 Product Registration Card 1 Handy Hints Guide 1 Flush Island Trim* 1 LP Conversion Kit 1 Installation Instructions 1 Use and Care Manual 1 Sponge 1 *The range is supplied with a Flush Island trim; however, see Warning concerning spacing behind the range when using the range with the Flush Island Trim. Remove all packaging materials and temporary labels from oven and cooktop. Please, recycle the packaging material as all THERMADOR® packaging is recyclable. 1. Check that you have the items listed above. 2. Record the Model and Serial number on page 90. See "Data Rating Labels" found on the Rating Label Plate. Rating plate is located on the right side of the range between the oven cavity and side panel (see Figure 33 on Page 90). These may be used for any future contacts with Customer Service. Enter this information on the Product Registration Card included with this product then mail it to the indicated address. 3. Optional Accessories: Grill Plate, Chopping Board, Griddle Cover, Wok Support Ring, and other accessories are available from your THERMADOR® Dealer. 4. Position the racks correctly in the oven. The correct rack position depends on the recipe and the cooking mode. The rack positions are numbered from the bottom of the oven, like an elevator. Rack position 3 is English 15
-
 1
1 -
2
-
3
-
4
-
5
-
6
-
7
-
8
-
9
-
10
-
11
-
12
-
13
-
 14
14 -
 15
15 -
 16
16 -
 17
17 -
 18
18 -
 19
19 -
 20
20 -
 21
21 -
 22
22 -
 23
23 -
 24
24 -
25
-
26
-
27
-
28
-
29
-
30
-
31
-
32
-
33
-
34
-
35
-
36
-
37
-
38
-
39
-
40
-
41
-
42
-
43
-
44
-
45
-
46
-
47
-
48
-
49
-
50
-
51
-
52
-
53
-
54
-
55
-
56
-
57
-
58
-
59
-
60
-
61
-
62
-
63
-
64
-
65
-
66
-
67
-
68
-
69
-
70
-
71
-
72
-
73
-
74
-
75
-
76
-
77
-
78
-
79
-
80
-
81
-
82
-
83
-
84
-
85
-
86
-
87
-
88
-
89
-
90
-
91
-
92
-
93
-
94
-
95
-
96
-
97
 |
 |
