Toshiba Satellite A100-S2311TD User Manual - Page 130
Memory expansion, Removing a SD/MS/MS Pro/MMC/xD card
 |
View all Toshiba Satellite A100-S2311TD manuals
Add to My Manuals
Save this manual to your list of manuals |
Page 130 highlights
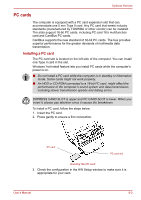
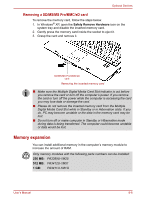
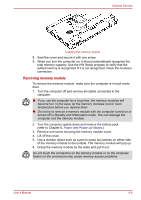
Optional Devices Removing a SD/MS/MS Pro/MMC/xD card To remove the memory card, follow the steps below. 1. In Windows® XP, open the Safely Remove Hardware icon on the system tray and disable the inserted memory card. 2. Gently press the memory card inside the socket to eject it. 3. Grasp the card and remove it. SD/MS/MS Pro/MMC/xD card Removing the inserted memory card ■ Make sure the Multiple Digital Media Card Slot indicator is out before you remove the card or turn off the computer's power. If you remove the card or turn off the power while the computer is accessing the card you may lose data or damage the card. ■ Please do not remove the inserted memory card from the Multiple Digital Media Card Slot while in Standby or in Hibernation state. If you do, PC may become unstable or the data in the memory card may be lost. ■ Do not turn off or make computer in Standby or Hibernation mode during data is being transferred. The computer could become unstable or data would be lost. Memory expansion You can install additional memory in the computer's memory module to increase the amount of RAM. Only memory modules with the following parts numbers can be installed: 256 MB: PA3389U-1M25 512 MB: PA3412U-1M51 1 GB: PA3411U-1M1G User's Manual 8-6
-
 1
1 -
2
-
3
-
4
-
5
-
6
-
7
-
8
-
9
-
10
-
11
-
12
-
13
-
14
-
15
-
16
-
17
-
18
-
19
-
20
-
21
-
22
-
23
-
24
-
25
-
26
-
27
-
28
-
29
-
30
-
31
-
32
-
33
-
34
-
35
-
36
-
37
-
38
-
39
-
40
-
41
-
42
-
43
-
44
-
45
-
46
-
47
-
48
-
49
-
50
-
51
-
52
-
53
-
54
-
55
-
56
-
57
-
58
-
59
-
60
-
61
-
62
-
63
-
64
-
65
-
66
-
67
-
68
-
69
-
70
-
71
-
72
-
73
-
74
-
75
-
76
-
77
-
78
-
79
-
80
-
81
-
82
-
83
-
84
-
85
-
86
-
87
-
88
-
89
-
90
-
91
-
92
-
93
-
94
-
95
-
96
-
97
-
98
-
99
-
100
-
101
-
102
-
103
-
104
-
105
-
106
-
107
-
108
-
109
-
110
-
111
-
112
-
113
-
114
-
115
-
116
-
117
-
118
-
119
-
120
-
121
-
122
-
123
-
124
-
 125
125 -
 126
126 -
 127
127 -
 128
128 -
 129
129 -
 130
130 -
 131
131 -
 132
132 -
 133
133 -
 134
134 -
 135
135 -
136
-
137
-
138
-
139
-
140
-
141
-
142
-
143
-
144
-
145
-
146
-
147
-
148
-
149
-
150
-
151
-
152
-
153
-
154
-
155
-
156
-
157
-
158
-
159
-
160
-
161
-
162
-
163
-
164
-
165
-
166
-
167
-
168
-
169
-
170
-
171
-
172
-
173
-
174
-
175
-
176
-
177
-
178
-
179
-
180
-
181
-
182
-
183
-
184
-
185
-
186
-
187
 |
 |
