Yamaha CLP-470 Owner's Manual - Page 35
With MIDI Recording
 |
View all Yamaha CLP-470 manuals
Add to My Manuals
Save this manual to your list of manuals |
Page 35 highlights
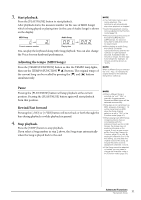
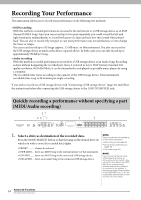
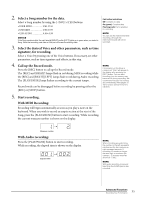
2. Select a Song number for the data. Select a Song number by using the [-/NO] [+/YES] buttons. • USER MIDI U.01-U.10 • USB MIDI U.00-U.99 • USB AUDIO A.00-A.99 NOTICE If the Song contains data, the part lamp(s) [RIGHT] and/or [LEFT] lights up in green when you select a Song. Note that recording new data on this part will erase the existing data. 3. Select the desired Voice and other parameters, such as time signature, for recording. Select a Voice by pressing one of the Voice buttons. If necessary, set other parameters, such as time signature and effects, in this step. 4. Call up the Record mode. Press the [REC] button to call up the Record mode. The [REC] and [RIGHT] lamps flash in red during MIDI recording while the [REC] and [RIGHT][LEFT] lamps flash in red during Audio recording. The [PLAY/PAUSE] lamp flashes according to the current tempo. Record mode can be disengaged before recording by pressing either the [REC] or [STOP] button. 5. Start recording. Part button indications Off: Contains no data On (green): Contains data Flashing (red): Part is enabled for recording NOTE You can use the metronome while recording, although the metronome sound will not be recorded. NOTE If the memory of the drive is running out, "Enp" will appear in the display after pressing the [REC] button. You can start recording, but the memory may become full during recording. We recommend that you first remove any unnecessary files (pages 37, 43) to ensure sufficient memory capacity. With MIDI Recording: Recording will begin automatically as soon as you play a note on the keyboard. When you wish to record an empty section at the start of the Song, press the [PLAY/PAUSE] button to start recording. While recording, the current measure number is shown on the display. Measure number With Audio recording: Press the [PLAY/PAUSE] button to start recording. While recording, the elapsed time is shown on the display. Elapsed time NOTE When recording an audio Song, the number on the left represents minutes and the two numbers on right represent seconds. If recording 10 minutes or longer, the tens digit is not shown (for example, 12 minutes would be shown as "2.00"). NOTE With audio recording, the sound input from the AUXIN jack is also recorded. Advanced Functions 35 Recording Your Performance
-
 1
1 -
2
-
3
-
4
-
5
-
6
-
7
-
8
-
9
-
10
-
11
-
12
-
13
-
14
-
15
-
16
-
17
-
18
-
19
-
20
-
21
-
22
-
23
-
24
-
25
-
26
-
27
-
28
-
29
-
 30
30 -
 31
31 -
 32
32 -
 33
33 -
 34
34 -
 35
35 -
 36
36 -
 37
37 -
 38
38 -
 39
39 -
 40
40 -
41
-
42
-
43
-
44
-
45
-
46
-
47
-
48
-
49
-
50
-
51
-
52
-
53
-
54
-
55
-
56
-
57
-
58
-
59
-
60
-
61
-
62
-
63
-
64
-
65
-
66
-
67
-
68
-
69
-
70
-
71
-
72
-
73
-
74
-
75
-
76
-
77
-
78
-
79
-
80
-
81
-
82
-
83
-
84
-
85
-
86
-
87
-
88
-
89
-
90
-
91
-
92
-
93
-
94
-
95
-
96
 |
 |