Yamaha CLP-470 Owner's Manual - Page 36
Recording specific parts of a Performance MIDI recording
 |
View all Yamaha CLP-470 manuals
Add to My Manuals
Save this manual to your list of manuals |
Page 36 highlights
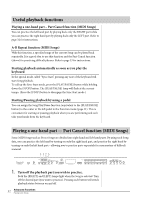
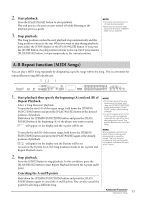
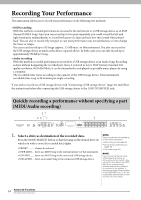
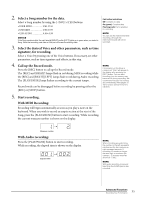
6. Stop recording. Press either the [STOP] or [REC] button to stop recording. When recording is stopped, dashes appear in the display in succession to indicate that the recorded data is being saved. After the data is saved, "End" will appear on the display and the Song number will appear. Finally, the recorded part's lamp will light in green to indicate that the current Song now contains data. (Record mode is disengaged automatically.) NOTICE Do not turn off the power of the instrument or disconnect the USB storage device, when dashes appear in the display in succession. Doing so may delete all Song data in the instrument, including external Songs (page 29). 7. Playing back the recorded performance. Press the [PLAY/PAUSE] button to play back the recorded performance. To stop playback, press the [STOP] button. Recording specific parts of a Performance (MIDI recording) MIDI recording allows you to record the right and left parts separately. 1. Make all the initial settings. Refer to steps 1 to 3 in "Quickly recording a performance without specifying a part" (page 34). If there is a part that has already been recorded, you can record the other part while playing this part. To stop playing of the part which is recorded, press the button for this part to turn off the green lamp. NOTICE If the Song contains data, the part lamp lights up in green when you select a Song. Note that recording new data on this part will erase the existing data. 2. Call up the Record mode. Press the [REC] button to call up the Record mode. 3. Select a recording part. Press the [RIGHT] or [LEFT] button so that the lamp of the recording part flashes in red. Record mode can be disengaged before recording by pressing either the [REC] or [STOP] button. 4. Start recording. Recording will begin automatically as soon as you play a note on the keyboard. When you wish to record an empty section at the start of the Song, press the [PLAY/PAUSE] button to start recording. Part button indications Off: Contains no data On (green): Contains data Flashing (red): Part is enabled for recording NOTE If the memory of the drive is running out, "Enp" will appear in the display after pressing the [REC] button. You can start recording, but the memory may become full during recording. We recommend that you first remove any unnecessary files (pages 37, 43) to ensure sufficient memory capacity. 36 Advanced Functions Recording Your Performance
-
 1
1 -
2
-
3
-
4
-
5
-
6
-
7
-
8
-
9
-
10
-
11
-
12
-
13
-
14
-
15
-
16
-
17
-
18
-
19
-
20
-
21
-
22
-
23
-
24
-
25
-
26
-
27
-
28
-
29
-
30
-
 31
31 -
 32
32 -
 33
33 -
 34
34 -
 35
35 -
 36
36 -
 37
37 -
 38
38 -
 39
39 -
 40
40 -
 41
41 -
42
-
43
-
44
-
45
-
46
-
47
-
48
-
49
-
50
-
51
-
52
-
53
-
54
-
55
-
56
-
57
-
58
-
59
-
60
-
61
-
62
-
63
-
64
-
65
-
66
-
67
-
68
-
69
-
70
-
71
-
72
-
73
-
74
-
75
-
76
-
77
-
78
-
79
-
80
-
81
-
82
-
83
-
84
-
85
-
86
-
87
-
88
-
89
-
90
-
91
-
92
-
93
-
94
-
95
-
96
 |
 |