Yamaha CLP-470 Owner's Manual - Page 41
Convert a MIDI Song to an Audio Song during playback
 |
View all Yamaha CLP-470 manuals
Add to My Manuals
Save this manual to your list of manuals |
Page 41 highlights
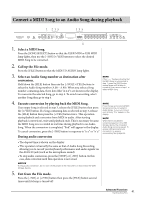
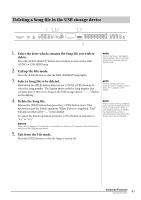
Convert a MIDI Song to an Audio Song during playback 1 235 135 4 1. Select a MIDI Song. Press the [SONG SELECT] button so that the USER MIDI or USB MIDI lamp lights, then use the [-/NO]/[+/YES] buttons to select the desired MIDI Song to be converted. 2. Call up the File mode. Press the [FILE] button so that the MIDI TO AUDIO lamp lights. 3. Select an Audio Song number as destination after conversion. Hold down the [FILE] button then use the [-/NO]/[+/YES] buttons to select the Audio Song number (A.00 - A.99). When you select a Song number containing data, three dots (like "A.x.x") are shown in the display. To overwrite the selected Song, go to step 4. To avoid overwriting, select another Song then go to step 4. 4. Execute conversion by playing back the MIDI Song. If an empty Song is selected in step 3, release the [FILE] button then press the [+/YES] button. If a Song containing data is selected in step 3, release the [FILE] button then press the [+/YES] button twice. This operation starts playback and conversion from MIDI to audio. After starting playback (conversion), wait until playback ends. This is necessary because the MIDI Song is re-recorded in real time during playback to an Audio Song. When the conversion is completed, "End" will appear in the display. To cancel conversion, press the [-/NO] button in response to "n y" or "n¯y." During audio conversion NOTE If the "_ _ _" flashes indicating that the MIDI Song is not selected in step 1, press the [FILE] button several times until its lamp is turned off, then return to step 1 to select a MIDI Song. NOTE Preset Songs and protected MIDI Songs cannot be converted to Audio Songs. If you try to convert such a Song, "Pro" appears in the display. NOTE When there is insufficient remaining capacity in the USB storage device, the converted Audio Song cannot be saved. To ensure sufficient memory for conversion, try erasing unnecessary files (page 43). • The elapsed time is shown on the display. • This operation is basically the same as that of Audio Song Recording, allowing you to record your keyboard performance and audio signals via the AUIX IN jack (such as the microphone sound). • To stop audio conversion, press the [STOP] or [-/NO] button. In this case, data converted until this operation is not saved. NOTICE During audio conversion, do not turn off the power of the instrument or disconnect the USB storage device. 5. Exit from the File mode. Press the [-/NO] or [+/YES] button then press the [FILE] button several times until its lamp is turned off. Advanced Functions 41 Handling Song Files
-
 1
1 -
2
-
3
-
4
-
5
-
6
-
7
-
8
-
9
-
10
-
11
-
12
-
13
-
14
-
15
-
16
-
17
-
18
-
19
-
20
-
21
-
22
-
23
-
24
-
25
-
26
-
27
-
28
-
29
-
30
-
31
-
32
-
33
-
34
-
35
-
 36
36 -
 37
37 -
 38
38 -
 39
39 -
 40
40 -
 41
41 -
 42
42 -
 43
43 -
 44
44 -
 45
45 -
 46
46 -
47
-
48
-
49
-
50
-
51
-
52
-
53
-
54
-
55
-
56
-
57
-
58
-
59
-
60
-
61
-
62
-
63
-
64
-
65
-
66
-
67
-
68
-
69
-
70
-
71
-
72
-
73
-
74
-
75
-
76
-
77
-
78
-
79
-
80
-
81
-
82
-
83
-
84
-
85
-
86
-
87
-
88
-
89
-
90
-
91
-
92
-
93
-
94
-
95
-
96
 |
 |