ZyXEL GS1510-24 User Guide - Page 127
Table 39
 |
View all ZyXEL GS1510-24 manuals
Add to My Manuals
Save this manual to your list of manuals |
Page 127 highlights
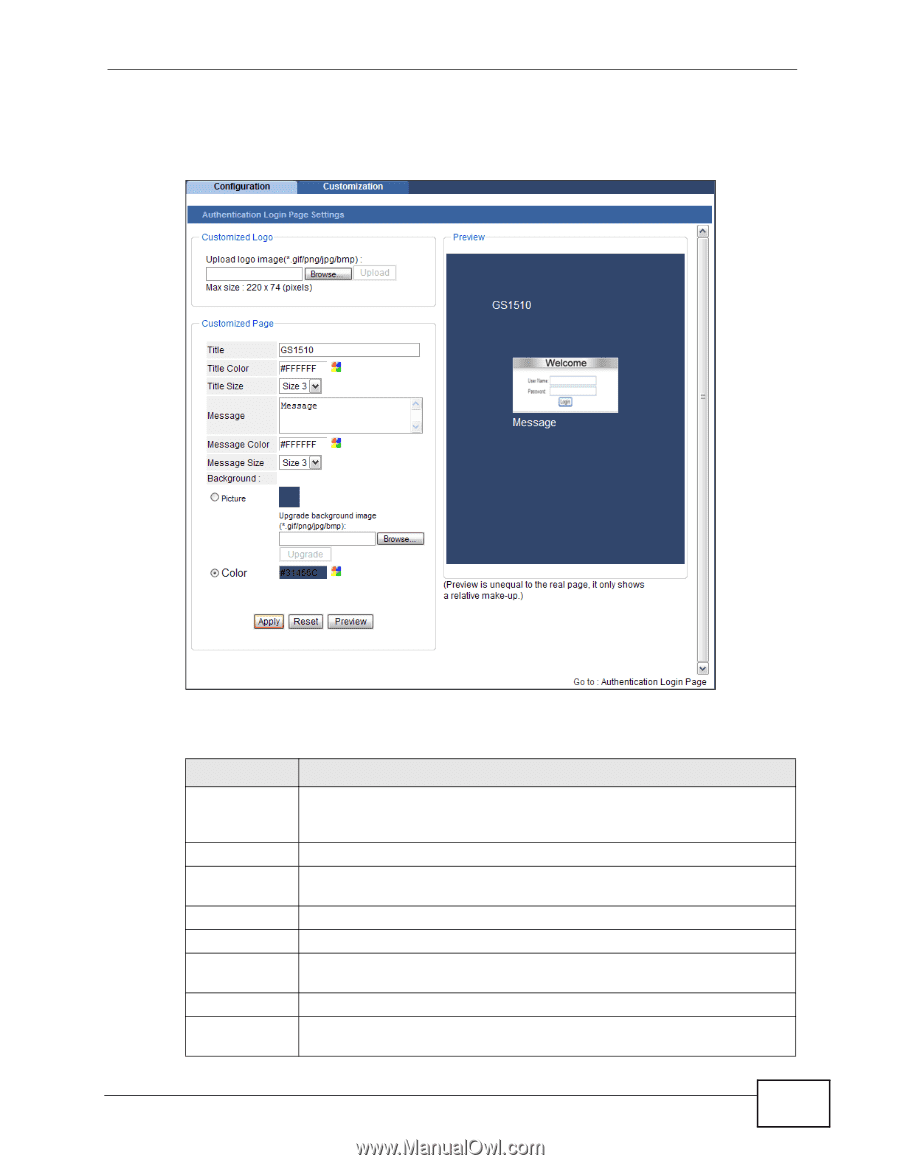
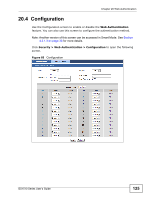
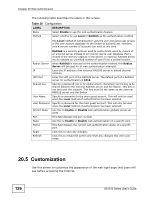
Chapter 20 Web Authentication Click Security > Web Authentication > Customization to open the following screen. Figure 67 Customization The following table describes the labels in this screen. Table 39 Customization LABEL DESCRIPTION Upload Logo File Enter or browse to the location of a suitable image file (GIF/PNG/JPG/ BMP) of no greater size than 220 x 74 pixels and click Upload. This will appear as the logo. Title Enter a text title to display on the login page. Title Color Enter the HTML code for the color of the Title or pick one from the swatch palette icon. Title Size Select the size of the title from the drop-down box. Message Enter a message to display on the login page. Message Color Enter the HTML code for the color of the Message or pick one from the swatch palette icon. Message Size Select the size of the message from the drop-down box. Picture Enter or browse to the location of a suitable image file (GIF/PNG/JPG/ BMP) and click Upload. This will appear as the background. GS1510 Series User's Guide 127
-
 1
1 -
2
-
3
-
4
-
5
-
6
-
7
-
8
-
9
-
10
-
11
-
12
-
13
-
14
-
15
-
16
-
17
-
18
-
19
-
20
-
21
-
22
-
23
-
24
-
25
-
26
-
27
-
28
-
29
-
30
-
31
-
32
-
33
-
34
-
35
-
36
-
37
-
38
-
39
-
40
-
41
-
42
-
43
-
44
-
45
-
46
-
47
-
48
-
49
-
50
-
51
-
52
-
53
-
54
-
55
-
56
-
57
-
58
-
59
-
60
-
61
-
62
-
63
-
64
-
65
-
66
-
67
-
68
-
69
-
70
-
71
-
72
-
73
-
74
-
75
-
76
-
77
-
78
-
79
-
80
-
81
-
82
-
83
-
84
-
85
-
86
-
87
-
88
-
89
-
90
-
91
-
92
-
93
-
94
-
95
-
96
-
97
-
98
-
99
-
100
-
101
-
102
-
103
-
104
-
105
-
106
-
107
-
108
-
109
-
110
-
111
-
112
-
113
-
114
-
115
-
116
-
117
-
118
-
119
-
120
-
121
-
 122
122 -
 123
123 -
 124
124 -
 125
125 -
 126
126 -
 127
127 -
 128
128 -
 129
129 -
 130
130 -
 131
131 -
 132
132 -
133
-
134
-
135
-
136
-
137
-
138
-
139
-
140
-
141
-
142
-
143
-
144
-
145
-
146
-
147
-
148
-
149
-
150
-
151
-
152
-
153
-
154
-
155
-
156
-
157
-
158
-
159
-
160
-
161
-
162
-
163
-
164
-
165
-
166
-
167
-
168
-
169
-
170
-
171
-
172
-
173
-
174
-
175
-
176
-
177
-
178
-
179
-
180
-
181
-
182
-
183
-
184
-
185
-
186
-
187
-
188
-
189
-
190
-
191
-
192
-
193
-
194
-
195
-
196
-
197
-
198
-
199
-
200
-
201
-
202
-
203
-
204
 |
 |