ZyXEL GS1510-24 User Guide - Page 38
Web Authentication, 3.1.4, DHCP Snooping
 |
View all ZyXEL GS1510-24 manuals
Add to My Manuals
Save this manual to your list of manuals |
Page 38 highlights
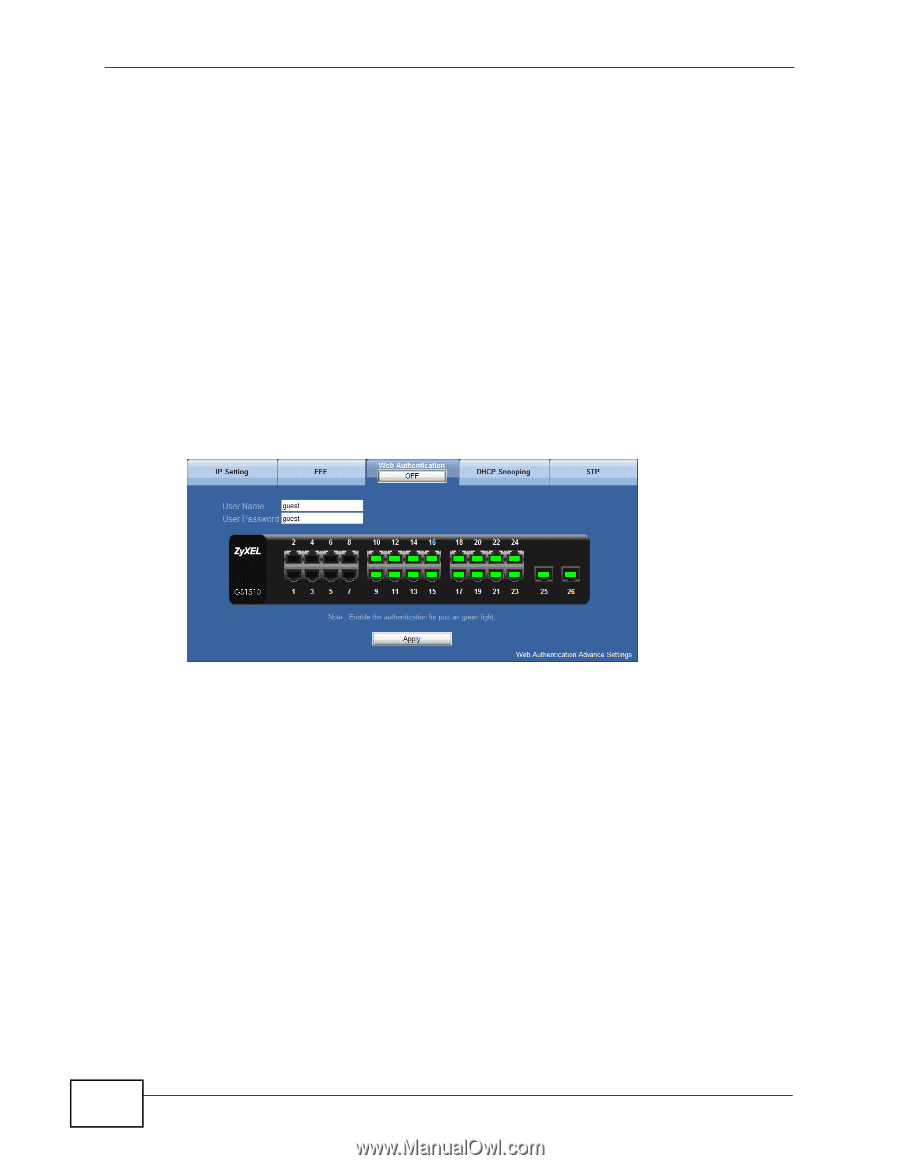
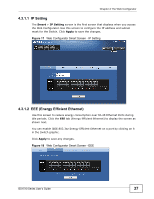
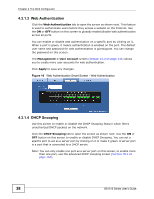
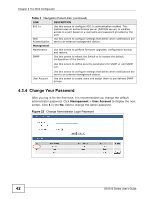
Chapter 4 The Web Configurator 4.3.1.3 Web Authentication Click the Web Authentication tab to open the screen as shown next. This feature is used to authenticate users before they access a website on the Internet. Use the ON or OFF button on this screen to globally enable/disable web authentication across all ports. You can enable or disable web authentication on a specific port by clicking on it. When a port is green, it means authentication is enabled on the port. The default user name and password for web authentication is guest/guest. You can change the password on this screen. The Management > User Account screen (Section 23.2 on page 143) allows you to create more user accounts for web authentication. Click Apply to save any changes. Figure 19 Web Authentication Smart Screen - Web Authentication 4.3.1.4 DHCP Snooping Use this screen to enable or disable the DHCP Snooping feature which filters unauthorized DHCP packets on the network. Click the DHCP Snooping tab to open the screen as shown next. Use the ON or OFF button on this screen to enable or disable DHCP Snooping. You can set a specific port to act as a server port by clicking on it to make it green. A server port is a port that is connected to a DHCP server. Note: You can only enable one port as a server port on this screen, to enable more than one port, use the advanced DHCP snooping screen (Section 18.4 on page 107). 38 GS1510 Series User's Guide
-
 1
1 -
2
-
3
-
4
-
5
-
6
-
7
-
8
-
9
-
10
-
11
-
12
-
13
-
14
-
15
-
16
-
17
-
18
-
19
-
20
-
21
-
22
-
23
-
24
-
25
-
26
-
27
-
28
-
29
-
30
-
31
-
32
-
 33
33 -
 34
34 -
 35
35 -
 36
36 -
 37
37 -
 38
38 -
 39
39 -
 40
40 -
 41
41 -
 42
42 -
 43
43 -
44
-
45
-
46
-
47
-
48
-
49
-
50
-
51
-
52
-
53
-
54
-
55
-
56
-
57
-
58
-
59
-
60
-
61
-
62
-
63
-
64
-
65
-
66
-
67
-
68
-
69
-
70
-
71
-
72
-
73
-
74
-
75
-
76
-
77
-
78
-
79
-
80
-
81
-
82
-
83
-
84
-
85
-
86
-
87
-
88
-
89
-
90
-
91
-
92
-
93
-
94
-
95
-
96
-
97
-
98
-
99
-
100
-
101
-
102
-
103
-
104
-
105
-
106
-
107
-
108
-
109
-
110
-
111
-
112
-
113
-
114
-
115
-
116
-
117
-
118
-
119
-
120
-
121
-
122
-
123
-
124
-
125
-
126
-
127
-
128
-
129
-
130
-
131
-
132
-
133
-
134
-
135
-
136
-
137
-
138
-
139
-
140
-
141
-
142
-
143
-
144
-
145
-
146
-
147
-
148
-
149
-
150
-
151
-
152
-
153
-
154
-
155
-
156
-
157
-
158
-
159
-
160
-
161
-
162
-
163
-
164
-
165
-
166
-
167
-
168
-
169
-
170
-
171
-
172
-
173
-
174
-
175
-
176
-
177
-
178
-
179
-
180
-
181
-
182
-
183
-
184
-
185
-
186
-
187
-
188
-
189
-
190
-
191
-
192
-
193
-
194
-
195
-
196
-
197
-
198
-
199
-
200
-
201
-
202
-
203
-
204
 |
 |