ZyXEL WAP3205 User Guide - Page 111
Reset/Restart Screen - reset to factory defaults
 |
View all ZyXEL WAP3205 manuals
Add to My Manuals
Save this manual to your list of manuals |
Page 111 highlights
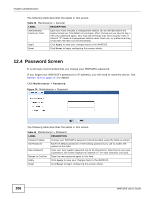
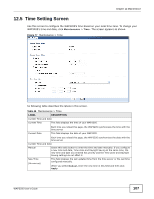
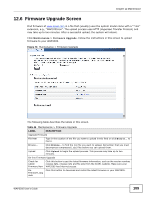
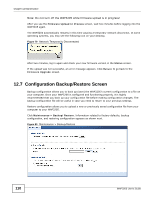
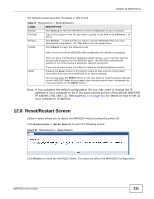
Chapter 12 Maintenance The following table describes the labels in this screen. Table 47 Maintenance > Backup/Restore LABEL DESCRIPTION Backup Click Backup to save the WAP3205's current configuration to your computer. File Path Type in the location of the file you want to upload in this field or click Browse... to find it. Browse... Click Browse... to find the file you want to upload. Remember that you must decompress compressed (.ZIP) files before you can upload them. Upload Click Upload to begin the upload process. Reset Note: Do not turn off the WAP3205 while configuration file upload is in progress. After you see a "configuration upload successful" screen, you must then wait one minute before logging into the WAP3205 again. The WAP3205 automatically restarts in this time causing a temporary network disconnect. If you see an error screen, click Back to return to the Backup/Restore screen. Pressing the Reset button in this section clears all user-entered configuration information and returns the WAP3205 to its factory defaults. You can also press the RESET button on the rear panel to reset the factory defaults of your WAP3205. Refer to the chapter about introducing the Web Configurator for more information on the RESET button. Note: If you uploaded the default configuration file you may need to change the IP address of your computer to be in the same subnet as that of the default WAP3205 IP address (192.168.1.2). See Appendix C on page 141 for details on how to set up your computer's IP address. 12.8 Reset/Restart Screen System restart allows you to reboot the WAP3205 without turning the power off. Click Maintenance > Reset/Restart to open the following screen. Figure 81 Maintenance > Reset/Restart Click Restart to have the WAP3205 reboot. This does not affect the WAP3205's configuration. WAP3205 User's Guide 111
-
 1
1 -
2
-
3
-
4
-
5
-
6
-
7
-
8
-
9
-
10
-
11
-
12
-
13
-
14
-
15
-
16
-
17
-
18
-
19
-
20
-
21
-
22
-
23
-
24
-
25
-
26
-
27
-
28
-
29
-
30
-
31
-
32
-
33
-
34
-
35
-
36
-
37
-
38
-
39
-
40
-
41
-
42
-
43
-
44
-
45
-
46
-
47
-
48
-
49
-
50
-
51
-
52
-
53
-
54
-
55
-
56
-
57
-
58
-
59
-
60
-
61
-
62
-
63
-
64
-
65
-
66
-
67
-
68
-
69
-
70
-
71
-
72
-
73
-
74
-
75
-
76
-
77
-
78
-
79
-
80
-
81
-
82
-
83
-
84
-
85
-
86
-
87
-
88
-
89
-
90
-
91
-
92
-
93
-
94
-
95
-
96
-
97
-
98
-
99
-
100
-
101
-
102
-
103
-
104
-
105
-
 106
106 -
 107
107 -
 108
108 -
 109
109 -
 110
110 -
 111
111 -
 112
112 -
 113
113 -
 114
114 -
 115
115 -
 116
116 -
117
-
118
-
119
-
120
-
121
-
122
-
123
-
124
-
125
-
126
-
127
-
128
-
129
-
130
-
131
-
132
-
133
-
134
-
135
-
136
-
137
-
138
-
139
-
140
-
141
-
142
-
143
-
144
-
145
-
146
-
147
-
148
-
149
-
150
-
151
-
152
-
153
-
154
-
155
-
156
-
157
-
158
-
159
-
160
-
161
-
162
-
163
-
164
-
165
-
166
-
167
-
168
-
169
-
170
-
171
-
172
-
173
-
174
-
175
-
176
-
177
-
178
-
179
-
180
-
181
-
182
-
183
-
184
-
185
-
186
-
187
-
188
-
189
-
190
-
191
-
192
-
193
-
194
-
195
-
196
 |
 |
