Canon MX700 MX700 series Quick Start Guide - Page 119
Output Tray Extension is standing, the Output Tray Extension upright.
 |
UPC - 013803081336
View all Canon MX700 manuals
Add to My Manuals
Save this manual to your list of manuals |
Page 119 highlights
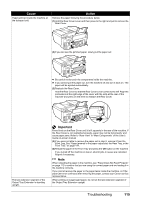
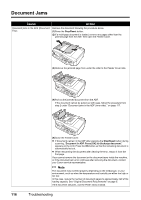
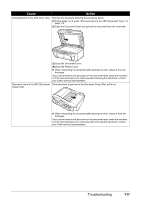
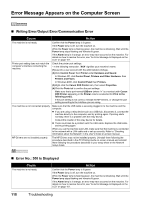
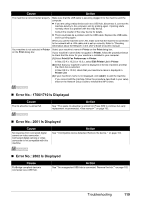
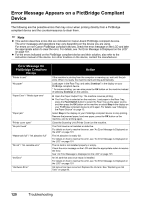
Cause Paper jammed inside the machine at the transport unit. Action Remove the paper following the procedure below. (1)Hold the Rear Cover Lever and then press to the right and pull to remove the Rear Cover. (2)If you can see the jammed paper, slowly pull the paper out. z Be careful not to touch the components inside the machine. z If you cannot pull the paper out, turn the machine off and turn it back on. The paper will be ejected automatically. (3)Reattach the Rear Cover. Hold the Rear Cover so that the Rear Cover Lever comes to the left. Align the protrusions at the right edge of the cover with the slots at the rear of the machine and press on the lever to reattach the Rear Cover. The last extension segment of the Output Tray Extension is standing upright. Important Press firmly on the Rear Cover until it is fit squarely in the rear of the machine. If the Rear Cover is not reattached properly, paper may not be fed properly and cause paper jams. Refer to "Rear View" in "Main Components" of the User's Guide on-screen manual. (4)If you were not able to remove the paper out in step 2, remove it from the Front Tray. See "Paper jammed in the paper output slot, the Rear Tray, or the Front Tray." on page 114. (5)Reload the paper in the Front Tray and press the OK button on the machine. If you turned off the machine in step 2, all print jobs in queue are canceled. Reprint if necessary. Note When reloading the paper in the machine, see "Paper Does Not Feed Properly" on page 112 to confirm that you are using the correct paper and are loading it in the machine correctly. If you cannot remove the paper or the paper tears inside the machine, or if the paper jam error continues after removing the paper, contact your Canon service representative. When printing on Legal-sized paper, do not set the last extension segment of the Output Tray Extension upright. Troubleshooting 115
-
 1
1 -
2
-
3
-
4
-
5
-
6
-
7
-
8
-
9
-
10
-
11
-
12
-
13
-
14
-
15
-
16
-
17
-
18
-
19
-
20
-
21
-
22
-
23
-
24
-
25
-
26
-
27
-
28
-
29
-
30
-
31
-
32
-
33
-
34
-
35
-
36
-
37
-
38
-
39
-
40
-
41
-
42
-
43
-
44
-
45
-
46
-
47
-
48
-
49
-
50
-
51
-
52
-
53
-
54
-
55
-
56
-
57
-
58
-
59
-
60
-
61
-
62
-
63
-
64
-
65
-
66
-
67
-
68
-
69
-
70
-
71
-
72
-
73
-
74
-
75
-
76
-
77
-
78
-
79
-
80
-
81
-
82
-
83
-
84
-
85
-
86
-
87
-
88
-
89
-
90
-
91
-
92
-
93
-
94
-
95
-
96
-
97
-
98
-
99
-
100
-
101
-
102
-
103
-
104
-
105
-
106
-
107
-
108
-
109
-
110
-
111
-
112
-
113
-
 114
114 -
 115
115 -
 116
116 -
 117
117 -
 118
118 -
 119
119 -
 120
120 -
 121
121 -
 122
122 -
 123
123 -
 124
124 -
125
-
126
-
127
-
128
-
129
-
130
-
131
-
132
-
133
-
134
-
135
-
136
-
137
-
138
-
139
-
140
-
141
-
142
-
143
-
144
-
145
-
146
-
147
-
148
-
149
-
150
-
151
-
152
 |
 |
