Canon MX700 MX700 series Quick Start Guide - Page 22
Loading Envelopes - windows 8
 |
UPC - 013803081336
View all Canon MX700 manuals
Add to My Manuals
Save this manual to your list of manuals |
Page 22 highlights
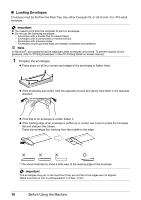
„ Loading Envelopes Envelopes must be fed from the Rear Tray. Use either European DL or US Comm. Env. #10-sized envelope. Important z You need to print from the computer to print on envelopes. z Do not use the following envelopes: - Envelopes with a double flap (or sticker flaps) - Envelopes with an embossed or treated surface - Envelopes with pressure seals - Envelopes whose gummed flaps are already moistened and adhesive Note In Windows®, print guidance will be displayed when envelopes are printed. To prevent display of print guidance, refer to "Printing Envelopes" in the PC Printing Guide on-screen manual. 1 Prepare the envelopes. z Press down on all four corners and edges of the envelopes to flatten them. z If the envelopes are curled, hold the opposite corners and gently twist them in the opposite direction. z If the flap of an envelope is curled, flatten it. z If the leading edge of an envelope is puffed up or curled, use a pen to press the envelope flat and sharpen the crease. Press the envelope flat, working from the middle to the edge. * The above illustrations show a side view of the leading edge of the envelope. Important The envelopes may jam in the machine if they are not flat or the edges are not aligned. Make sure that no curl or puff exceeds 0.1 inches / 3 mm. 18 Before Using the Machine
-
 1
1 -
2
-
3
-
4
-
5
-
6
-
7
-
8
-
9
-
10
-
11
-
12
-
13
-
14
-
15
-
16
-
 17
17 -
 18
18 -
 19
19 -
 20
20 -
 21
21 -
 22
22 -
 23
23 -
 24
24 -
 25
25 -
 26
26 -
 27
27 -
28
-
29
-
30
-
31
-
32
-
33
-
34
-
35
-
36
-
37
-
38
-
39
-
40
-
41
-
42
-
43
-
44
-
45
-
46
-
47
-
48
-
49
-
50
-
51
-
52
-
53
-
54
-
55
-
56
-
57
-
58
-
59
-
60
-
61
-
62
-
63
-
64
-
65
-
66
-
67
-
68
-
69
-
70
-
71
-
72
-
73
-
74
-
75
-
76
-
77
-
78
-
79
-
80
-
81
-
82
-
83
-
84
-
85
-
86
-
87
-
88
-
89
-
90
-
91
-
92
-
93
-
94
-
95
-
96
-
97
-
98
-
99
-
100
-
101
-
102
-
103
-
104
-
105
-
106
-
107
-
108
-
109
-
110
-
111
-
112
-
113
-
114
-
115
-
116
-
117
-
118
-
119
-
120
-
121
-
122
-
123
-
124
-
125
-
126
-
127
-
128
-
129
-
130
-
131
-
132
-
133
-
134
-
135
-
136
-
137
-
138
-
139
-
140
-
141
-
142
-
143
-
144
-
145
-
146
-
147
-
148
-
149
-
150
-
151
-
152
 |
 |
