Canon PIXMA iP4200 iP4200 Quick Start Guide - Page 37
Always load Photo Stickers in the Auto Sheet Feeder.
 |
View all Canon PIXMA iP4200 manuals
Add to My Manuals
Save this manual to your list of manuals |
Page 37 highlights
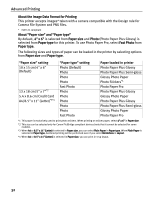
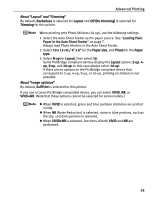
Advanced Printing About "Layout" and "Trimming" By default, Borderless is selected for Layout and Off (No trimming) is selected for Trimming for this printer. When printing onto Photo Stickers (16-up), use the following settings. 1. Select the Auto Sheet Feeder as the paper source. See "Loading Plain Paper in the Auto Sheet Feeder" on page 7. Always load Photo Stickers in the Auto Sheet Feeder. 2. Select 10 x 15 cm / 4" x 6" for the Paper size, and Photo for the Paper type. 3. Select N-up for Layout, then select 16. Some PictBridge compliant devices display the Layout option; 2-up, 4up, 9-up, and 16-up. In this case always select 16-up. If there are no options on the PictBridge compliant device that correspond to 2-up, 4-up, 9-up, or 16-up, printing on stickers is not possible. About "Image optimize" By default, ExifPrint is selected for this printer. If you use a Canon PictBridge-compatible device, you can select VIVID, NR, or VIVID+NR. (Note that these options cannot be selected for some models.) z When VIVID is selected, green and blue portions of photos are printed vividly. z When NR (Noise Reduction) is selected, noise in blue portions, such as the sky, and dark portions is removed. z When VIVID+NR is selected, functions of both VIVID and NR are performed. 33
-
 1
1 -
2
-
3
-
4
-
5
-
6
-
7
-
8
-
9
-
10
-
11
-
12
-
13
-
14
-
15
-
16
-
17
-
18
-
19
-
20
-
21
-
22
-
23
-
24
-
25
-
26
-
27
-
28
-
29
-
30
-
31
-
 32
32 -
 33
33 -
 34
34 -
 35
35 -
 36
36 -
 37
37 -
 38
38 -
 39
39 -
 40
40 -
 41
41 -
 42
42 -
43
-
44
-
45
-
46
-
47
-
48
-
49
-
50
-
51
-
52
-
53
-
54
-
55
-
56
-
57
-
58
-
59
-
60
-
61
-
62
-
63
-
64
-
65
-
66
-
67
-
68
-
69
-
70
-
71
-
72
-
73
-
74
-
75
-
76
-
77
-
78
-
79
-
80
-
81
-
82
-
83
-
84
-
85
-
86
-
87
-
88
-
89
-
90
-
91
-
92
-
93
-
94
-
95
-
96
-
97
-
98
-
99
-
100
-
101
-
102
-
103
-
104
 |
 |