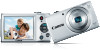
Canon PowerShot A2500 User Guide - Page 12
Turn the camera on., Set the date and time., Set the home time zone., Removing the Battery - memory card
 |
View all Canon PowerShot A2500 manuals
Add to My Manuals
Save this manual to your list of manuals |
Page 12 highlights
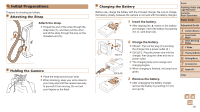
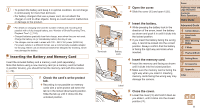
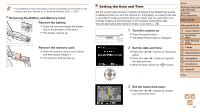
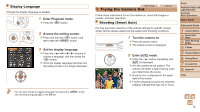
• For guidelines on how many shots or hours of recording can be saved on one memory card, see "Number of 4:3 Shots per Memory Card" (=104). Removing the Battery and Memory Card Remove the battery. zzOpen the cover and press the battery lock in the direction of the arrow. XXThe battery will pop up. Remove the memory card. zzPush the memory card in until it clicks, and then slowly release it. XXThe memory card will pop up. Setting the Date and Time Set the current date and time correctly as follows if the [Date/Time] screen is displayed when you turn the camera on. Information you specify this way is recorded in image properties when you shoot, and it is used when you manage images by shooting date or print images showing the date. You can also add a date stamp to shots, if you wish (=35). 1 Turn the camera on. zzPress the power button. XXThe [Date/Time] screen is displayed. 2 Set the date and time. zzPress the buttons to choose an option. zzPress the buttons to specify the date and time. zzWhen finished, press the button. Cover Preliminary Notes and Legal Information Contents: Basic Operations Basic Guide Advanced Guide 1 Camera Basics 2 Smart Auto Mode 3 Other Shooting Modes 4 P Mode 5 Playback Mode 6 Setting Menu 7 Accessories 8 Appendix Index 3 Set the home time zone. zzPress the buttons to choose your home time zone. 12
-
 1
1 -
2
-
3
-
4
-
5
-
6
-
 7
7 -
 8
8 -
 9
9 -
 10
10 -
 11
11 -
 12
12 -
 13
13 -
 14
14 -
 15
15 -
 16
16 -
 17
17 -
18
-
19
-
20
-
21
-
22
-
23
-
24
-
25
-
26
-
27
-
28
-
29
-
30
-
31
-
32
-
33
-
34
-
35
-
36
-
37
-
38
-
39
-
40
-
41
-
42
-
43
-
44
-
45
-
46
-
47
-
48
-
49
-
50
-
51
-
52
-
53
-
54
-
55
-
56
-
57
-
58
-
59
-
60
-
61
-
62
-
63
-
64
-
65
-
66
-
67
-
68
-
69
-
70
-
71
-
72
-
73
-
74
-
75
-
76
-
77
-
78
-
79
-
80
-
81
-
82
-
83
-
84
-
85
-
86
-
87
-
88
-
89
-
90
-
91
-
92
-
93
-
94
-
95
-
96
-
97
-
98
-
99
-
100
-
101
-
102
-
103
-
104
-
105
-
106
-
107
-
108
-
109
 |
 |
