Canon PowerShot A2500 User Guide - Page 20
Save the images to the, computer. - download cable
 |
View all Canon PowerShot A2500 manuals
Add to My Manuals
Save this manual to your list of manuals |
Page 20 highlights
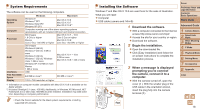
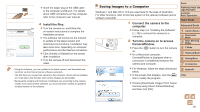
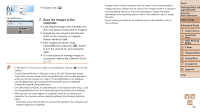
zzDouble click [ ]. CameraWindow 3 Save the images to the computer. zzClick [Import Images from Camera], and then click [Import Untransferred Images]. XXImages are now saved to the Pictures folder on the computer, in separate folders named by date. zzAfter images are saved, close CameraWindow, press the button to turn the camera off, and unplug the cable. zzFor instructions on viewing images on a computer, refer to the Software Guide (= 17). • In Windows 7, if the screen in step 2 is not displayed, click the [ ] icon in the taskbar. • To start CameraWindow in Windows Vista or XP, click [Downloads Images From Canon Camera using Canon CameraWindow] on the screen displayed when you turn the camera on in step 2. If CameraWindow is not displayed, click the [Start] menu and choose [All Programs] ► [Canon Utilities] ► [CameraWindow] ► [CameraWindow]. • On a Macintosh computer, if CameraWindow is not displayed after step 2, click the [CameraWindow] icon in the Dock (the bar at the bottom of the desktop). • Although you can save images to a computer simply by connecting your camera to the computer without using the software, the following limitations apply. - It may take a few minutes after you connect the camera to the computer until camera images are accessible. - Images shot in vertical orientation may be saved in horizontal orientation. - Image protection settings may be cleared from images saved to a computer. - Some problems may occur when saving images or image information, depending on the operating system version, the software in use, or image file sizes. - Some functions provided by the software may not be available, such as movie editing. Cover Preliminary Notes and Legal Information Contents: Basic Operations Basic Guide Advanced Guide 1 Camera Basics 2 Smart Auto Mode 3 Other Shooting Modes 4 P Mode 5 Playback Mode 6 Setting Menu 7 Accessories 8 Appendix Index 20
-
 1
1 -
2
-
3
-
4
-
5
-
6
-
7
-
8
-
9
-
10
-
11
-
12
-
13
-
14
-
 15
15 -
 16
16 -
 17
17 -
 18
18 -
 19
19 -
 20
20 -
 21
21 -
 22
22 -
 23
23 -
 24
24 -
 25
25 -
26
-
27
-
28
-
29
-
30
-
31
-
32
-
33
-
34
-
35
-
36
-
37
-
38
-
39
-
40
-
41
-
42
-
43
-
44
-
45
-
46
-
47
-
48
-
49
-
50
-
51
-
52
-
53
-
54
-
55
-
56
-
57
-
58
-
59
-
60
-
61
-
62
-
63
-
64
-
65
-
66
-
67
-
68
-
69
-
70
-
71
-
72
-
73
-
74
-
75
-
76
-
77
-
78
-
79
-
80
-
81
-
82
-
83
-
84
-
85
-
86
-
87
-
88
-
89
-
90
-
91
-
92
-
93
-
94
-
95
-
96
-
97
-
98
-
99
-
100
-
101
-
102
-
103
-
104
-
105
-
106
-
107
-
108
-
109
 |
 |
