Canon PowerShot A2500 User Guide - Page 32
Common, Convenient Features
 |
View all Canon PowerShot A2500 manuals
Add to My Manuals
Save this manual to your list of manuals |
Page 32 highlights
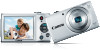
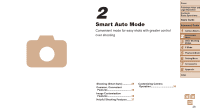
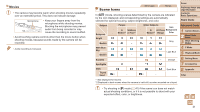
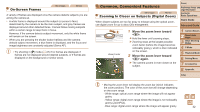
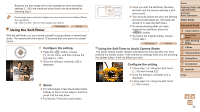
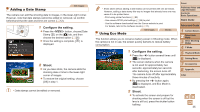
On-Screen Frames Still Images Movies A variety of frames are displayed once the camera detects subjects you are aiming the camera at. • A white frame is displayed around the subject (or person's face) determined by the camera to be the main subject, and gray frames are displayed around other detected faces. Frames follow moving subjects within a certain range to keep them in focus. However, if the camera detects subject movement, only the white frame will remain on the screen. • When you are pressing the shutter button halfway and the camera detects subject movement, a blue frame is displayed, and the focus and image brightness are constantly adjusted (Servo AF). • Try shooting in [G] mode (=47) if no frames are displayed, if frames are not displayed around desired subjects, or if frames are displayed on the background or similar areas. Common, Convenient Features Still Images Movies Zooming In Closer on Subjects (Digital Zoom) When distant subjects are too far away to enlarge using the optical zoom, use digital zoom for up to about 20x enlargement. Cover Preliminary Notes and Legal Information Contents: Basic Operations Basic Guide Advanced Guide Zoom Factor 1 Move the zoom lever toward . zzHold the lever until zooming stops. XXZooming stops at the largest possible zoom factor (before the image becomes noticeably grainy), which is then indicated on the screen. 2 Move the zoom lever toward again. XXThe camera zooms in even closer on the subject. 1 Camera Basics 2 Smart Auto Mode 3 Other Shooting Modes 4 P Mode 5 Playback Mode 6 Setting Menu 7 Accessories 8 Appendix Index • Moving the zoom lever will display the zoom bar (which indicates the zoom position). The color of the zoom bar will change depending on the zoom range. - White range: optical zoom range where the image will not appear grainy. - Yellow range: digital zoom range where the image is not noticeably grainy (ZoomPlus). - Blue range: digital zoom range where the image will appear grainy. 32
-
 1
1 -
2
-
3
-
4
-
5
-
6
-
7
-
8
-
9
-
10
-
11
-
12
-
13
-
14
-
15
-
16
-
17
-
18
-
19
-
20
-
21
-
22
-
23
-
24
-
25
-
26
-
 27
27 -
 28
28 -
 29
29 -
 30
30 -
 31
31 -
 32
32 -
 33
33 -
 34
34 -
 35
35 -
 36
36 -
 37
37 -
38
-
39
-
40
-
41
-
42
-
43
-
44
-
45
-
46
-
47
-
48
-
49
-
50
-
51
-
52
-
53
-
54
-
55
-
56
-
57
-
58
-
59
-
60
-
61
-
62
-
63
-
64
-
65
-
66
-
67
-
68
-
69
-
70
-
71
-
72
-
73
-
74
-
75
-
76
-
77
-
78
-
79
-
80
-
81
-
82
-
83
-
84
-
85
-
86
-
87
-
88
-
89
-
90
-
91
-
92
-
93
-
94
-
95
-
96
-
97
-
98
-
99
-
100
-
101
-
102
-
103
-
104
-
105
-
106
-
107
-
108
-
109
 |
 |