Canon VIXIA HF R32 VIXIA HF R30 / HF R32 / HF R300 Instruction Manual - Page 153
Manual Setup - camcorder review
 |
View all Canon VIXIA HF R32 manuals
Add to My Manuals
Save this manual to your list of manuals |
Page 153 highlights
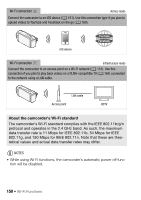
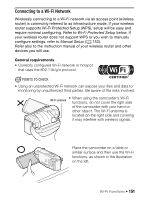
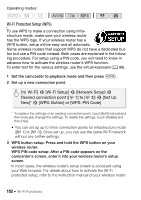
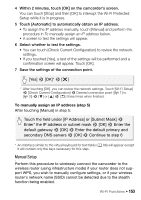
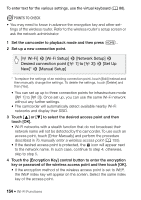
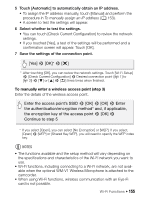
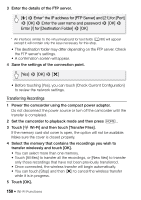
4 Within 2 minutes, touch [OK] on the camcorder's screen. You can touch [Stop] and then [OK] to interrupt the Wi-Fi Protected Setup while it is in progress. 5 Touch [Automatic] to automatically obtain an IP address. • To assign the IP address manually, touch [Manual] and perform the procedure in To manually assign an IP address below. • A screen to test the settings will appear. 6 Select whether to test the settings. • You can touch [Check Current Configuration] to review the network settings. • If you touched [Yes], a test of the settings will be performed and a confirmation screen will appear. Touch [OK]. 7 Save the settings of the connection point. [Yes] > [OK]* > [X] * After touching [OK], you can review the network settings. Touch [Wi-Fi Setup] > [Check Current Configuration] > Desired connection point ([ 1] to [ 3]) > [Î] or [Í] > [K] three times when finished. To manually assign an IP address (step 5) After touching [Manual] in step 5: Touch the field under [IP Address] or [Subnet Mask] > Enter* the IP address or subnet mask > [OK] > Enter the default gateway > [OK] > Enter the default primary and secondary DNS servers > [OK] > Continue to step 6 * An interface similar to the virtual keyboard for text fields (A 88) will appear except it will contain only the keys necessary for this step. Manual Setup Perform this procedure to wirelessly connect the camcorder to the wireless router (using infrastructure mode) if your router does not support WPS, you wish to manually configure settings, or if your wireless router's network name (SSID) cannot be detected due to the stealth function being enabled. Wi-Fi Functions Š 153
-
 1
1 -
2
-
3
-
4
-
5
-
6
-
7
-
8
-
9
-
10
-
11
-
12
-
13
-
14
-
15
-
16
-
17
-
18
-
19
-
20
-
21
-
22
-
23
-
24
-
25
-
26
-
27
-
28
-
29
-
30
-
31
-
32
-
33
-
34
-
35
-
36
-
37
-
38
-
39
-
40
-
41
-
42
-
43
-
44
-
45
-
46
-
47
-
48
-
49
-
50
-
51
-
52
-
53
-
54
-
55
-
56
-
57
-
58
-
59
-
60
-
61
-
62
-
63
-
64
-
65
-
66
-
67
-
68
-
69
-
70
-
71
-
72
-
73
-
74
-
75
-
76
-
77
-
78
-
79
-
80
-
81
-
82
-
83
-
84
-
85
-
86
-
87
-
88
-
89
-
90
-
91
-
92
-
93
-
94
-
95
-
96
-
97
-
98
-
99
-
100
-
101
-
102
-
103
-
104
-
105
-
106
-
107
-
108
-
109
-
110
-
111
-
112
-
113
-
114
-
115
-
116
-
117
-
118
-
119
-
120
-
121
-
122
-
123
-
124
-
125
-
126
-
127
-
128
-
129
-
130
-
131
-
132
-
133
-
134
-
135
-
136
-
137
-
138
-
139
-
140
-
141
-
142
-
143
-
144
-
145
-
146
-
147
-
 148
148 -
 149
149 -
 150
150 -
 151
151 -
 152
152 -
 153
153 -
 154
154 -
 155
155 -
 156
156 -
 157
157 -
 158
158 -
159
-
160
-
161
-
162
-
163
-
164
-
165
-
166
-
167
-
168
-
169
-
170
-
171
-
172
-
173
-
174
-
175
-
176
-
177
-
178
-
179
-
180
-
181
-
182
-
183
-
184
-
185
-
186
-
187
-
188
-
189
-
190
-
191
-
192
-
193
-
194
-
195
-
196
-
197
-
198
-
199
-
200
-
201
-
202
-
203
-
204
-
205
-
206
-
207
-
208
-
209
-
210
-
211
-
212
-
213
-
214
-
215
-
216
-
217
-
218
-
219
-
220
-
221
-
222
-
223
-
224
-
225
-
226
 |
 |