Cisco SPA2102-SF Administration Guide - Page 82
Configuring a Trunk Group, Voice tab > L
 |
View all Cisco SPA2102-SF manuals
Add to My Manuals
Save this manual to your list of manuals |
Page 82 highlights
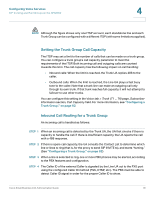
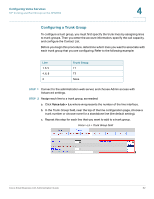
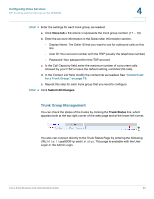
Configuring Voice Services SIP Trunking and Hunt Groups on the SPA8000 4 Configuring a Trunk Group To configure a hunt group, you must first specify the trunk lines by assigning lines to trunk groups. Then you enter the account information, specify the call capacity, and configure the Contact List. Before you begin this procedure, determine which lines you want to associate with each trunk group that you are configuring. Refer to the following example: Line 1, 3, 5 4, 6, 8 2 Trunk Group T1 T2 None STEP 1 Connect to the administration web server, and choose Admin access with Advanced settings. STEP 2 Assign each line to a trunk group, as needed: a. Click Voice tab > Ln, where n represents the number of the line interface. b. In the Trunk Group field, near the top of the line configuration page, choose a trunk number or choose none for a standalone line (the default setting). c. Repeat this step for each line that you want to add to a trunk group. Voice > Ln > Trunk Group field Cisco Small Business ATA Administration Guide 82
-
 1
1 -
2
-
3
-
4
-
5
-
6
-
7
-
8
-
9
-
10
-
11
-
12
-
13
-
14
-
15
-
16
-
17
-
18
-
19
-
20
-
21
-
22
-
23
-
24
-
25
-
26
-
27
-
28
-
29
-
30
-
31
-
32
-
33
-
34
-
35
-
36
-
37
-
38
-
39
-
40
-
41
-
42
-
43
-
44
-
45
-
46
-
47
-
48
-
49
-
50
-
51
-
52
-
53
-
54
-
55
-
56
-
57
-
58
-
59
-
60
-
61
-
62
-
63
-
64
-
65
-
66
-
67
-
68
-
69
-
70
-
71
-
72
-
73
-
74
-
75
-
76
-
 77
77 -
 78
78 -
 79
79 -
 80
80 -
 81
81 -
 82
82 -
 83
83 -
 84
84 -
 85
85 -
 86
86 -
 87
87 -
88
-
89
-
90
-
91
-
92
-
93
-
94
-
95
-
96
-
97
-
98
-
99
-
100
-
101
-
102
-
103
-
104
-
105
-
106
-
107
-
108
-
109
-
110
-
111
-
112
-
113
-
114
-
115
-
116
-
117
-
118
-
119
-
120
-
121
-
122
-
123
-
124
-
125
-
126
-
127
-
128
-
129
-
130
-
131
-
132
-
133
-
134
-
135
-
136
-
137
-
138
-
139
-
140
-
141
-
142
-
143
-
144
-
145
-
146
-
147
-
148
-
149
-
150
-
151
-
152
-
153
-
154
-
155
-
156
-
157
-
158
-
159
-
160
-
161
-
162
-
163
-
164
-
165
-
166
-
167
-
168
-
169
-
170
-
171
-
172
-
173
-
174
-
175
-
176
-
177
-
178
-
179
-
180
-
181
-
182
-
183
-
184
-
185
-
186
-
187
-
188
-
189
-
190
-
191
-
192
-
193
-
194
-
195
-
196
-
197
-
198
-
199
-
200
-
201
-
202
-
203
-
204
-
205
-
206
-
207
-
208
-
209
-
210
-
211
-
212
-
213
-
214
-
215
-
216
-
217
-
218
-
219
-
220
-
221
-
222
-
223
-
224
-
225
-
226
-
227
-
228
-
229
-
230
-
231
-
232
-
233
-
234
-
235
-
236
-
237
-
238
-
239
 |
 |