Cisco SPA2102-SF Administration Guide - Page 83
Trunk Group Management, Configuring Voice Services, Contact List, for a Trunk Group, - default admin password
 |
View all Cisco SPA2102-SF manuals
Add to My Manuals
Save this manual to your list of manuals |
Page 83 highlights
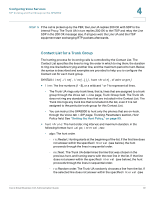
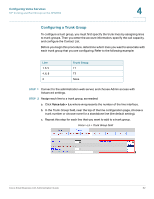
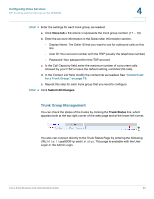
Configuring Voice Services SIP Trunking and Hunt Groups on the SPA8000 4 STEP 3 Enter the settings for each trunk group, as needed: a. Click Voice tab > Tn, where n represents the trunk group number (T1 ... T4). b. Enter the account information in the Subscriber Information section. • Display Name: The Caller ID that you want to use for outbound calls on this line • User ID: Your account number with the ITSP (usually the telephone number) • Password: Your password for this ITSP account c. In the Call Capacity field, enter the maximum number of concurrent calls allowed by your ITSP, or leave the default setting, unlimited (16 calls). d. In the Contact List field, modify the contact list as needed. See "Contact List for a Trunk Group," on page 79. e. Repeat this step for each trunk group that you need to configure. STEP 4 Click Submit All Changes. Trunk Group Management You can check the status of the trunks by clicking the Trunk Status link, which appears both at the top right corner of the web page and at the lower left corner. You also can connect directly to the Trunk Status Page by entering the following URL: http://spa8000-ip-addr/status. This page is available with the User Login or the Admin Login. Cisco Small Business ATA Administration Guide 83
-
 1
1 -
2
-
3
-
4
-
5
-
6
-
7
-
8
-
9
-
10
-
11
-
12
-
13
-
14
-
15
-
16
-
17
-
18
-
19
-
20
-
21
-
22
-
23
-
24
-
25
-
26
-
27
-
28
-
29
-
30
-
31
-
32
-
33
-
34
-
35
-
36
-
37
-
38
-
39
-
40
-
41
-
42
-
43
-
44
-
45
-
46
-
47
-
48
-
49
-
50
-
51
-
52
-
53
-
54
-
55
-
56
-
57
-
58
-
59
-
60
-
61
-
62
-
63
-
64
-
65
-
66
-
67
-
68
-
69
-
70
-
71
-
72
-
73
-
74
-
75
-
76
-
77
-
 78
78 -
 79
79 -
 80
80 -
 81
81 -
 82
82 -
 83
83 -
 84
84 -
 85
85 -
 86
86 -
 87
87 -
 88
88 -
89
-
90
-
91
-
92
-
93
-
94
-
95
-
96
-
97
-
98
-
99
-
100
-
101
-
102
-
103
-
104
-
105
-
106
-
107
-
108
-
109
-
110
-
111
-
112
-
113
-
114
-
115
-
116
-
117
-
118
-
119
-
120
-
121
-
122
-
123
-
124
-
125
-
126
-
127
-
128
-
129
-
130
-
131
-
132
-
133
-
134
-
135
-
136
-
137
-
138
-
139
-
140
-
141
-
142
-
143
-
144
-
145
-
146
-
147
-
148
-
149
-
150
-
151
-
152
-
153
-
154
-
155
-
156
-
157
-
158
-
159
-
160
-
161
-
162
-
163
-
164
-
165
-
166
-
167
-
168
-
169
-
170
-
171
-
172
-
173
-
174
-
175
-
176
-
177
-
178
-
179
-
180
-
181
-
182
-
183
-
184
-
185
-
186
-
187
-
188
-
189
-
190
-
191
-
192
-
193
-
194
-
195
-
196
-
197
-
198
-
199
-
200
-
201
-
202
-
203
-
204
-
205
-
206
-
207
-
208
-
209
-
210
-
211
-
212
-
213
-
214
-
215
-
216
-
217
-
218
-
219
-
220
-
221
-
222
-
223
-
224
-
225
-
226
-
227
-
228
-
229
-
230
-
231
-
232
-
233
-
234
-
235
-
236
-
237
-
238
-
239
 |
 |