Dell OptiPlex Gn Diagnostics and Troubleshooting Guide (.pdf) - Page 78
Go to Checking the Diskette/Tape Drive Sub, CAUTION: See Protecting Against Electro
 |
View all Dell OptiPlex Gn manuals
Add to My Manuals
Save this manual to your list of manuals |
Page 78 highlights
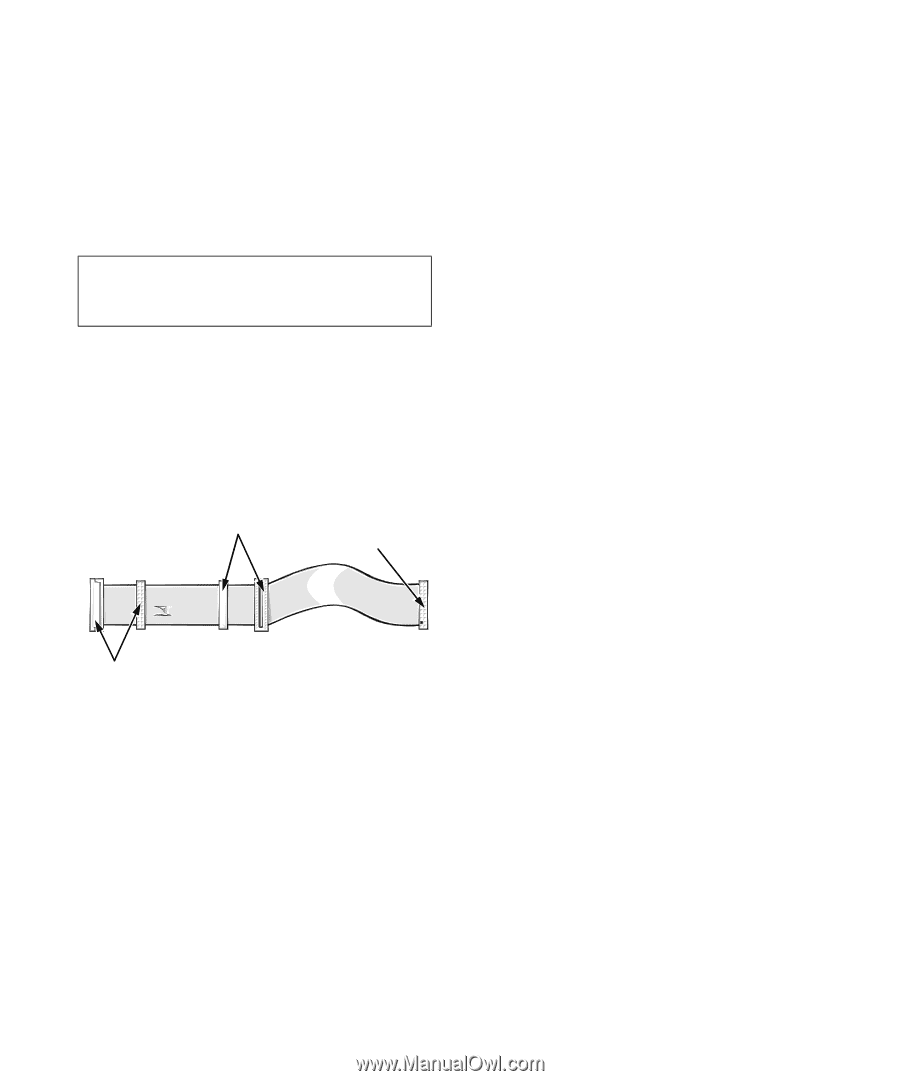
Follow these steps to troubleshoot a diskette-drive subsystem: 1. Turn off the system, including any attached peripherals, and disconnect all the AC power cables from their power sources. Also, disconnect any telephone or telecommunication lines from the computer. 2. Remove the computer cover. CAUTION: See "Protecting Against Electrostatic Discharge" in the safety instructions at the front of this guide. 3. Check the diskette drive cabling. See your system documentation for the location of your diskette drive and cabling. The diskette drive should be connected to the drive A connector on the diskette/tape drive interface cable. connect to tape drive or second diskette drive connect to FLOPPY connector on system board connect to boot diskette drive (drive A) Is the diskette drive securely connected to the proper diskette/tape drive interface cable connector? Is the diskette/tape drive interface cable connector securely connected to the interface connector on the system board? Is the drive's direct current (DC) power cable firmly connected to the drive? Yes. Go to step 5. No. Go to step 4. 4. Reconnect the cable connectors. 5. Replace the computer cover, reconnect the system to AC power, insert the Dell Diagnostics Diskette into drive A, and reboot the system. Does the system boot properly from the Dell Diagnostics Diskette? Yes. Go to "Checking the Diskette/Tape Drive Subsystem" found earlier in this chapter. No. Go to step 6. 6. Repeat steps 1 and 2, and remove all expansion cards. See your system documentation for instructions. 7. Replace the computer cover, reconnect the system to AC power, insert the Dell Diagnostics Diskette into drive A, and reboot the system. Does the system boot properly from the Dell Diagnostics Diskette? Yes. An expansion card may be conflicting with the diskette/tape drive logic, or you may have a faulty expansion card. Go to "Checking the Diskette/Tape Drive Subsystem" found earlier in this chapter. No. Go to step 8. 8. Repeat steps 1 and 2, and reinstall one of the expansion cards you removed in step 6. 9. Replace the computer cover, reconnect the system to AC power, insert the Dell Diagnostics Diskette into drive A, and reboot the system. Does the system boot properly from the Dell Diagnostics Diskette? Yes. Go to step 10. No. Go to step 11. 10. Repeat steps 8 and 9 until all expansion cards have been reinstalled or until one of the expansion cards prevents the system from booting from the Dell Diagnostics Diskette. 11. Repeat steps 1 and 2. Verify that the drive's termination is enabled and that the drive-select jumper is set to the DS1 position. NOTE: Some diskette drives may require you to remove the drive from the computer to access the termination and drive-select jumper. 6-10 Diagnostics and Troubleshooting Guide
-
 1
1 -
2
-
3
-
4
-
5
-
6
-
7
-
8
-
9
-
10
-
11
-
12
-
13
-
14
-
15
-
16
-
17
-
18
-
19
-
20
-
21
-
22
-
23
-
24
-
25
-
26
-
27
-
28
-
29
-
30
-
31
-
32
-
33
-
34
-
35
-
36
-
37
-
38
-
39
-
40
-
41
-
42
-
43
-
44
-
45
-
46
-
47
-
48
-
49
-
50
-
51
-
52
-
53
-
54
-
55
-
56
-
57
-
58
-
59
-
60
-
61
-
62
-
63
-
64
-
65
-
66
-
67
-
68
-
69
-
70
-
71
-
72
-
 73
73 -
 74
74 -
 75
75 -
 76
76 -
 77
77 -
 78
78 -
 79
79 -
 80
80 -
 81
81 -
 82
82 -
 83
83 -
84
-
85
-
86
-
87
-
88
-
89
-
90
-
91
-
92
-
93
-
94
-
95
-
96
-
97
-
98
-
99
-
100
-
101
-
102
-
103
-
104
-
105
-
106
-
107
-
108
-
109
-
110
-
111
-
112
-
113
-
114
-
115
-
116
-
117
-
118
-
119
-
120
-
121
-
122
-
123
-
124
-
125
-
126
-
127
-
128
-
129
-
130
-
131
 |
 |