Fluke 125 Fluke 125 Users Manual - Page 62
Setting the Test Limits, SETUP LIMITS menu. You will
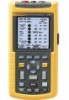 |
View all Fluke 125 manuals
Add to My Manuals
Save this manual to your list of manuals |
Page 62 highlights
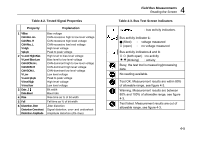
Fluke 125 Users Manual Setting the Test Limits You can change the test limits used to generate the messages OK , WARNING , and NOT OK . The test limits apply to the selected bus type. To change the test limits for another bus type do steps 1-5 on page 42 first. To change the test limits, do the following: c From the test screen open the SETUP LIMITS menu. You will see a screen like Figure 4-5. The header shows the bus type. d Select the signal property for which you want to set the limit. e Select the level to be adjusted: LOW, HIGH or ! WARNING Press to set all limits to the default setting. f Change the limits. A * in the SETUP LIMITS screen indicates that a signal property has limits that differ from the default setting. Press N/A if a limit should not be involved in the test. g Accept the limits and return to the test screen. In the test screen the text LIMIT will be followed by a * if any of the limits is not the default limit. Note Changed limits will persist until: - you change them again, - you reset the test tool; resetting will restore the default limits. 4-8
-
 1
1 -
2
-
3
-
4
-
5
-
6
-
7
-
8
-
9
-
10
-
11
-
12
-
13
-
14
-
15
-
16
-
17
-
18
-
19
-
20
-
21
-
22
-
23
-
24
-
25
-
26
-
27
-
28
-
29
-
30
-
31
-
32
-
33
-
34
-
35
-
36
-
37
-
38
-
39
-
40
-
41
-
42
-
43
-
44
-
45
-
46
-
47
-
48
-
49
-
50
-
51
-
52
-
53
-
54
-
55
-
56
-
 57
57 -
 58
58 -
 59
59 -
 60
60 -
 61
61 -
 62
62 -
 63
63 -
 64
64 -
 65
65 -
 66
66 -
 67
67 -
68
-
69
-
70
-
71
-
72
-
73
-
74
-
75
-
76
-
77
-
78
-
79
-
80
-
81
-
82
-
83
-
84
-
85
-
86
-
87
-
88
-
89
-
90
-
91
-
92
-
93
-
94
-
95
-
96
-
97
-
98
-
99
-
100
-
101
-
102
-
103
-
104
-
105
-
106
-
107
-
108
-
109
-
110
-
111
-
112
-
113
 |
 |
