Garmin GPS III Plus Owner's Manual
Garmin GPS III Plus - Personal Navigator Manual
 |
UPC - 753759015817
View all Garmin GPS III Plus manuals
Add to My Manuals
Save this manual to your list of manuals |
Garmin GPS III Plus manual content summary:
- Garmin GPS III Plus | Owner's Manual - Page 1
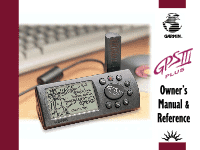
Owner's Manual & Reference - Garmin GPS III Plus | Owner's Manual - Page 2
the content without obligation to notify any person or organization of such changes. Visit the GARMIN web site (www.garmin.com) for current updates and supplemental information concerning the use and operation of this and other GARMIN products. January 2001 Part # 190-00162-00 Rev. B Printed in - Garmin GPS III Plus | Owner's Manual - Page 3
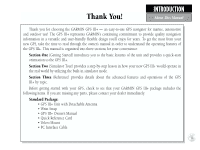
to see that your GARMIN GPS III+ package includes the following items. If you are missing any parts, please contact your dealer immediately. Standard Package: • GPS III+ Unit with Detachable Antenna • Wrist Strap • GPS III+ Owner's Manual • Quick Reference Card • Velcro Mount • PC Interface Cable i - Garmin GPS III Plus | Owner's Manual - Page 4
not cause damage or personal injury in the event of an accident. Do not mount the GPS III+ over airbag panels or in a place where the driver or passengers are likely to have an impact with it in an accident or collision. The mounting hardware provided by GARMIN is not warranted against collision - Garmin GPS III Plus | Owner's Manual - Page 5
this device must accept any interference received, including interference that may cause undesired operation. The GPS III+ does not contain any user-serviceable parts. Repairs should only be made by an authorized GARMIN service center. Unauthorized repairs or modifications could void your warranty - Garmin GPS III Plus | Owner's Manual - Page 6
prepaid and insured to a GARMIN warranty service station. A copy of the original sales receipt is required as the proof of purchase for warranty repairs. GARMIN retains the exclusive right to repair or replace the unit or software or offer a full refund of the purchase price at its sole discretion - Garmin GPS III Plus | Owner's Manual - Page 7
today! Have the serial number of your GPS III+ handy and connect to our web site (www.garmin.com). Look for the Product Registration link on the Home page. You can also find current user's manuals, updated unit operating software, FAQs and more on the Support page. Also, be sure to record your - Garmin GPS III Plus | Owner's Manual - Page 8
16 FCC Compliance iii SIMULATOR TOUR 17 Limited Warranty iv REFERENCE GETTING STARTED Satellite Status Page 25 Unit Features 1 Satellite Status Page Options 29 Keypad Usage / Display 2 Position Page 30 Battery Installation 3 Position Page Options 31 What is GPS 4 Map Page 33 - Garmin GPS III Plus | Owner's Manual - Page 9
Main Menu 69 Setup Menu 74 APPENDIX A: Dashboard Mounting 86 APPENDIX B: Specifications 87 APPENDIX C: Wiring/Interfacing 88 APPENDIX D: Antenna/Remote Mounting . . . . 89 APPENDIX E: Messages 90 APPENDIX F: Map Datums 92 APPENDIX G: Navigation Terms 95 APPENDIX H: Time Offsets 97 APPENDIX - Garmin GPS III Plus | Owner's Manual - Page 10
you will use on your new GPS III+. TO DO THIS: SEE PAGE(S): Turn the unit on or off 5 Initialize the GPS receiver (first time use 5 Adjust 60 Learn about the map page 10,33 Pan using the map arrow 20,34 Zoom in or out on the Map page 10,33 Reconfigure the Map Page display 36 Access - Garmin GPS III Plus | Owner's Manual - Page 11
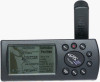
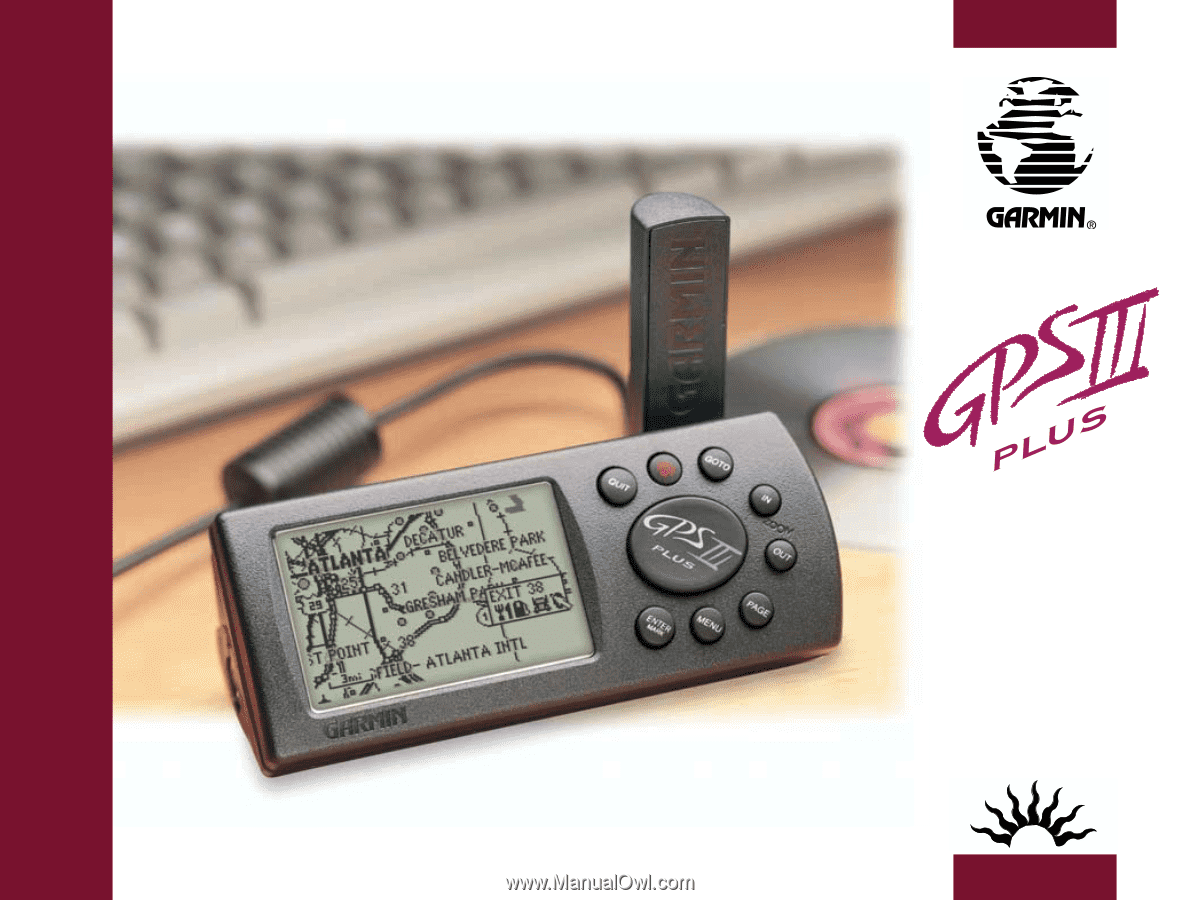
To change the screen orientation, press and hold the PAGE key. GETTING STARTED Unit Features Antenna (detachable) Function Keys Power/Backlight Key (red) Rocker Keypad LCD Display Battery Door 1 - Garmin GPS III Plus | Owner's Manual - Page 12
value. (IN and OUT)- Allows you to zoom in/out through 24 scales on the Map Page. Also adjusts scale on the Highway Page. (ROCKER KEYPAD)- Controls the movement of the format, built into the operating software or the unit's memory, that will be followed unless the user chooses a different setting. - Garmin GPS III Plus | Owner's Manual - Page 13
counterclockwise. 2. Install the batteries and close the battery compartment door. When replacing the GPS III+'s batteries, observe the polarity battery life varies in different conditions and that lithium batteries provide longer life in colder conditions. An internal 10-year lithium battery - Garmin GPS III Plus | Owner's Manual - Page 14
power off) from the last time you used it. • If the receiver's memory has been cleared and all internally stored data has been lost. Because the GPS III+ relies on satellite signals to provide you with navigation guidance, the receiver needs to have an unobstructed, clear view of the sky for best - Garmin GPS III Plus | Owner's Manual - Page 15
a comfortable height with the antenna pointing up (see page 4), or mount the receiver on the dash of a vehicle (Appendix A) or on a bike. (Likewise, when you use your GPS III+ in a vehicle, make sure the antenna is pointing up.) To turn the GPS III+ on, press and hold the red power key. The Welcome - Garmin GPS III Plus | Owner's Manual - Page 16
transitions from the Satellite Page to the Map Page, unless you have manually changed pages (shown left). Your receiver is now ready to use! To turn the unit off: 1. Press and hold the red power key for 1 second. Troubleshooting If you have trouble initializing or getting a position fix, check the - Garmin GPS III Plus | Owner's Manual - Page 17
Map Page GETTING STARTED Main Page Sequence Press the PAGE key to move through each of the main pages in normal fashion. Highway Page Compass Page Press the QUIT key to To turn the GPS III into how they help you navigate. We'll go over all of them in more detail in the reference section. 7 - Garmin GPS III Plus | Owner's Manual - Page 18
taller the bar, the stronger the signal. Receiver Status Signal Strength Bar If satellite reception is lost, or an insufficient number of satellites are available, you will be alerted with a 'Poor Coverage' receiver status and message. 8 Battery Level Indicator Satellite Status Page Sky View - Garmin GPS III Plus | Owner's Manual - Page 19
local time or UTC (Coordinated Universal Time). GETTING STARTED Position Page Position Page showing UTM coordinates for use with USGS topographic maps, etc. Track Compass Trip Odometer Current Position Coordinates Position Page Current Time and Date The trip odometer, trip timer and average - Garmin GPS III Plus | Owner's Manual - Page 20
a larger area. The map can be oriented with the map with any one of over 70 different symbols, with the waypoint name shown directly above the symbol. We'll cover more about the GPS III+'s waypoint features and the Map Page in the reference section of this manual. Present Position Data Fields Map - Garmin GPS III Plus | Owner's Manual - Page 21
The GPS III+ features two different navigation pages: Compass and Highway. The Compass Page is first. This page provides graphic steering guidance to a destination waypoint, with an emphasis on the bearing to - Garmin GPS III Plus | Owner's Manual - Page 22
course, simply move toward the center of the highway. The GPS III+'s Highway Page also provides graphic steering guidance to a destination down the middle of the highway represents your desired course. As you navigate toward a waypoint, the highway will actually move-indicating the direction you - Garmin GPS III Plus | Owner's Manual - Page 23
GPS III+'s Main Menu provides access to additional pages (submenus) that are used to create or edit waypoints, create routes, list nearby waypoints, review setting various alarms, enabling the built-in simulator feature and interface options with other equipment: To change units of measure for - Garmin GPS III Plus | Owner's Manual - Page 24
symbol, making it easy to identify the waypoint on the Map Page. 14 GPS is really about marking and going to places called 'waypoints'. Before we can use the GPS III+ to guide us somewhere, we have to mark a position as a waypoint. Your GPS III+ can hold up to 500 waypoints. To mark your present - Garmin GPS III Plus | Owner's Manual - Page 25
Once you've stored a waypoint in memory, you can use the GPS III+ to guide you to it by using the GOTO feature. exists at the destination location, the GPS III+ will automatically create one, named 'MAP' in the step below.) 2. Press GOTO, and then ENTER to navigate to the selected location. To GOTO - Garmin GPS III Plus | Owner's Manual - Page 26
GETTING STARTED Cancel GOTO/Active Route To cancel the current GOTO destination, select 'Cancel GOTO' from the GOTO Options Page. To cancel the current GOTO destination, simply select another destination. If no destination is currently desired, or you want to resume a previously selected route, the - Garmin GPS III Plus | Owner's Manual - Page 27
replaced by a warning page, then by the Satellite Status Page. Since we'll be using the simulator mode, we don't need to wait for the receiver to acquire satellites. I WARNING: Keep in mind that the GPS III+ does not track satellites in simulator mode and should never be used for actual navigation - Garmin GPS III Plus | Owner's Manual - Page 28
pages in reverse order. In normal mode operation, the GPS III+ would automatically sequence from Satellite Status Page to Map Page once enough satellites were received to determine your position. At that point the receiver is ready to use for navigation. Since we're in simulator we won't see that - Garmin GPS III Plus | Owner's Manual - Page 29
until it appears. The GPS III+'s Map Page combines digital charting with a number of user-selectable features. Before we select our destination and begin navigating toward it, let's take a look at some of those features. Nearby Waypoints SIMULATOR TOUR Using the Map Page Background Roads and - Garmin GPS III Plus | Owner's Manual - Page 30
Field Waypoint Position 3. If the name of the city or town is longer than six characters, the GPS III+ will abbreviate the name when it creates the waypoint. (If you select an open location on the map, where no city, town or other feature is located, a three-digit number is pre-assigned to - Garmin GPS III Plus | Owner's Manual - Page 31
let's see how the GPS III+ is used to navigate to it. The reference arrow can also be used to GOTO any point on the map-even without a waypoint already All' will display a list of all waypoints currently stored in memory.) 3. Highlight the new waypoint you just created using the rocker keypad, and - Garmin GPS III Plus | Owner's Manual - Page 32
If you were at home when you initialized your GPS III+, you might want to keep this waypoint in memory for future use!) To rename the waypoint and the 'DONE?' prompt, and press ENTER. Now we have two waypoints in memory and on the map: the city location we saved earlier and 'HOME'. It's about time we - Garmin GPS III Plus | Owner's Manual - Page 33
. The other primary navigation screens are the Compass and Highway pages, with the Compass Page appearing first in the sequence of main pages. To view the Compass Page, press PAGE. SIMULATOR TOUR Compass Page Bearing Pointer Compass Ring User-selectable data fields The GPS III+'s Compass Page - Garmin GPS III Plus | Owner's Manual - Page 34
navigate Operating the GPS III+ is GPS satellites as you move about. Before ending the tour, try a few experiments of your own, such as going back to the 'HOME' waypoint, retracing your steps utilizing the TracBack feature, or creating a few more waypoints. Use the Reference section of this manual - Garmin GPS III Plus | Owner's Manual - Page 35
GPS III+'s Satellite Status Page provides a visual reference of various receiver functions, including current satellite coverage, receiver operating mode, battery level and position accuracy. As the receiver navigation (solid bar status). Once a fix has been calculated, the GPS III+ will then update - Garmin GPS III Plus | Owner's Manual - Page 36
), but is unable to determine altitude. Additional satellites may be needed. '3D Navigation' means the GPS III+ has determined a horizontal and vertical position (latitude, longitude and altitude). The receiver is ready for navigation. 26 You can use the sky view to help determine if any satellites - Garmin GPS III Plus | Owner's Manual - Page 37
, as described on page 77. The GPS III+ features an internal 10-year lithium battery that will maintain the unit's memory when the receiver is not running off batteries or external power. REFERENCE Satellite Status Page 'Poor GPS Coverage' means the receiver isn't tracking enough satellites for - Garmin GPS III Plus | Owner's Manual - Page 38
in simulator, change the sky view orientation or initialize the receiver. 'AutoLocate' forces the receiver to search for all satellites (twelve at a time) error, in feet or meters. Satellite Status Page Options Many features of the GPS III+ are menu driven. Each of the main pages has an options menu, - Garmin GPS III Plus | Owner's Manual - Page 39
altitude, when the GPS III+ is acquiring satellites or navigating in 2D mode. By default, 2D navigation will attempt to use the last known altitude. If the altitude shown is off by several hundred feet (or more), manually entering your approximate altitude will enable the receiver to more accurately - Garmin GPS III Plus | Owner's Manual - Page 40
to save the new backlight setting. Position Page The second page in the GPS III+'s main page sequence is the Position Page. This page shows you where and minutes (default). The GPS III+ uses this basic information to mark exact positions as waypoints, which help guide you from one place to another - Garmin GPS III Plus | Owner's Manual - Page 41
speed, max speed, trip odometer and trip timer-can each be reset from the Main Menu, as described on page 74. Many features of the GPS III+ are menu driven. Each of the main pages has an options menu, allowing you to custom tailor the corresponding page to your preferences and/or - Garmin GPS III Plus | Owner's Manual - Page 42
data fields. Available data types are: Altitude, Average (Avg) Speed, Battery (Bat) Timer, Max Speed, Odometer, Speed, Sunrise (at present position Trip Timer, User Timer and Voltage. See page 95 for descriptions of navigation terms. To change a data field: 1. Highlight 'Change Fields' and press - Garmin GPS III Plus | Owner's Manual - Page 43
map position, mark new waypoints while you navigate or retrieve exit information. The GPS III+ also features dedicated zoom keys for instant zooming (see pg. 2). The map above when display is vertical) the map displays the time and distance to next waypoint, plus your current speed (all defaults). A - Garmin GPS III Plus | Owner's Manual - Page 44
to manually select your destination from the GOTO Page. 34 Another function on the Map Page is the pan function, which allows you to move the map with name is highlighted, you can review information about the waypoint, list waypoint options, or execute a GOTO right from the Map Page. To select an on - Garmin GPS III Plus | Owner's Manual - Page 45
centers and weigh stations. Common exits are depicted with an open square icon when services are available and a filled-gray square icon when no services are available. To display available services for an exit shown on the map page: 1. Use the rocker keypad to place the panning arrow on the desired - Garmin GPS III Plus | Owner's Manual - Page 46
user-selectable fields (along the right-hand side of the map page). 36 Many GPS III+ features are menu driven. Each of the main pages has Destination (DEST), Track and a Trip Odometer. See page 95 for descriptions of navigation terms. To change a data field: 1. Highlight 'Change Fields' and press - Garmin GPS III Plus | Owner's Manual - Page 47
MapSource Info- shows the number of maps downloaded from the optional MapSource software package and the amount of memory used (in kilobytes). MapSource allows you to supplement the built-in map with up to 1.44 MB of additional detail, including residential streets and topographic information. Each - Garmin GPS III Plus | Owner's Manual - Page 48
(interstate) highway and 50 geo (geographical) points nearest to the map pointer. The nearest locations pages are organized by a series of 'file location for the selected tab (category). The lists are continuously updated as you're moving and provide quick access to the closest points of - Garmin GPS III Plus | Owner's Manual - Page 49
For exits, all the exit services information (described on page 35) is available. You can show the map area for the point or Map' (from the Info Page Options) and press ENTER. Press QUIT to return to the previous screen. Save As Waypnt- creates a waypoint at the item location and saves it in memory - Garmin GPS III Plus | Owner's Manual - Page 50
REFERENCE Map Page Options Geo Pnts setup allows you to choose what category to designate which item categories you wish to display on the City, Exit services or Geo Pnts list pages. See page 54 for setup instructions. Restore Defaults- resets all options to the factory default settings for the - Garmin GPS III Plus | Owner's Manual - Page 51
press ENTER. Select the desired detail level-More, Normal, Less, Least-and press ENTER. REFERENCE Map Page Options 'Map Setup' allows you to change map orientation, background map detail, text size, etc. The map settings are organized by a series of 'file tabs'. Use the rocker keypad to select the - Garmin GPS III Plus | Owner's Manual - Page 52
from 80 miles through each lower scale, stopping at 800 ft. as you approach your destination waypoint. 5. To enable/disable the accuracy circle, select the 'Map' tab (if not already selected). Scroll down to highlight the 'Acc. Circle' field and press ENTER. Select 'On' or 'Off' to enable or disable - Garmin GPS III Plus | Owner's Manual - Page 53
GPS III+'s Compass Page will guide you to your destination with digital readouts and a graphic compass display, which includes a bearing pointer. Use this page (instead of the Highway Page) when travelling at slower speeds, when making frequent directional changes, or where straight line navigation - Garmin GPS III Plus | Owner's Manual - Page 54
available data types. Four different items may be displayed on the Compass Page-two when using the 44 'Big Numbers' option. Many features of the GPS III+ are menu driven. Each of the main pages has an options menu, allowing you to custom tailor the corresponding page to your preferences and/or - Garmin GPS III Plus | Owner's Manual - Page 55
The GPS III+'s Highway Page also provides graphic steering waypoint and which direction you should steer to stay on course. If you are navigating a route, the highway display will show each route waypoint in sequence, with route, the Highway Page will guide you to each waypoint along the route. 45 - Garmin GPS III Plus | Owner's Manual - Page 56
type of data to display on four user-selectable data fields. Select the desired type from the 'Change Fields' list. 46 Many features of the GPS III+ are menu driven. Each of the main pages has an options menu, allowing you to custom tailor the corresponding page to your preferences and/or - Garmin GPS III Plus | Owner's Manual - Page 57
GPS III+ stores up to 500 waypoints, with a selectable symbol and comment available for each waypoint. Waypoints can be created using five methods: Mark Present Position- your present position can be captured and saved as a waypoint using the ENTER/MARK key. On Map waypoint in memory, highlight ' - Garmin GPS III Plus | Owner's Manual - Page 58
to enter the new waypoint name and press ENTER when finished. 5. To save the waypoint in memory, highlight 'Done' and press ENTER. Creating Waypoints by Text Entry Waypoints may be created by manually entering the position coordinates or by entering the bearing and distance from an existing waypoint - Garmin GPS III Plus | Owner's Manual - Page 59
is selected with the rocker keypad.) 8. To save the new waypoint in memory, highlight 'Done' and press ENTER. Waypoint List Options The Waypoint List the waypoint on the map display. The Spell 'n Find option allows you to retrieve waypoint information by manually entering the waypoint's name - Garmin GPS III Plus | Owner's Manual - Page 60
waypoints with this corresponding symbol will be deleted from memory. Delete All- deletes all waypoints currently stored in memory. To delete a waypoint (or waypoints): 1. Select the desired delete option from the list above and press ENTER. The GPS III+ will delete all waypoints not used in a route - Garmin GPS III Plus | Owner's Manual - Page 61
2. Use the rocker keypad to select the desired symbol and press ENTER. The selected symbol will be used to denote the waypoint position on the map display. 3. If finished, highlight 'Done' and press ENTER. When a waypoint is created, the time and date of creation is automatically added as a waypoint - Garmin GPS III Plus | Owner's Manual - Page 62
you designate how the selected waypoint will appear on the map display. Options are provided to show Symbol & Name to average position samples over time to update the waypoint's position with a more allows you to remove the selected waypoint from memory. To delete a waypoint: 1. Highlight 'Delete - Garmin GPS III Plus | Owner's Manual - Page 63
GPS III+ nearby location for the selected tab (category). The lists are continuously updated as you're moving and provide quick access to the closest points includes state, country, size or reference, and position. You can show the map area for the city, save it as a waypoint or switch between size - Garmin GPS III Plus | Owner's Manual - Page 64
nearest list. Press GOTO to display the GOTO Page with the desired location selected. 2. Press ENTER to confirm the selected waypoint and begin navigating. Nearest Location Options The nearest locations pages also feature an options page that allows you to define the category of items you want to - Garmin GPS III Plus | Owner's Manual - Page 65
automatically stored in the receiver's memory. This eliminates the need to store waypoints along the way. (See page 58 for more information about TracBack.) Routes- allows you to manually create a sequence of intermediate waypoints which lead you to your final destination. The GPS III+ will store up - Garmin GPS III Plus | Owner's Manual - Page 66
to manually enter the name of your destination waypoint. A GOTO can also be initiated from the map display and begin navigating. To GOTO an existing waypoint, city or highway exit on the map display: 1. track log automatically stored in the receiver's memory. This eliminates the need to store - Garmin GPS III Plus | Owner's Manual - Page 67
ENTER. MOB (man overboard) The GPS III+'s MOB function lets you simultaneously mark and set a course to a position for quick response in an emergency. Once an MOB has been activated, an MOB symbol will appear on the map display and the navigation screens will guide you back to the 'MOB' waypoint - Garmin GPS III Plus | Owner's Manual - Page 68
The TracBack navigation feature allows you to retrace your path using the track log automatically stored in the receiver's memory. This eliminates the need to manually store waypoints along the way. A track log is an electronic breadcrumb trail, showing the path you have travelled. Your GPS III+ can - Garmin GPS III Plus | Owner's Manual - Page 69
full' message. The receiver will use the available waypoints to create a route with an emphasis on the track log data closest to the destination. Also, existing TracBack waypoints ('T###') that are not contained in routes will be erased to free more memory. The GPS III+ will create new waypoints - Garmin GPS III Plus | Owner's Manual - Page 70
(using the rocker keypad to enter waypoint names) or directly from the map display. Using the map display allows you to see each route graphically on-screen as you create, review, modify or navigate the route. All of the GPS III+'s route functions are accessed through the Main Menu. To create a new - Garmin GPS III Plus | Owner's Manual - Page 71
a route from the map display: 1. Press MENU twice to display the Main Menu. 2. Highlight 'Routes' and press ENTER. The Route List is displayed, showing all routes stored in memory. 3. Press MENU to display the Route Options. 4. Highlight 'New Route ' and press ENTER. The GPS III+ creates a route - Garmin GPS III Plus | Owner's Manual - Page 72
and press ENTER to see the Route Plan Page. Activating a route tells the GPS III+ you wish to use this route for navigation guidance. 62 The GPS III+'s Route List displays all the routes currently stored in memory, along with a descriptive name for each route. Once a route has been created, it - Garmin GPS III Plus | Owner's Manual - Page 73
Route Editing Once a route is added to memory you can review and/or edit the route from the Route Plan Page. The Route Plan Page shows the sequence of waypoints for the selected route and provides additional options to depict the route layout on the map - Garmin GPS III Plus | Owner's Manual - Page 74
options. 6. To edit the route from the map display, press MENU from the Route Plan Page. Highlight 'Show Map' and press ENTER. Use the rocker keypad time, 64 fuel usage and speed. H NOTE: Fuel flow rates on your GPS III+ are measured in "units per hour". System setting changes for units of measure - Garmin GPS III Plus | Owner's Manual - Page 75
a new route, as described on page 60. Activate Route- allows you to navigate the route in the same sequence it was originally created, as described on page from memory. The waypoints contained in the route will still appear in memory, but not as part of the route. To delete a route from memory: 1. - Garmin GPS III Plus | Owner's Manual - Page 76
all routes from memory. The waypoints contained in all stored routes will remain in memory, but not as part of any route. To delete all routes from memory: 1. Highlight waypoint. As you navigate the route, the information on the Active Route Page will automatically update to indicate the destination - Garmin GPS III Plus | Owner's Manual - Page 77
Map' will show the map display centered around the first waypoint in the active route. Setup Plan- displays a trip planning screen, allowing you to plan and review units (gallons, liters, etc.) are not specified on the GPS III+. Enter these figures based upon available information for your vehicle - Garmin GPS III Plus | Owner's Manual - Page 78
, select the 'Invert' option. Deactivate- cancels navigation of the route you are currently using. See page 62. Invert- reactivates review information. Delete Route- allows you to remove the current route from memory. The waypoints contained in the route will still appear in memory, but not as part - Garmin GPS III Plus | Owner's Manual - Page 79
The GPS III+'s Main Menu provides access to the waypoint, route, track log, timer and setup features of the receiver. The Main Menu can be to the next character. As you spell the name of the desired city, the GPS III+ will display the first entry in the built-in database which corresponds to the - Garmin GPS III Plus | Owner's Manual - Page 80
retrieve information for any city in the built-in database. The 'Show Map' Option allows you to view the area around the city location. Use the map area around the city location: 1. Select 'Show Map' and press ENTER. Save As Waypnt creates a waypoint at the city location and saves it in memory. If - Garmin GPS III Plus | Owner's Manual - Page 81
for TracBack information. The Track Logs Page is divided in two main sections: one for the active log (the log currently being recorded) and available memory, and the second section showing any saved track logs and the total number saved. The active log stores up to 1900 track log positions, based - Garmin GPS III Plus | Owner's Manual - Page 82
the Track Logs Page) and press MENU. The following options are available: TracBack converts the track log data in memory into an inverted route (of up to 30 waypoints) and begins navigation along the route. See pages 58-59. Save Active Log extracts up to 250 of the most significant points along - Garmin GPS III Plus | Owner's Manual - Page 83
from using the TracBack feature. 'Fill' - A track log will be recorded until the track memory is full. 'Wrap' (default) - A track log will be continuously recorded, wrapping through available memory; replacing the oldest track data with new data. Interval defines the frequency with which the track - Garmin GPS III Plus | Owner's Manual - Page 84
review of unit settings. 74 Track Log Settings (cont.) Displayed on Map/Not Displayed- allows you to control if a saved track log is displayed on the map Time' will appear instead. This latter option logs trip time any time the GPS III+ is on and has a position fix. NOTE: The 'Reset Trip' option - Garmin GPS III Plus | Owner's Manual - Page 85
- Distance & Speed, Heading and Altitude Timers Count up/down User Timer, Battery Timer, and usage timers for current day and since new Time Formats for local , regional grids); Map Datum selection Interface Format (NMEA, RTCM, GARMIN proprietary); Mode setting for use with PC or a second unit - Garmin GPS III Plus | Owner's Manual - Page 86
to automatically align track heading to the desired course (when using a GOTO or route), or allows you to manually adjust the track heading, as desired. Track allows you to manually enter a track heading. This setting is only available when Track Control is set to 'User Track'. Altitude allows - Garmin GPS III Plus | Owner's Manual - Page 87
gauge on the Satellite Status Page (see page 27). Power Saver is suitable for most applications and offers position updates which adapt to your needs while extending battery life. The GPS III+ will operate up to 36 hours when using Power Saver mode. To select power saver mode: 1. Highlight the - Garmin GPS III Plus | Owner's Manual - Page 88
'User Mag Var' is selected, you must periodically update the magnetic variation as your position changes. Using this setting, the GPS III+ will not automatically calculate and update the magnetic variation at your present position. Failure to update this setting may result in substantial differences - Garmin GPS III Plus | Owner's Manual - Page 89
a running count of total GPS III+ operating time since the receiver was shipped from the factory. REFERENCE Setup Menu: Timers The 'User Timer' option provides both count up and count down timers. The battery timer will automatically reset when depleted batteries are replaced with a fresh set. 79 - Garmin GPS III Plus | Owner's Manual - Page 90
'Ahead of UTC' (as appropriate) and press ENTER. Time displays the current time based on the settings made above and information provided by the satellites received. Date displays the current date based on the settings made above and information provided by the satellites - Garmin GPS III Plus | Owner's Manual - Page 91
Alarms Settings Clock Alarm uses the internal clock to provide an 'Alarm Clock' message at the time ) and press ENTER. Enter the alarm time using the rocker keypad and press ENTER. H NOTE: The GPS III+ must be turned on when the alarm time is reached. Otherwise, the message will not occur. Arrival - Garmin GPS III Plus | Owner's Manual - Page 92
are used to describe geographic positions for surveying, mapping, and navigation and are not actual maps built in the unit. Use WGS 84 unless III+ match that of the map or chart. This information should be displayed somewhere on the map or chart. If the information is not present, contact the map - Garmin GPS III Plus | Owner's Manual - Page 93
, the active waypoint information will reflect those changes. Since the III+ does not rely on the LORAN signal for navigation, it can reference a different GRI chain and/or secondary stations and still navigate to the location stored in memory. The LORAN Position Format field is located under the - Garmin GPS III Plus | Owner's Manual - Page 94
/download MapSource data, exchange waypoint, route, track log data with a PC or with another GPS III+. • GRMN DGPS - used to connect the III+ with a GARMIN DGPS beacon receiver • NMEA - supports the input/output of standard NMEA 0183 version 2.0 data. • None - provides no interfacing capabilities - Garmin GPS III Plus | Owner's Manual - Page 95
and maintenance. For DGPS transmitter problems or to find the most updated list of frequencies & coverage areas, contact your local USCG, or see their web site at http://www.navcen.uscg.mil/. REFERENCE Setup Menu: DGPS The III+ can automatically tune the GARMIN - Garmin GPS III Plus | Owner's Manual - Page 96
surface using the two Velcro™ strips provided with the unit. Be sure to read the warnings on page ii before mounting the GPS in a vehicle! To mount the GPS III+ using the Velcro strips: 1. Select a location for the unit that provides a clear and unobstructed view of the sky. 2. Remove the - Garmin GPS III Plus | Owner's Manual - Page 97
, please contact your GARMIN dealer or GARMIN Customer Service. The GPS III+ has no user-serviceable Specifications parts. Never attempt any repairs yourself, as this may cause injury or void your warranty. To protect your GPS III+, keep it in its carrying case (optional accessory) when not in - Garmin GPS III Plus | Owner's Manual - Page 98
output lines on your GPS III+ are RS-232 compatible allowing easy interface to a wide range of external devices, including PCs, differential beacon receivers, marine autopilots and/or a second GPS receiver. The NMEA 0183 version 2.0 interface format is supported by the GPS III+ and enables the unit - Garmin GPS III Plus | Owner's Manual - Page 99
APPENDIX D The GPS III+'s antenna may be removed to allow attachment of an optional remote-mounted antenna. In some applications, using a remote-mounted antenna Antenna / Remote Mounting will dramatically increase the number of satellites received. The GPS antenna should be mounted in a location - Garmin GPS III Plus | Owner's Manual - Page 100
quality. Check other navigational sources to verify the position indicated. Leg not Smoothed-The upcoming route leg is too short for smooth waypoint transitions. Memory Battery Power Low-The battery that sustains user memory is low and should be replaced by an authorized service center as soon as - Garmin GPS III Plus | Owner's Manual - Page 101
Failed-The GPS III+ has detected a failure in its internal memory. If the message persists, the GPS III+ is unusable and should be taken to an authorized GARMIN service center. Received Invalid Waypoint-A waypoint was received during upload transfer that has an invalid identifier. Receiver Failed - Garmin GPS III Plus | Owner's Manual - Page 102
The following are the map datums available for the GPS III+. Menu Page abbreviations are listed first, followed by the corresponding map datum name and area. The default map datum for the GPS III+ is WGS 84. Adindan Afgooye AIN EL ABD '70 Anna 1 Ast '65 ARC 1950 ARC 1960 Ascnsn Isld '58 Astro - Garmin GPS III Plus | Owner's Manual - Page 103
- Nigeria North American 1927- Alaska North American 1927- Bahamas (excluding San Salvador Island) North American 1927- Canada and Newfoundland APPENDIX F Map Datums NAD27 Canal Zone North Am. 1927- Canal Zone NAD27 Caribbn North American 1927- Caribbean (Barbados, Caicos Islands, Cuba, Dom. Rep - Garmin GPS III Plus | Owner's Manual - Page 104
APPENDIX F Map Datums Old Hawaiian Oman Ord Srvy GB Pico De Las Nv Ptcairn Ast '67 Prov S Am '56 Prov S Chln '63 Puerto Rico Qatar National Qornoq - Garmin GPS III Plus | Owner's Manual - Page 105
) in the route. Leg Time-The time required to travel from a route waypoint to the next waypoint (in sequence) in the route. APPENDIX G Navigation Terms Max Speed-The maximum second-by-second speed recorded since last reset. Odometer-A running tally of distance travelled, based upon the distance - Garmin GPS III Plus | Owner's Manual - Page 106
APPENDIX G Navigation Terms To Course-The recommended direction to steer in order to reduce course error or stay on course. Provides the most efficient heading to get - Garmin GPS III Plus | Owner's Manual - Page 107
The chart below gives an approximate UTC (Universal Time Coordinate) time offset for the various longitudinal zones. Check with local charts for more detailed information. If you are in daylight savings time, add one hour to the offset. APPENDIX H Time Offsets Longitudinal Zone W180.0º to W172.5º - Garmin GPS III Plus | Owner's Manual - Page 108
Installation/Replacement . . . 3 Battery Level Indicator 3,27,77 98 Battery Type 27,77 Beacon Receiver Setup 84-85 Bearing 95 Bearing Pointer 11,23,43 Big Numbers 11,44 C Cancel GOTO 16,57 Cautions ii Cities, on Map 10,20,33,39-42 Cities, Nearest 15,38-39,53-54 Cities, Spell 'n Find - Garmin GPS III Plus | Owner's Manual - Page 109
Interface Settings 73.81.84 Interstate Highway Exits 35 K Keypad Usage 2 L Lakes, on Map 39-40 Lat/Long Grid 39-40 Leg Distance 91 Leg Fuel 91 Leg Time 91 Loran TD 82-83 M Main Menu 13,67 Main Page Sequence 7,18 Manual Tune(DGPS 85 Map Mounting 82 N Navigation Basics 91-92 Navigation - Garmin GPS III Plus | Owner's Manual - Page 110
on Map 41-42 Receiver Status 8,26-27 Reference Waypoints . . . 48-49,70-71 Registration v 100 Rivers, on Map 41-42 Roads, on Map 41-42 Contrast 25,30 Screen Orientation 1,77 Scrolling 2 Serial Number v Services, at Exit 35,53-54 Setup Options 13,74-85 Sign Navigation . . 55,58-59,71-72 - Garmin GPS III Plus | Owner's Manual - Page 111
9,74 Trip Odometer 9,74,96 Trip Planning 64,67 Troubleshooting 6 Turn 96 2D Altitude 29 U Unit Features 1 69 Comments 51 Create By Text 48 Create On Map 20,48 Deleting 50,52 Deleting All 50 Deleting Reference 49,70,95 Renaming 14,22,51 Reviewing 34,50 Sign Posts 46 APPENDIX I Index - Garmin GPS III Plus | Owner's Manual - Page 112
- Garmin GPS III Plus | Owner's Manual - Page 113
- Garmin GPS III Plus | Owner's Manual - Page 114
-2001 GARMIN Corporation GARMIN International, Inc., 1200 E. 151st Street, Olathe, KS 66062 GARMIN (Europe) Ltd., Unit 5, The Quadrangle, Abbey Park Industrial Estate, Romsey SO51 9AQ UK GARMIN Corporation, No. 68, Jangshu 2nd Road, Shijr, Taipei County, Taiwan Web Site Address: www.garmin.com Part
-
 1
1 -
 2
2 -
 3
3 -
 4
4 -
 5
5 -
 6
6 -
 7
7 -
8
-
9
-
10
-
11
-
12
-
13
-
14
-
15
-
16
-
17
-
18
-
19
-
20
-
21
-
22
-
23
-
24
-
25
-
26
-
27
-
28
-
29
-
30
-
31
-
32
-
33
-
34
-
35
-
36
-
37
-
38
-
39
-
40
-
41
-
42
-
43
-
44
-
45
-
46
-
47
-
48
-
49
-
50
-
51
-
52
-
53
-
54
-
55
-
56
-
57
-
58
-
59
-
60
-
61
-
62
-
63
-
64
-
65
-
66
-
67
-
68
-
69
-
70
-
71
-
72
-
73
-
74
-
75
-
76
-
77
-
78
-
79
-
80
-
81
-
82
-
83
-
84
-
85
-
86
-
87
-
88
-
89
-
90
-
91
-
92
-
93
-
94
-
95
-
96
-
97
-
98
-
99
-
100
-
101
-
102
-
103
-
104
-
105
-
106
-
107
-
108
-
109
-
110
-
111
-
112
-
113
-
114
 |
 |
Owner’s
Manual
&
Reference