Garmin GPS III Plus Owner's Manual - Page 34
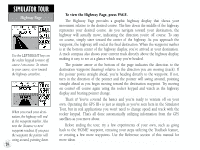
To view the Highway press
 |
UPC - 753759015817
View all Garmin GPS III Plus manuals
Add to My Manuals
Save this manual to your list of manuals |
Page 34 highlights
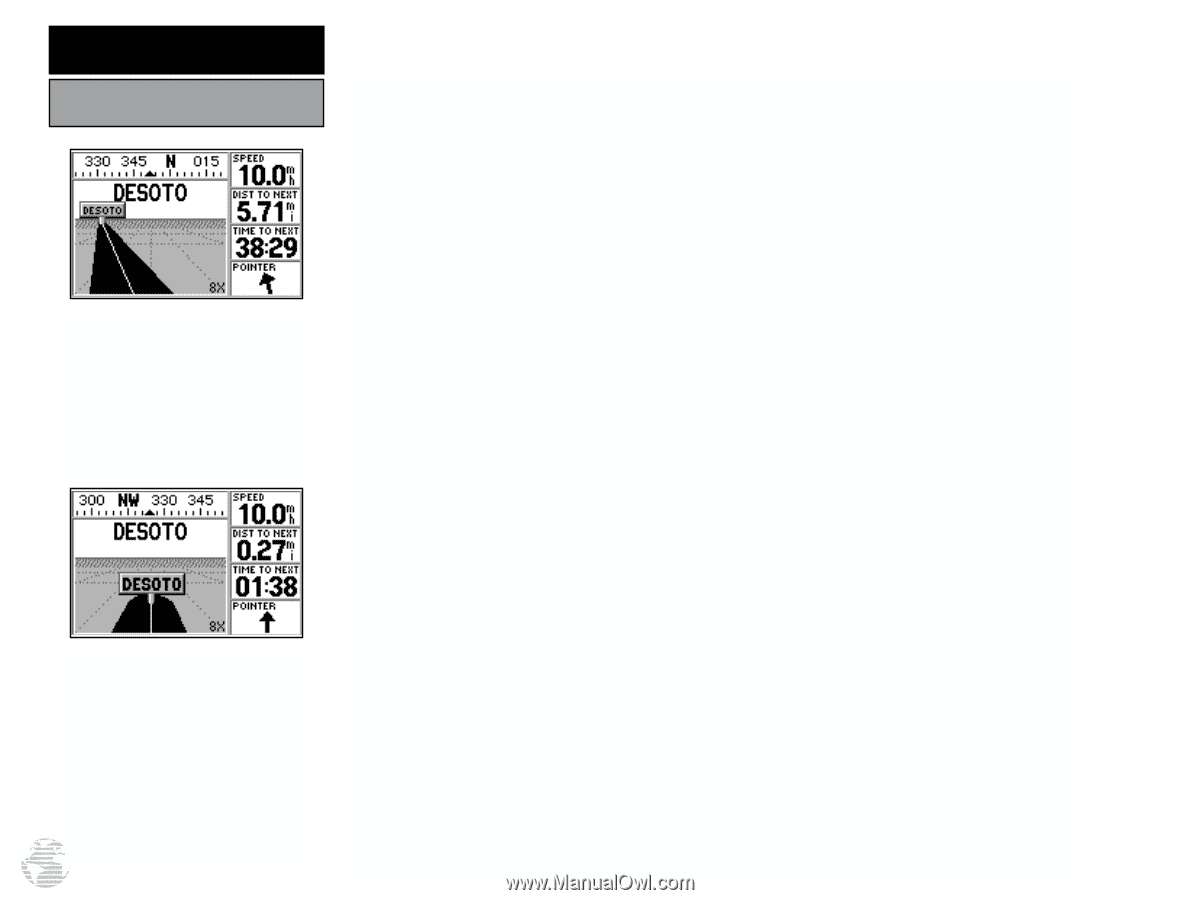
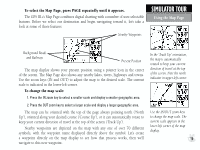
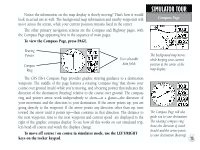
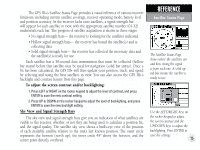
SIMULATOR TOUR Highway Page Use the LEFT/RIGHT keys on the rocker keypad to move off course / on course. To return to your course, steer toward the highway centerline. When you reach your destination, the highway will end at the waypoint marker. Also note the 'distance to next' waypoint readout. If you pass the waypoint the pointer will swing around, pointing down. 24 To view the Highway Page, press PAGE. The Highway Page provides a graphic highway display that shows your movement relative to the desired course. The line down the middle of the highway represents your desired course. As you navigate toward your destination, the highway will actually move, indicating the direction you're off course. To stay on course, simply steer toward the center of the highway. As you approach the waypoint, the highway will end at the final destination. When the waypoint marker is at the bottom center of the highway display, you've arrived at your destination. A track compass also shows your current track directly above the highway display, making it easy to see at a glance which way you're headed. The pointer arrow at the bottom of the page indicates the direction to the destination waypoint (bearing) relative to the direction you are moving (track). If the pointer points straight ahead, you're heading directly to the waypoint. If not, turn in the direction of the pointer and the pointer will swing around, pointing straight ahead as you begin moving toward the destination waypoint. Try moving on course/ off course again using the rocker keypad and watch as the highway display and bearing pointer change. That's it! You've covered the basics and you're ready to venture off on your own. Operating the GPS III+ is just as simple as you've seen here in the Simulator Tour, but in real applications you won't need to change speed and track with the rocker keypad. That's all done automatically utilizing information from the GPS satellites as you move about. Before ending the tour, try a few experiments of your own, such as going back to the 'HOME' waypoint, retracing your steps utilizing the TracBack feature, or creating a few more waypoints. Use the Reference section of this manual for more ideas.
-
 1
1 -
2
-
3
-
4
-
5
-
6
-
7
-
8
-
9
-
10
-
11
-
12
-
13
-
14
-
15
-
16
-
17
-
18
-
19
-
20
-
21
-
22
-
23
-
24
-
25
-
26
-
27
-
28
-
 29
29 -
 30
30 -
 31
31 -
 32
32 -
 33
33 -
 34
34 -
 35
35 -
 36
36 -
 37
37 -
 38
38 -
 39
39 -
40
-
41
-
42
-
43
-
44
-
45
-
46
-
47
-
48
-
49
-
50
-
51
-
52
-
53
-
54
-
55
-
56
-
57
-
58
-
59
-
60
-
61
-
62
-
63
-
64
-
65
-
66
-
67
-
68
-
69
-
70
-
71
-
72
-
73
-
74
-
75
-
76
-
77
-
78
-
79
-
80
-
81
-
82
-
83
-
84
-
85
-
86
-
87
-
88
-
89
-
90
-
91
-
92
-
93
-
94
-
95
-
96
-
97
-
98
-
99
-
100
-
101
-
102
-
103
-
104
-
105
-
106
-
107
-
108
-
109
-
110
-
111
-
112
-
113
-
114
 |
 |