Garmin GPS III Plus Owner's Manual - Page 49
Show Map, Save As Waypnt, Show Reference For cities only
 |
UPC - 753759015817
View all Garmin GPS III Plus manuals
Add to My Manuals
Save this manual to your list of manuals |
Page 49 highlights
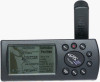
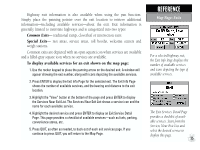
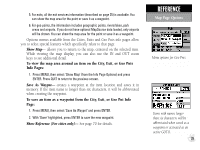
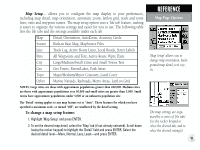
5. For exits, all the exit services information (described on page 35) is available. You can show the map area for the point or save it as a waypoint. 6. For geo points, the information includes geographic points, rivers/lakes, park areas and airports. If you do not have optional MapSource data loaded, only airports will be shown. You can show the map area for the point or save it as a waypoint. Options menus available from the Cities, Exits and Geo Pnts info pages allow you to select special features which specifically relate to that page. Show Map- allows you to return to the map, centered on the selected item. While viewing the map display, you can also use the IN and OUT zoom keys to see additional detail. To view the map area around an item on the City, Exit, or Geo Pnts Info Pages: 1. Press MENU, then select 'Show Map' (from the Info Page Options) and press ENTER. Press QUIT to return to the previous screen. Save As Waypnt- creates a waypoint at the item location and saves it in memory. If the item name is longer than six characters, it will be abbreviated when creating the waypoint. To save an item as a waypoint from the City, Exit, or Geo Pnt Info Page: 1. Press MENU, then select 'Save As Waypnt' and press ENTER. 2. With 'Done' highlighted, press ENTER to save the new waypoint. Show Reference (For cities only)- See page 70 for details. REFERENCE Map Page Options Menu options for Geo Pnts. Items with names longer than six characters will be abbreviated when saved as a waypoint or activated as an active GOTO. 39
-
 1
1 -
2
-
3
-
4
-
5
-
6
-
7
-
8
-
9
-
10
-
11
-
12
-
13
-
14
-
15
-
16
-
17
-
18
-
19
-
20
-
21
-
22
-
23
-
24
-
25
-
26
-
27
-
28
-
29
-
30
-
31
-
32
-
33
-
34
-
35
-
36
-
37
-
38
-
39
-
40
-
41
-
42
-
43
-
 44
44 -
 45
45 -
 46
46 -
 47
47 -
 48
48 -
 49
49 -
 50
50 -
 51
51 -
 52
52 -
 53
53 -
 54
54 -
55
-
56
-
57
-
58
-
59
-
60
-
61
-
62
-
63
-
64
-
65
-
66
-
67
-
68
-
69
-
70
-
71
-
72
-
73
-
74
-
75
-
76
-
77
-
78
-
79
-
80
-
81
-
82
-
83
-
84
-
85
-
86
-
87
-
88
-
89
-
90
-
91
-
92
-
93
-
94
-
95
-
96
-
97
-
98
-
99
-
100
-
101
-
102
-
103
-
104
-
105
-
106
-
107
-
108
-
109
-
110
-
111
-
112
-
113
-
114
 |
 |