Garmin GPS III Plus Owner's Manual - Page 90
Time Settings
 |
UPC - 753759015817
View all Garmin GPS III Plus manuals
Add to My Manuals
Save this manual to your list of manuals |
Page 90 highlights
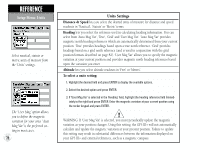
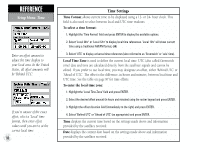
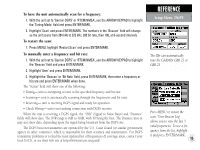
REFERENCE Setup Menu: Time Enter an offset amount to adjust the time display to your local area. In the United States, all offset amounts will be 'Behind UTC'. If you're unsure of the exact offset, select a 'Local' time format, then enter offset values until you arrive at the correct local time. 80 Time Settings Time Format allows current time to be displayed using a 12- or 24- hour clock. This field is also used to select between local and UTC time readouts. To select a time format: 1. Highlight the 'Time Format' field and press ENTER to display the available options. 2. Select 'Local 24hr' or 'Local 12hr' to display local time references. 'Local 12hr' will show current time using a traditional AM/PM format, OR 3. Select 'UTC' to display universal time references (also referred to as 'Greenwich' or 'zulu' time). Local Time Zone is used to define the current local time. UTC (also called Greenwich time) date and time are calculated directly from the satellites' signals and cannot be edited. If you prefer to use local time, you may designate an offset, either 'Behind UTC' or 'Ahead of UTC'. The offset is the difference, in hours and minutes, between local time and UTC time. See the table on page 97 for time offsets. To enter the local time zone: 1. Highlight the 'Local Time Zone' field and press ENTER. 2. Select the desired offset amount (in hours and minutes) using the rocker keypad and press ENTER. 3. Highlight the offset direction field (immediately to the right) and press ENTER. 4. Select 'Behind UTC' or 'Ahead of UTC' (as appropriate) and press ENTER. Time displays the current time based on the settings made above and information provided by the satellites received. Date displays the current date based on the settings made above and information provided by the satellites received.
-
 1
1 -
2
-
3
-
4
-
5
-
6
-
7
-
8
-
9
-
10
-
11
-
12
-
13
-
14
-
15
-
16
-
17
-
18
-
19
-
20
-
21
-
22
-
23
-
24
-
25
-
26
-
27
-
28
-
29
-
30
-
31
-
32
-
33
-
34
-
35
-
36
-
37
-
38
-
39
-
40
-
41
-
42
-
43
-
44
-
45
-
46
-
47
-
48
-
49
-
50
-
51
-
52
-
53
-
54
-
55
-
56
-
57
-
58
-
59
-
60
-
61
-
62
-
63
-
64
-
65
-
66
-
67
-
68
-
69
-
70
-
71
-
72
-
73
-
74
-
75
-
76
-
77
-
78
-
79
-
80
-
81
-
82
-
83
-
84
-
 85
85 -
 86
86 -
 87
87 -
 88
88 -
 89
89 -
 90
90 -
 91
91 -
 92
92 -
 93
93 -
 94
94 -
 95
95 -
96
-
97
-
98
-
99
-
100
-
101
-
102
-
103
-
104
-
105
-
106
-
107
-
108
-
109
-
110
-
111
-
112
-
113
-
114
 |
 |
