Garmin GPS III Plus Owner's Manual - Page 71
Creating New Routes
 |
UPC - 753759015817
View all Garmin GPS III Plus manuals
Add to My Manuals
Save this manual to your list of manuals |
Page 71 highlights
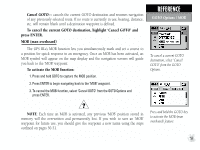
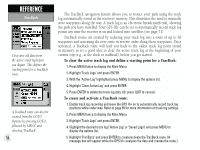
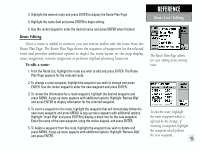
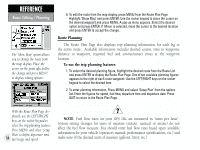
To create a route from the map display: 1. Press MENU twice to display the Main Menu. 2. Highlight 'Routes' and press ENTER. The Route List is displayed, showing all routes stored in memory. 3. Press MENU to display the Route Options. 4. Highlight 'New Route ' and press ENTER. The GPS III+ creates a route called 'EMPTY- 1'. (The name changes as you add waypoints to the route, so make note of the route name for future reference.) 5. Press MENU to display the New Route Options and highlight 'Show Map'. 6. Press ENTER and use the rocker keypad to place the arrow over the first route waypoint. (Use the IN and OUT zoom keys to aid in locating the desired waypoint.) 7. Press ENTER to accept the selected route waypoint. 8. Highlight the next waypoint on the map display and press ENTER to add the waypoint to the route. Repeat this step until all route waypoints have been added to the route. Press PAGE or QUIT to exit the page. 9. You can also create route waypoints during this process. If no waypoint exists at the arrow location, the GPS III+ will automatically create one-using a three digit number as the waypoint's name. (You can rename the waypoint following the steps on page 51.) 10. If you wish to include a city location in the route, place the arrow over the city and press ENTER. A confirmation page will appear with the name of the city as a new waypoint (sometimes abbreviated, depending on the length of the original name). To add to the route, select 'Use' and press ENTER. As you add each new waypoint to the route, the data window at the top of the map display will show the name of the route you are creating, which includes the first and last waypoints in the route. A solid route line will appear on the map to indicate each leg, and a dotted line will appear to indicate the distance and bearing from the last route waypoint to the cursor position. REFERENCE Creating New Routes To create a route directly from the map display, select 'New Route' from the Main Menu, then select 'Show Map' from the New Route Options. You can add city (or highway exit) locations to a route by placing the editing arrow on a city (or highway exit) and pressing ENTER. 61
-
 1
1 -
2
-
3
-
4
-
5
-
6
-
7
-
8
-
9
-
10
-
11
-
12
-
13
-
14
-
15
-
16
-
17
-
18
-
19
-
20
-
21
-
22
-
23
-
24
-
25
-
26
-
27
-
28
-
29
-
30
-
31
-
32
-
33
-
34
-
35
-
36
-
37
-
38
-
39
-
40
-
41
-
42
-
43
-
44
-
45
-
46
-
47
-
48
-
49
-
50
-
51
-
52
-
53
-
54
-
55
-
56
-
57
-
58
-
59
-
60
-
61
-
62
-
63
-
64
-
65
-
 66
66 -
 67
67 -
 68
68 -
 69
69 -
 70
70 -
 71
71 -
 72
72 -
 73
73 -
 74
74 -
 75
75 -
 76
76 -
77
-
78
-
79
-
80
-
81
-
82
-
83
-
84
-
85
-
86
-
87
-
88
-
89
-
90
-
91
-
92
-
93
-
94
-
95
-
96
-
97
-
98
-
99
-
100
-
101
-
102
-
103
-
104
-
105
-
106
-
107
-
108
-
109
-
110
-
111
-
112
-
113
-
114
 |
 |