Garmin GPS III Plus Owner's Manual - Page 59
Creating Waypoints
 |
UPC - 753759015817
View all Garmin GPS III Plus manuals
Add to My Manuals
Save this manual to your list of manuals |
Page 59 highlights
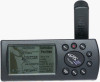
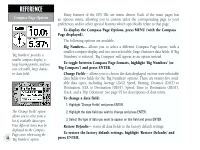
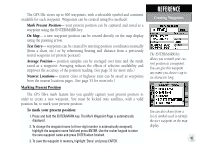
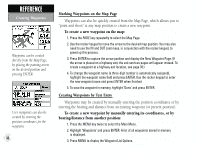
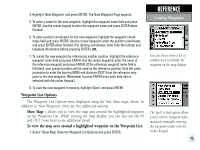
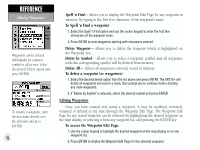
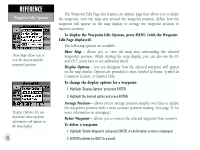
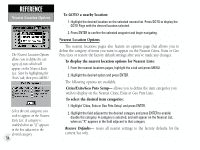
4. Highlight 'New Waypoint' and press ENTER. The New Waypoint Page appears. 5. To enter a name for the new waypoint, highlight the waypoint name field and press ENTER. Use the rocker keypad to enter the waypoint name and press ENTER when finished. 6. To enter position coordinates for the new waypoint, highlight the waypoint coordinates field and press ENTER. Use the rocker keypad to enter the position coordinates and press ENTER when finished. (For lat/long coordinates, enter both the latitude and longitude information before pressing ENTER.) OR, 7. To create the new waypoint by referencing another position, highlight the reference waypoint name field and press ENTER. Use the rocker keypad to enter the name of the reference waypoint and press ENTER. (If the reference waypoint name field is left blank, your present position will be used as the reference position.) Use the same procedure to enter the bearing (BRG) and distance (DIST) from the reference waypoint to the new waypoint. (Remember to press ENTER once each data item is selected with the rocker keypad.) 8. To save the new waypoint in memory, highlight 'Done' and press ENTER. Waypoint List Options The Waypoint List Options were displayed using the first three steps, above. In addition to 'New Waypoint', there are five additional options: Show Map- allows you to view the map area around the highlighted waypoint on the Waypoint List. While viewing the map display, you can also use the IN and OUT zoom keys to see additional detail. To view the map area around a highlighted waypoint on the Waypoint List: 1. Select 'Show Map' (from the Waypoint List Options) and press ENTER. REFERENCE Creating Waypoints You can choose from a list of symbols used to identify the waypoint on the map display. The Spell 'n Find option allows you to retrieve waypoint information by manually entering the waypoint's name with the rocker keypad. 49
-
 1
1 -
2
-
3
-
4
-
5
-
6
-
7
-
8
-
9
-
10
-
11
-
12
-
13
-
14
-
15
-
16
-
17
-
18
-
19
-
20
-
21
-
22
-
23
-
24
-
25
-
26
-
27
-
28
-
29
-
30
-
31
-
32
-
33
-
34
-
35
-
36
-
37
-
38
-
39
-
40
-
41
-
42
-
43
-
44
-
45
-
46
-
47
-
48
-
49
-
50
-
51
-
52
-
53
-
 54
54 -
 55
55 -
 56
56 -
 57
57 -
 58
58 -
 59
59 -
 60
60 -
 61
61 -
 62
62 -
 63
63 -
 64
64 -
65
-
66
-
67
-
68
-
69
-
70
-
71
-
72
-
73
-
74
-
75
-
76
-
77
-
78
-
79
-
80
-
81
-
82
-
83
-
84
-
85
-
86
-
87
-
88
-
89
-
90
-
91
-
92
-
93
-
94
-
95
-
96
-
97
-
98
-
99
-
100
-
101
-
102
-
103
-
104
-
105
-
106
-
107
-
108
-
109
-
110
-
111
-
112
-
113
-
114
 |
 |