HP 2700n Service Manual - Page 226
Light image, Light color, Table 6-4
 |
View all HP 2700n manuals
Add to My Manuals
Save this manual to your list of manuals |
Page 226 highlights
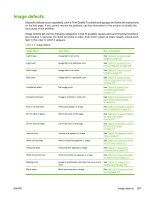
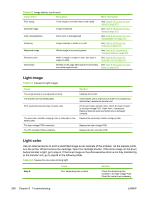
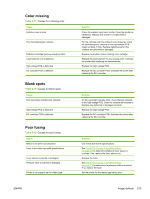
Table 6-3 Image defects (continued) Image defect Description More information Poor fusing Toner image is not fully fixed on the media See Table 6-19 Causes for poor fusing on page 213. Distorted Image Image is distorted See Table 6-19 Causes for poor fusing on page 213. Color misregistration Some color is misregistered See Table 6-21 Causes for color misregistration on page 214. Smearing Image smeared in whole or in part See Table 6-22 Causes for smearing on page 215. Misplaced image Whole image is incorrectly placed See Table 6-23 Causes for a misplaced image on page 215. Reversed color White in image is output in color, and color is output in white See Table 6-24 Causes for reversed color on page 215. Snail tracks Streaks on the page (that look like snail tracks); See Table 6-25 Causes for snail the media might wrinkle tracks on page 215. Light image Table 6-4 Causes for light images Cause The image density is not adjusted correctly The transfer unit has deteriorated Poor secondary-transfer-bias contacts exist The secondary transfer charging roller is deformed or has deteriorated The high-voltage PCB is defective The DC controller PCB is defective Solution Calibrate the printer. If the transfer unit is at the end of its life or its surface has deteriorated, replace the transfer unit. On the secondary transfer roller, check the bias contacts to the high-voltage PCB. Clean them, if necessary. Replace defective parts and deformed or damaged contacts. Replace the secondary transfer charging roller. Replace the high-voltage PCB. Replace the DC controller PCB. Light color Use an external device to print a solid-filled image as an example of the problem. As the sample prints, turn the printer off and remove the cartridge. Open the cartridge shutter. If the toner image on the drum before transfer is light, go to step A. If the toner image on the photosensitive drum is not fully transferring to the transfer unit, go to step B in the following table. Table 6-5 Causes for one color printing light Step A Cause Poor developing-bias contacts Solution Check the developing-bias contacts to the high-voltage PCB. Clean the contacts as necessary. 208 Chapter 6 Troubleshooting ENWW
-
 1
1 -
2
-
3
-
4
-
5
-
6
-
7
-
8
-
9
-
10
-
11
-
12
-
13
-
14
-
15
-
16
-
17
-
18
-
19
-
20
-
21
-
22
-
23
-
24
-
25
-
26
-
27
-
28
-
29
-
30
-
31
-
32
-
33
-
34
-
35
-
36
-
37
-
38
-
39
-
40
-
41
-
42
-
43
-
44
-
45
-
46
-
47
-
48
-
49
-
50
-
51
-
52
-
53
-
54
-
55
-
56
-
57
-
58
-
59
-
60
-
61
-
62
-
63
-
64
-
65
-
66
-
67
-
68
-
69
-
70
-
71
-
72
-
73
-
74
-
75
-
76
-
77
-
78
-
79
-
80
-
81
-
82
-
83
-
84
-
85
-
86
-
87
-
88
-
89
-
90
-
91
-
92
-
93
-
94
-
95
-
96
-
97
-
98
-
99
-
100
-
101
-
102
-
103
-
104
-
105
-
106
-
107
-
108
-
109
-
110
-
111
-
112
-
113
-
114
-
115
-
116
-
117
-
118
-
119
-
120
-
121
-
122
-
123
-
124
-
125
-
126
-
127
-
128
-
129
-
130
-
131
-
132
-
133
-
134
-
135
-
136
-
137
-
138
-
139
-
140
-
141
-
142
-
143
-
144
-
145
-
146
-
147
-
148
-
149
-
150
-
151
-
152
-
153
-
154
-
155
-
156
-
157
-
158
-
159
-
160
-
161
-
162
-
163
-
164
-
165
-
166
-
167
-
168
-
169
-
170
-
171
-
172
-
173
-
174
-
175
-
176
-
177
-
178
-
179
-
180
-
181
-
182
-
183
-
184
-
185
-
186
-
187
-
188
-
189
-
190
-
191
-
192
-
193
-
194
-
195
-
196
-
197
-
198
-
199
-
200
-
201
-
202
-
203
-
204
-
205
-
206
-
207
-
208
-
209
-
210
-
211
-
212
-
213
-
214
-
215
-
216
-
217
-
218
-
219
-
220
-
 221
221 -
 222
222 -
 223
223 -
 224
224 -
 225
225 -
 226
226 -
 227
227 -
 228
228 -
 229
229 -
 230
230 -
 231
231 -
232
-
233
-
234
-
235
-
236
-
237
-
238
-
239
-
240
-
241
-
242
-
243
-
244
-
245
-
246
-
247
-
248
-
249
-
250
-
251
-
252
-
253
-
254
-
255
-
256
-
257
-
258
-
259
-
260
-
261
-
262
-
263
-
264
-
265
-
266
-
267
-
268
-
269
-
270
-
271
-
272
-
273
-
274
-
275
-
276
-
277
-
278
-
279
-
280
-
281
-
282
-
283
-
284
-
285
-
286
-
287
-
288
-
289
-
290
-
291
-
292
-
293
-
294
-
295
-
296
-
297
-
298
-
299
-
300
-
301
-
302
-
303
-
304
-
305
-
306
-
307
-
308
-
309
-
310
-
311
-
312
-
313
-
314
-
315
-
316
-
317
-
318
-
319
-
320
-
321
-
322
-
323
-
324
-
325
-
326
-
327
-
328
-
329
-
330
-
331
-
332
-
333
-
334
-
335
-
336
-
337
-
338
-
339
-
340
-
341
-
342
-
343
-
344
-
345
-
346
-
347
-
348
 |
 |