HP 2700n Service Manual - Page 27
System Setup menu
 |
View all HP 2700n manuals
Add to My Manuals
Save this manual to your list of manuals |
Page 27 highlights
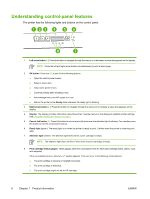
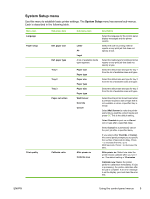
System Setup menu Use this menu to establish basic printer settings. The System Setup menu has several sub-menus. Each is described in the following table. Menu item Language Paper setup Print quality Sub-menu item Def. paper size Def. paper type Tray 1 Tray 2 Tray 3 Paper out action Calibrate color Sub-menu item Letter A4 Legal A list of available media types appears. Paper size Paper type Paper size Paper type Paper size Paper type Wait forever Override Cancel After power on Calibrate now Description Select the language for the control-panel display messages and the printer reports. Select the size for printing internal reports or any print job that does not specify a size. Select the media type for printing internal reports or any print job that does not specify a type. Select the default size and type for tray 1 from the list of available sizes and types. Select the default size and type for tray 2 from the list of available sizes and types. Select the default size and type for tray 3 from the list of available sizes and types. Select how the printer should react when a print job requires a size or type that is not available or when a specified tray is empty. Select Wait forever to make the printer wait until you load the correct media and press OK. This is the default setting. Select Override to print on a different size or type after a specified delay. Select Cancel to automatically cancel the print job after a specified delay. If you select either Override or Cancel, the control panel prompts you to specify the number of seconds to delay. Press > to increase the time, up to 3600 seconds. Press < to decrease the time. After power on: Select how soon the printer should calibrate after you turn it on. The default setting is 15 minutes. Calibrate now: Makes the printer perform a calibration immediately. If a job is processing, the printer calibrates after the job is complete. If an error message is on the display, you must clear the error first. ENWW Using the control-panel menus 9
-
 1
1 -
2
-
3
-
4
-
5
-
6
-
7
-
8
-
9
-
10
-
11
-
12
-
13
-
14
-
15
-
16
-
17
-
18
-
19
-
20
-
21
-
 22
22 -
 23
23 -
 24
24 -
 25
25 -
 26
26 -
 27
27 -
 28
28 -
 29
29 -
 30
30 -
 31
31 -
 32
32 -
33
-
34
-
35
-
36
-
37
-
38
-
39
-
40
-
41
-
42
-
43
-
44
-
45
-
46
-
47
-
48
-
49
-
50
-
51
-
52
-
53
-
54
-
55
-
56
-
57
-
58
-
59
-
60
-
61
-
62
-
63
-
64
-
65
-
66
-
67
-
68
-
69
-
70
-
71
-
72
-
73
-
74
-
75
-
76
-
77
-
78
-
79
-
80
-
81
-
82
-
83
-
84
-
85
-
86
-
87
-
88
-
89
-
90
-
91
-
92
-
93
-
94
-
95
-
96
-
97
-
98
-
99
-
100
-
101
-
102
-
103
-
104
-
105
-
106
-
107
-
108
-
109
-
110
-
111
-
112
-
113
-
114
-
115
-
116
-
117
-
118
-
119
-
120
-
121
-
122
-
123
-
124
-
125
-
126
-
127
-
128
-
129
-
130
-
131
-
132
-
133
-
134
-
135
-
136
-
137
-
138
-
139
-
140
-
141
-
142
-
143
-
144
-
145
-
146
-
147
-
148
-
149
-
150
-
151
-
152
-
153
-
154
-
155
-
156
-
157
-
158
-
159
-
160
-
161
-
162
-
163
-
164
-
165
-
166
-
167
-
168
-
169
-
170
-
171
-
172
-
173
-
174
-
175
-
176
-
177
-
178
-
179
-
180
-
181
-
182
-
183
-
184
-
185
-
186
-
187
-
188
-
189
-
190
-
191
-
192
-
193
-
194
-
195
-
196
-
197
-
198
-
199
-
200
-
201
-
202
-
203
-
204
-
205
-
206
-
207
-
208
-
209
-
210
-
211
-
212
-
213
-
214
-
215
-
216
-
217
-
218
-
219
-
220
-
221
-
222
-
223
-
224
-
225
-
226
-
227
-
228
-
229
-
230
-
231
-
232
-
233
-
234
-
235
-
236
-
237
-
238
-
239
-
240
-
241
-
242
-
243
-
244
-
245
-
246
-
247
-
248
-
249
-
250
-
251
-
252
-
253
-
254
-
255
-
256
-
257
-
258
-
259
-
260
-
261
-
262
-
263
-
264
-
265
-
266
-
267
-
268
-
269
-
270
-
271
-
272
-
273
-
274
-
275
-
276
-
277
-
278
-
279
-
280
-
281
-
282
-
283
-
284
-
285
-
286
-
287
-
288
-
289
-
290
-
291
-
292
-
293
-
294
-
295
-
296
-
297
-
298
-
299
-
300
-
301
-
302
-
303
-
304
-
305
-
306
-
307
-
308
-
309
-
310
-
311
-
312
-
313
-
314
-
315
-
316
-
317
-
318
-
319
-
320
-
321
-
322
-
323
-
324
-
325
-
326
-
327
-
328
-
329
-
330
-
331
-
332
-
333
-
334
-
335
-
336
-
337
-
338
-
339
-
340
-
341
-
342
-
343
-
344
-
345
-
346
-
347
-
348
 |
 |