HP 2700n Service Manual - Page 46
Configuring trays, Configuring trays for custom paper
 |
View all HP 2700n manuals
Add to My Manuals
Save this manual to your list of manuals |
Page 46 highlights
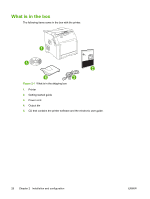
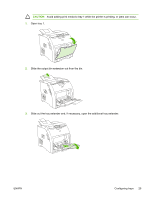
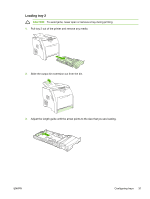
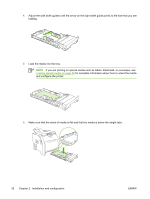
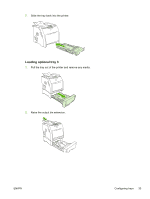
Configuring trays You can configure the printer trays by type and size. Load different media in the printer trays and then request media by type or size in the software program. The following instructions are for configuring the trays at the printer control panel. You can also configure the trays from your computer through the embedded Web server (see Using the embedded Web server on page 59) or through HP ToolboxFX (see Using the HP ToolboxFX on page 62). Configuring size 1. Press OK. 2. Press > to highlight System Setup, and then press OK. 3. Press > to highlight Paper Setup, and then press OK. 4. Press > to highlight Tray 1 or Tray 2, and then press OK. 5. Press > to highlight Paper size, and then press OK. 6. Press > to highlight the appropriate size, and then press OK. Configuring type 1. Press OK. 2. Press > to highlight System Setup, and then press OK. 3. Press > to highlight Paper Setup, and then press OK. 4. Press > to highlight Tray 1 or Tray 2, and then press OK. 5. Press > to highlight Paper type, and then press OK. 6. Press > to highlight the appropriate type, and then press OK. Configuring trays for custom paper Some software programs and printer drivers allow you to specify custom media-size dimensions. Be sure to set the correct media size in both the page setup and print dialog boxes. If your software does not allow this, specify the custom media-size dimensions at the control panel. See System Setup menu on page 9 for more information. Use the Any size size setting when the selected media does not exactly match the size of the paper specified in the document you are printing. If no source tray is specified, the printer looks first for paper that exactly matches the document, and then it looks for and prints from a tray set to Any size or Any type. Printing from tray 1 (100-sheet multipurpose tray) Tray 1 holds up to 100 sheets of media. It provides a convenient way to print envelopes, transparencies, custom-size paper, or other types of paper without having to unload the other trays. Loading tray 1 See Print-media specifications on page 17 for a list of media types and sizes that tray 1 supports. 28 Chapter 2 Installation and configuration ENWW
-
 1
1 -
2
-
3
-
4
-
5
-
6
-
7
-
8
-
9
-
10
-
11
-
12
-
13
-
14
-
15
-
16
-
17
-
18
-
19
-
20
-
21
-
22
-
23
-
24
-
25
-
26
-
27
-
28
-
29
-
30
-
31
-
32
-
33
-
34
-
35
-
36
-
37
-
38
-
39
-
40
-
 41
41 -
 42
42 -
 43
43 -
 44
44 -
 45
45 -
 46
46 -
 47
47 -
 48
48 -
 49
49 -
 50
50 -
 51
51 -
52
-
53
-
54
-
55
-
56
-
57
-
58
-
59
-
60
-
61
-
62
-
63
-
64
-
65
-
66
-
67
-
68
-
69
-
70
-
71
-
72
-
73
-
74
-
75
-
76
-
77
-
78
-
79
-
80
-
81
-
82
-
83
-
84
-
85
-
86
-
87
-
88
-
89
-
90
-
91
-
92
-
93
-
94
-
95
-
96
-
97
-
98
-
99
-
100
-
101
-
102
-
103
-
104
-
105
-
106
-
107
-
108
-
109
-
110
-
111
-
112
-
113
-
114
-
115
-
116
-
117
-
118
-
119
-
120
-
121
-
122
-
123
-
124
-
125
-
126
-
127
-
128
-
129
-
130
-
131
-
132
-
133
-
134
-
135
-
136
-
137
-
138
-
139
-
140
-
141
-
142
-
143
-
144
-
145
-
146
-
147
-
148
-
149
-
150
-
151
-
152
-
153
-
154
-
155
-
156
-
157
-
158
-
159
-
160
-
161
-
162
-
163
-
164
-
165
-
166
-
167
-
168
-
169
-
170
-
171
-
172
-
173
-
174
-
175
-
176
-
177
-
178
-
179
-
180
-
181
-
182
-
183
-
184
-
185
-
186
-
187
-
188
-
189
-
190
-
191
-
192
-
193
-
194
-
195
-
196
-
197
-
198
-
199
-
200
-
201
-
202
-
203
-
204
-
205
-
206
-
207
-
208
-
209
-
210
-
211
-
212
-
213
-
214
-
215
-
216
-
217
-
218
-
219
-
220
-
221
-
222
-
223
-
224
-
225
-
226
-
227
-
228
-
229
-
230
-
231
-
232
-
233
-
234
-
235
-
236
-
237
-
238
-
239
-
240
-
241
-
242
-
243
-
244
-
245
-
246
-
247
-
248
-
249
-
250
-
251
-
252
-
253
-
254
-
255
-
256
-
257
-
258
-
259
-
260
-
261
-
262
-
263
-
264
-
265
-
266
-
267
-
268
-
269
-
270
-
271
-
272
-
273
-
274
-
275
-
276
-
277
-
278
-
279
-
280
-
281
-
282
-
283
-
284
-
285
-
286
-
287
-
288
-
289
-
290
-
291
-
292
-
293
-
294
-
295
-
296
-
297
-
298
-
299
-
300
-
301
-
302
-
303
-
304
-
305
-
306
-
307
-
308
-
309
-
310
-
311
-
312
-
313
-
314
-
315
-
316
-
317
-
318
-
319
-
320
-
321
-
322
-
323
-
324
-
325
-
326
-
327
-
328
-
329
-
330
-
331
-
332
-
333
-
334
-
335
-
336
-
337
-
338
-
339
-
340
-
341
-
342
-
343
-
344
-
345
-
346
-
347
-
348
 |
 |