HP 2700n Service Manual - Page 230
Horizontal line, Table 6-15
 |
View all HP 2700n manuals
Add to My Manuals
Save this manual to your list of manuals |
Page 230 highlights
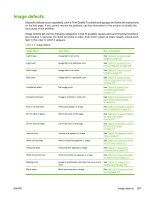
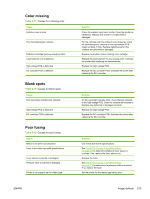
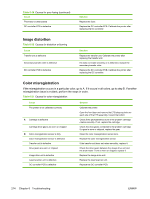
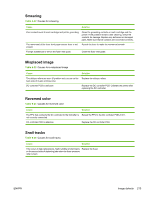
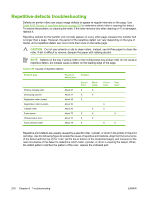
Table 6-14 Causes for white vertical lines (continued) Cause Solution B Vertical scratches on the transfer unit Replace the transfer unit. Vertical scratches on the fuser sleeve Replace the fuser. Horizontal line If the line appears in a particular color, go to step A. If it appears in the full-color print, go to step B. Table 6-15 Causes for horizontal line Cause Solution A The developing cylinder is deformed by remaining engaged with the photosensitive drum for too long. See Table 6-26 Causes of repetitive defects on page 216 to determine whether a developing cylinder is involved. If so, print about 20 pages to solve the problem. If the problem is not resolved, replace the cartridge. Horizontal scratches on the photosensitive drum (cartridge) See Table 6-26 Causes of repetitive defects on page 216 to determine whether a photosensitive drum is involved. If so, replace the cartridge. The print-cartridge cleaning blade leaves a line of toner At the printer control panel, set CONFIGURE DEVICE/ on the drum (C-blade blur). The line repeats every PRINT QUALITY/OPTIMIZE/ PRE-ROTATION=ON. 77 mm (3.0 inches). B Horizontal scratches on the fuser sleeve See Table 6-26 Causes of repetitive defects on page 216 to determine whether a fuser sleeve is involved. If so, replace the fuser. White horizontal line If the line appears in a particular color, go to A. If it appears in full color, go to B. Table 6-16 Causes for white horizontal lines Cause A Horizontal scratches on the photosensitive drum (cartridge) B Horizontal scratches on the transfer unit C The fuser sleeve is deformed by remaining engaged with the pressure roller for too long Solution See Table 6-26 Causes of repetitive defects on page 216 to determine whether a photosensitive drum is involved. If so, replace the print cartridge. Check the transfer unit surface for horizontal scratches. If any, replace the transfer unit. See Table 6-26 Causes of repetitive defects on page 216 to determine whether the fuser sleeve is involved. If so, replace the fuser. 212 Chapter 6 Troubleshooting ENWW
-
 1
1 -
2
-
3
-
4
-
5
-
6
-
7
-
8
-
9
-
10
-
11
-
12
-
13
-
14
-
15
-
16
-
17
-
18
-
19
-
20
-
21
-
22
-
23
-
24
-
25
-
26
-
27
-
28
-
29
-
30
-
31
-
32
-
33
-
34
-
35
-
36
-
37
-
38
-
39
-
40
-
41
-
42
-
43
-
44
-
45
-
46
-
47
-
48
-
49
-
50
-
51
-
52
-
53
-
54
-
55
-
56
-
57
-
58
-
59
-
60
-
61
-
62
-
63
-
64
-
65
-
66
-
67
-
68
-
69
-
70
-
71
-
72
-
73
-
74
-
75
-
76
-
77
-
78
-
79
-
80
-
81
-
82
-
83
-
84
-
85
-
86
-
87
-
88
-
89
-
90
-
91
-
92
-
93
-
94
-
95
-
96
-
97
-
98
-
99
-
100
-
101
-
102
-
103
-
104
-
105
-
106
-
107
-
108
-
109
-
110
-
111
-
112
-
113
-
114
-
115
-
116
-
117
-
118
-
119
-
120
-
121
-
122
-
123
-
124
-
125
-
126
-
127
-
128
-
129
-
130
-
131
-
132
-
133
-
134
-
135
-
136
-
137
-
138
-
139
-
140
-
141
-
142
-
143
-
144
-
145
-
146
-
147
-
148
-
149
-
150
-
151
-
152
-
153
-
154
-
155
-
156
-
157
-
158
-
159
-
160
-
161
-
162
-
163
-
164
-
165
-
166
-
167
-
168
-
169
-
170
-
171
-
172
-
173
-
174
-
175
-
176
-
177
-
178
-
179
-
180
-
181
-
182
-
183
-
184
-
185
-
186
-
187
-
188
-
189
-
190
-
191
-
192
-
193
-
194
-
195
-
196
-
197
-
198
-
199
-
200
-
201
-
202
-
203
-
204
-
205
-
206
-
207
-
208
-
209
-
210
-
211
-
212
-
213
-
214
-
215
-
216
-
217
-
218
-
219
-
220
-
221
-
222
-
223
-
224
-
 225
225 -
 226
226 -
 227
227 -
 228
228 -
 229
229 -
 230
230 -
 231
231 -
 232
232 -
 233
233 -
 234
234 -
 235
235 -
236
-
237
-
238
-
239
-
240
-
241
-
242
-
243
-
244
-
245
-
246
-
247
-
248
-
249
-
250
-
251
-
252
-
253
-
254
-
255
-
256
-
257
-
258
-
259
-
260
-
261
-
262
-
263
-
264
-
265
-
266
-
267
-
268
-
269
-
270
-
271
-
272
-
273
-
274
-
275
-
276
-
277
-
278
-
279
-
280
-
281
-
282
-
283
-
284
-
285
-
286
-
287
-
288
-
289
-
290
-
291
-
292
-
293
-
294
-
295
-
296
-
297
-
298
-
299
-
300
-
301
-
302
-
303
-
304
-
305
-
306
-
307
-
308
-
309
-
310
-
311
-
312
-
313
-
314
-
315
-
316
-
317
-
318
-
319
-
320
-
321
-
322
-
323
-
324
-
325
-
326
-
327
-
328
-
329
-
330
-
331
-
332
-
333
-
334
-
335
-
336
-
337
-
338
-
339
-
340
-
341
-
342
-
343
-
344
-
345
-
346
-
347
-
348
 |
 |
