HP 2700n Service Manual - Page 232
Image distortion, Color misregistration, misregistration issue is evident, perform the steps in order.
 |
View all HP 2700n manuals
Add to My Manuals
Save this manual to your list of manuals |
Page 232 highlights
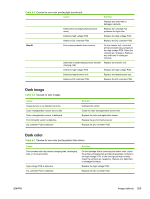
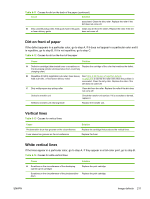
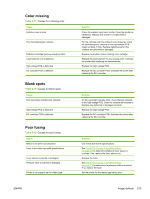
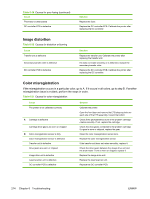
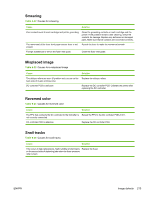
Table 6-19 Causes for poor fusing (continued) Cause Thermistor is deteriorated DC controller PCB is defective Solution Replace the fuser. Replace the DC controller PCB. Calibrate the printer after replacing the DC controller. Image distortion Table 6-20 Causes for distortion or blurring Cause Transfer unit is defective Secondary-transfer roller is defective DC controller PCB is defective Solution Replace the transfer unit. Calibrate the printer after replacing the transfer unit. If it does not rotate smoothly or is deformed, replace the secondary-transfer roller. Replace the DC controller PCB. Calibrate the printer after replacing the DC controller. Color misregistration If the misregistration occurs in a particular color, go to A. If it occurs in all colors, go to step B. If another misregistration issue is evident, perform the steps in order. Table 6-21 Causes for color misregistration Cause The printer is not calibrated correctly A Cartridge is defective Cartridge drive gears are worn or chipped B Color misregistration sensor is dirty Color misregistration sensor is defective Transfer unit is defective Drive gears are worn or chipped Image drive unit is defective Laser/scanner unit is defective DC controller PCB is defective Solution Calibrate the printer. Open the front door and remove the ETB shipping locks on each side of the ETB assembly, toward the bottom. Check if the photosensitive drum in the problem cartridge rotates smoothly. If not, replace the cartridge. Check the drive gears connected to the problem cartridge. If a gear is worn or chipped, replace the gear. Clean the color misregistration sensor lens. Replace the color misregistration sensor. If the transfer unit does not rotate smoothly, replace it. Check the drive gears between the image drive unit and the drum motor. If one is worn or chipped, replace it. Replace the image drive unit. Replace the laser/scanner unit. Replace the DC controller PCB. 214 Chapter 6 Troubleshooting ENWW
-
 1
1 -
2
-
3
-
4
-
5
-
6
-
7
-
8
-
9
-
10
-
11
-
12
-
13
-
14
-
15
-
16
-
17
-
18
-
19
-
20
-
21
-
22
-
23
-
24
-
25
-
26
-
27
-
28
-
29
-
30
-
31
-
32
-
33
-
34
-
35
-
36
-
37
-
38
-
39
-
40
-
41
-
42
-
43
-
44
-
45
-
46
-
47
-
48
-
49
-
50
-
51
-
52
-
53
-
54
-
55
-
56
-
57
-
58
-
59
-
60
-
61
-
62
-
63
-
64
-
65
-
66
-
67
-
68
-
69
-
70
-
71
-
72
-
73
-
74
-
75
-
76
-
77
-
78
-
79
-
80
-
81
-
82
-
83
-
84
-
85
-
86
-
87
-
88
-
89
-
90
-
91
-
92
-
93
-
94
-
95
-
96
-
97
-
98
-
99
-
100
-
101
-
102
-
103
-
104
-
105
-
106
-
107
-
108
-
109
-
110
-
111
-
112
-
113
-
114
-
115
-
116
-
117
-
118
-
119
-
120
-
121
-
122
-
123
-
124
-
125
-
126
-
127
-
128
-
129
-
130
-
131
-
132
-
133
-
134
-
135
-
136
-
137
-
138
-
139
-
140
-
141
-
142
-
143
-
144
-
145
-
146
-
147
-
148
-
149
-
150
-
151
-
152
-
153
-
154
-
155
-
156
-
157
-
158
-
159
-
160
-
161
-
162
-
163
-
164
-
165
-
166
-
167
-
168
-
169
-
170
-
171
-
172
-
173
-
174
-
175
-
176
-
177
-
178
-
179
-
180
-
181
-
182
-
183
-
184
-
185
-
186
-
187
-
188
-
189
-
190
-
191
-
192
-
193
-
194
-
195
-
196
-
197
-
198
-
199
-
200
-
201
-
202
-
203
-
204
-
205
-
206
-
207
-
208
-
209
-
210
-
211
-
212
-
213
-
214
-
215
-
216
-
217
-
218
-
219
-
220
-
221
-
222
-
223
-
224
-
225
-
226
-
 227
227 -
 228
228 -
 229
229 -
 230
230 -
 231
231 -
 232
232 -
 233
233 -
 234
234 -
 235
235 -
 236
236 -
 237
237 -
238
-
239
-
240
-
241
-
242
-
243
-
244
-
245
-
246
-
247
-
248
-
249
-
250
-
251
-
252
-
253
-
254
-
255
-
256
-
257
-
258
-
259
-
260
-
261
-
262
-
263
-
264
-
265
-
266
-
267
-
268
-
269
-
270
-
271
-
272
-
273
-
274
-
275
-
276
-
277
-
278
-
279
-
280
-
281
-
282
-
283
-
284
-
285
-
286
-
287
-
288
-
289
-
290
-
291
-
292
-
293
-
294
-
295
-
296
-
297
-
298
-
299
-
300
-
301
-
302
-
303
-
304
-
305
-
306
-
307
-
308
-
309
-
310
-
311
-
312
-
313
-
314
-
315
-
316
-
317
-
318
-
319
-
320
-
321
-
322
-
323
-
324
-
325
-
326
-
327
-
328
-
329
-
330
-
331
-
332
-
333
-
334
-
335
-
336
-
337
-
338
-
339
-
340
-
341
-
342
-
343
-
344
-
345
-
346
-
347
-
348
 |
 |