HP 2700n Service Manual - Page 241
Engine resets, Restore defaults (cold reset), NVRAM initialization
 |
View all HP 2700n manuals
Add to My Manuals
Save this manual to your list of manuals |
Page 241 highlights
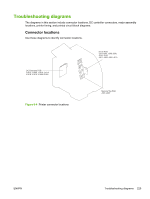
Engine resets Use the following information to perform system-wide reset procedures. Customers do not have access to this information. Engine resets Restore defaults (cold reset) The traditional cold reset function that other HP LaserJet printers have is not supported for this printer. The equivalent function is the Restore defaults option in the Service menu. Restoring the default settings unlocks menus that have been previously locked and resets all controlpanel menu items to the factory defaults. It does not reset the serial number and the page counts. NOTE Before restoring defaults, print a menu structure report and a configuration page. Use the information on these pages to reset customer-specific settings. CAUTION All HP Jetdirect settings are also reset. Be sure to print a configuration page before restoring defaults. Make note of the IP address that is listed on the Jetdirect configuration page. You might need to restore the IP address after performing a cold reset. To restore default settings 1. Press OK to enter the menus. 2. Press > to highlight Service, and press OK. 3. Press > to highlight Restore defaults, if it is not already highlighted. Press OK. NVRAM initialization CAUTION All HP Jetdirect settings are also reset. Be sure to print a configuration page before performing an NVRAM initialization. Make note of the IP address that is listed on the Jetdirect configuration page. You need to restore the IP address after performing an NVRAM initialization. Performing an NVRAM initialization resets the following settings and information: ● All menu settings are reset to factory default values. ● All localization settings, including language and country/region, are reset. After performing an NVRAM initialization, reconfigure any computers that print to this printer so that the computers can recognize the printer. To perform an NVRAM initialization 1. Turn the printer off. 2. Simultaneously press > and X. Hold these buttons as you turn on the printer. 3. When Permanent storage init. appears on the display, release both buttons. 4. When the printer has finished the NVRAM initialization, it returns to the Ready state. ENWW Engine resets 223
-
 1
1 -
2
-
3
-
4
-
5
-
6
-
7
-
8
-
9
-
10
-
11
-
12
-
13
-
14
-
15
-
16
-
17
-
18
-
19
-
20
-
21
-
22
-
23
-
24
-
25
-
26
-
27
-
28
-
29
-
30
-
31
-
32
-
33
-
34
-
35
-
36
-
37
-
38
-
39
-
40
-
41
-
42
-
43
-
44
-
45
-
46
-
47
-
48
-
49
-
50
-
51
-
52
-
53
-
54
-
55
-
56
-
57
-
58
-
59
-
60
-
61
-
62
-
63
-
64
-
65
-
66
-
67
-
68
-
69
-
70
-
71
-
72
-
73
-
74
-
75
-
76
-
77
-
78
-
79
-
80
-
81
-
82
-
83
-
84
-
85
-
86
-
87
-
88
-
89
-
90
-
91
-
92
-
93
-
94
-
95
-
96
-
97
-
98
-
99
-
100
-
101
-
102
-
103
-
104
-
105
-
106
-
107
-
108
-
109
-
110
-
111
-
112
-
113
-
114
-
115
-
116
-
117
-
118
-
119
-
120
-
121
-
122
-
123
-
124
-
125
-
126
-
127
-
128
-
129
-
130
-
131
-
132
-
133
-
134
-
135
-
136
-
137
-
138
-
139
-
140
-
141
-
142
-
143
-
144
-
145
-
146
-
147
-
148
-
149
-
150
-
151
-
152
-
153
-
154
-
155
-
156
-
157
-
158
-
159
-
160
-
161
-
162
-
163
-
164
-
165
-
166
-
167
-
168
-
169
-
170
-
171
-
172
-
173
-
174
-
175
-
176
-
177
-
178
-
179
-
180
-
181
-
182
-
183
-
184
-
185
-
186
-
187
-
188
-
189
-
190
-
191
-
192
-
193
-
194
-
195
-
196
-
197
-
198
-
199
-
200
-
201
-
202
-
203
-
204
-
205
-
206
-
207
-
208
-
209
-
210
-
211
-
212
-
213
-
214
-
215
-
216
-
217
-
218
-
219
-
220
-
221
-
222
-
223
-
224
-
225
-
226
-
227
-
228
-
229
-
230
-
231
-
232
-
233
-
234
-
235
-
 236
236 -
 237
237 -
 238
238 -
 239
239 -
 240
240 -
 241
241 -
 242
242 -
 243
243 -
 244
244 -
 245
245 -
 246
246 -
247
-
248
-
249
-
250
-
251
-
252
-
253
-
254
-
255
-
256
-
257
-
258
-
259
-
260
-
261
-
262
-
263
-
264
-
265
-
266
-
267
-
268
-
269
-
270
-
271
-
272
-
273
-
274
-
275
-
276
-
277
-
278
-
279
-
280
-
281
-
282
-
283
-
284
-
285
-
286
-
287
-
288
-
289
-
290
-
291
-
292
-
293
-
294
-
295
-
296
-
297
-
298
-
299
-
300
-
301
-
302
-
303
-
304
-
305
-
306
-
307
-
308
-
309
-
310
-
311
-
312
-
313
-
314
-
315
-
316
-
317
-
318
-
319
-
320
-
321
-
322
-
323
-
324
-
325
-
326
-
327
-
328
-
329
-
330
-
331
-
332
-
333
-
334
-
335
-
336
-
337
-
338
-
339
-
340
-
341
-
342
-
343
-
344
-
345
-
346
-
347
-
348
 |
 |