HP LaserJet 9000 HP LaserJet 9000 Series - Software Technical Reference - Page 114
Detailed Windows installation, Typical Installation dialog box sequence, Choose Setup Language
 |
View all HP LaserJet 9000 manuals
Add to My Manuals
Save this manual to your list of manuals |
Page 114 highlights
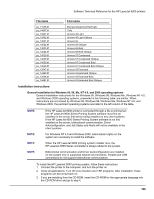
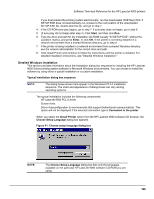
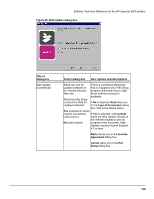
Software Technical Reference for the HP LaserJet 9000 printers If you downloaded the printing system electronically, run the downloaded .EXE file(s) first. If SETUP.EXE does not automatically run, browse to the root location of the downloaded SETUP.EXE file, double-click the file, and go to step 7. 4. If the CD-ROM auto-play begins, go to step 7. If auto-play does not begin, go to step 5. 5. (If auto-play did not begin after step 4.) Click Start, and then click Run. 6. Type the drive and path for the installation CD-ROM (usually "D:\SETUP.EXE", without the quotation marks), and press Enter, or click OK. If the printer is not being installed in a network environment from a shared Windows directory, go to step 8. 7. If the printer is being installed in a network environment from a shared Windows directory, see the network administrator for the correct drive and path. 8. Click Install Printer and continue to follow the instructions until the printer is installed. For detailed installation instructions, see "Detailed Windows installation." Detailed Windows installation This section provides information about the installation dialog box sequence for installing the HP LaserJet 9000 Series printing system software in Microsoft Windows environments. You can choose to install the software by using either a typical installation or a custom installation. Typical Installation dialog box sequence NOTE: The dialog boxes shown here appear in the Windows NT 4.0 installation sequence. The order and appearance of dialog boxes can vary among operating systems. The typical installation includes the following components: • HP LaserJet 9000 PCL 6 driver. • Screen fonts. • Driver Autoconfiguration (in environments that support bidirectional communication). This option will not be displayed if the selected connection type is Connected to the printer. When you select the Install Printer option from the HP LaserJet 9000 software CD browser, the Choose Setup Language dialog box appears. Figure 41: Choose setup language dialog box NOTE: The Choose Setup Language dialog box lists only the languages available on the particular HP LaserJet 9000 software CD-ROM you are using. 106
-
 1
1 -
2
-
3
-
4
-
5
-
6
-
7
-
8
-
9
-
10
-
11
-
12
-
13
-
14
-
15
-
16
-
17
-
18
-
19
-
20
-
21
-
22
-
23
-
24
-
25
-
26
-
27
-
28
-
29
-
30
-
31
-
32
-
33
-
34
-
35
-
36
-
37
-
38
-
39
-
40
-
41
-
42
-
43
-
44
-
45
-
46
-
47
-
48
-
49
-
50
-
51
-
52
-
53
-
54
-
55
-
56
-
57
-
58
-
59
-
60
-
61
-
62
-
63
-
64
-
65
-
66
-
67
-
68
-
69
-
70
-
71
-
72
-
73
-
74
-
75
-
76
-
77
-
78
-
79
-
80
-
81
-
82
-
83
-
84
-
85
-
86
-
87
-
88
-
89
-
90
-
91
-
92
-
93
-
94
-
95
-
96
-
97
-
98
-
99
-
100
-
101
-
102
-
103
-
104
-
105
-
106
-
107
-
108
-
 109
109 -
 110
110 -
 111
111 -
 112
112 -
 113
113 -
 114
114 -
 115
115 -
 116
116 -
 117
117 -
 118
118 -
 119
119 -
120
-
121
-
122
-
123
-
124
-
125
-
126
-
127
-
128
-
129
-
130
-
131
-
132
-
133
-
134
-
135
-
136
-
137
-
138
-
139
-
140
-
141
-
142
-
143
-
144
-
145
-
146
-
147
-
148
-
149
-
150
-
151
-
152
-
153
-
154
-
155
-
156
-
157
-
158
-
159
-
160
-
161
-
162
-
163
-
164
-
165
-
166
-
167
-
168
-
169
-
170
-
171
-
172
-
173
-
174
-
175
-
176
-
177
-
178
-
179
-
180
-
181
-
182
-
183
-
184
 |
 |
