HP LaserJet 9000 HP LaserJet 9000 Series - Software Technical Reference - Page 136
File and Print Sharing, Add Printer Wizard.
 |
View all HP LaserJet 9000 manuals
Add to My Manuals
Save this manual to your list of manuals |
Page 136 highlights
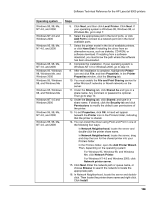
Software Technical Reference for the HP LaserJet 9000 printers Operating system Steps Windows 95, 98, Me, NT 4.0, and 2000 Windows NT 4.0 and Windows 2000 Windows 95, 98, Me, NT 4.0, and 2000 Windows 95, 98, Me, NT 4.0, and 2000 Windows 95, Windows 98, Windows Me, and Windows 2000 Windows 95, Windows 98, and Windows Me Windows 95, Windows 98, and Windows Me Windows NT 4.0 and Windows 2000 Windows 95, 98, Me, NT 4.0, and 2000 Windows 95, 98, Me, NT 4.0, and 2000 5. Click Next, and then click Local Printer. Click Next. If your operating system is Windows 95, Windows 98, or Windows Me, go to step 7. 6. Select the appropriate port in the list of ports, or click Add Port to connect to a network port not in the list of available ports. 7. Select the printer model in the list of available printers, or click Have Disk if installing the driver from an alternative source, such as diskette, CD-ROM, or software download. If installing from a software download, you must know the path where the software has been downloaded. 8. Complete the installation. If your operating system is Windows NT 4.0 or Windows 2000, go to step 12. 9. After the installation is complete, highlight the Printer icon and click File, and then Properties. In the Printer Properties window, click the Sharing tab. 10. You must enable the File and Print Sharing service for either Microsoft networks or Novell networks on the server. 11. Under the Sharing tab, click Shared As and type in a share name. Any comment or password is optional. Then go to step 13. 12. Under the Sharing tab, click Shared: and type in a share name. If desired, click the Security tab and click Permissions to modify the default user permissions of the printer. 13. To exit Properties, click OK. A hand will appear beneath the Printer icon in the Printers folder, indicating that the printer is shared. 14. You can install the driver using Point and Print in one of the following four ways: • In Network Neighborhood, locate the server and double-click the printer share name. • In Network Neighborhood, locate the server; drag and drop the icon for the shared printer into your Printers folder. • In the Printers folder, open the Add Printer Wizard. Then, depending on the operating system: • For Windows 95, Windows 98, and Windows Me, click Network Printer. • For Windows NT 4.0 and Windows 2000, click Network printer server. 15. Click Next. Enter the network path or queue name, or choose Browse to search the network to locate the appropriate path. 16. In Network Neighborhood, locate the server and doubleclick. Then locate the printer share name and right-click. Click Install. 128
-
 1
1 -
2
-
3
-
4
-
5
-
6
-
7
-
8
-
9
-
10
-
11
-
12
-
13
-
14
-
15
-
16
-
17
-
18
-
19
-
20
-
21
-
22
-
23
-
24
-
25
-
26
-
27
-
28
-
29
-
30
-
31
-
32
-
33
-
34
-
35
-
36
-
37
-
38
-
39
-
40
-
41
-
42
-
43
-
44
-
45
-
46
-
47
-
48
-
49
-
50
-
51
-
52
-
53
-
54
-
55
-
56
-
57
-
58
-
59
-
60
-
61
-
62
-
63
-
64
-
65
-
66
-
67
-
68
-
69
-
70
-
71
-
72
-
73
-
74
-
75
-
76
-
77
-
78
-
79
-
80
-
81
-
82
-
83
-
84
-
85
-
86
-
87
-
88
-
89
-
90
-
91
-
92
-
93
-
94
-
95
-
96
-
97
-
98
-
99
-
100
-
101
-
102
-
103
-
104
-
105
-
106
-
107
-
108
-
109
-
110
-
111
-
112
-
113
-
114
-
115
-
116
-
117
-
118
-
119
-
120
-
121
-
122
-
123
-
124
-
125
-
126
-
127
-
128
-
129
-
130
-
 131
131 -
 132
132 -
 133
133 -
 134
134 -
 135
135 -
 136
136 -
 137
137 -
 138
138 -
 139
139 -
 140
140 -
 141
141 -
142
-
143
-
144
-
145
-
146
-
147
-
148
-
149
-
150
-
151
-
152
-
153
-
154
-
155
-
156
-
157
-
158
-
159
-
160
-
161
-
162
-
163
-
164
-
165
-
166
-
167
-
168
-
169
-
170
-
171
-
172
-
173
-
174
-
175
-
176
-
177
-
178
-
179
-
180
-
181
-
182
-
183
-
184
 |
 |
