HP LaserJet 9000 HP LaserJet 9000 Series - Software Technical Reference - Page 121
Basic Microsoft Server Setup, Specify Network Path
 |
View all HP LaserJet 9000 manuals
Add to My Manuals
Save this manual to your list of manuals |
Page 121 highlights
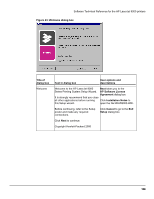
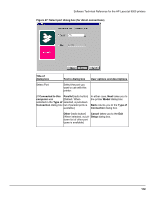
Software Technical Reference for the HP LaserJet 9000 printers Figure 48: Network setup dialog box (for network connections) Title of dialog box Text in dialog box User options and descriptions Network Setup [If Connected to the network was selected in the Type of Connection dialog box] Indicate the type of network Next takes you to the connection Network Printer Configuration dialog box. Basic Microsoft Server Setup Create a connection (network If you choose the Client port) to a printer attached directly Setup option, Next takes you to the network. Your computer will to the Specify Network Path manage its own print jobs and dialog box, and then to the may optionally share the printer Installation Type dialog box. with other network users. [radio button] If the Help me option is chosen, Next initiates a series Client Setup of question dialog boxes that The printer is already set up as a help you determine the best shared printer on the network and connection type option to is managed by a server or another follow. This series begins with PC. the Cable Type Selection [radio button] dialog box. Help me determine which setup Back returns you to the Type is right for me of Connection dialog box (6). Setup will ask you questions to help you determine the Cancel takes you to the Exit appropriate network setup for your Setup dialog box. situation. [radio button] 113
-
 1
1 -
2
-
3
-
4
-
5
-
6
-
7
-
8
-
9
-
10
-
11
-
12
-
13
-
14
-
15
-
16
-
17
-
18
-
19
-
20
-
21
-
22
-
23
-
24
-
25
-
26
-
27
-
28
-
29
-
30
-
31
-
32
-
33
-
34
-
35
-
36
-
37
-
38
-
39
-
40
-
41
-
42
-
43
-
44
-
45
-
46
-
47
-
48
-
49
-
50
-
51
-
52
-
53
-
54
-
55
-
56
-
57
-
58
-
59
-
60
-
61
-
62
-
63
-
64
-
65
-
66
-
67
-
68
-
69
-
70
-
71
-
72
-
73
-
74
-
75
-
76
-
77
-
78
-
79
-
80
-
81
-
82
-
83
-
84
-
85
-
86
-
87
-
88
-
89
-
90
-
91
-
92
-
93
-
94
-
95
-
96
-
97
-
98
-
99
-
100
-
101
-
102
-
103
-
104
-
105
-
106
-
107
-
108
-
109
-
110
-
111
-
112
-
113
-
114
-
115
-
 116
116 -
 117
117 -
 118
118 -
 119
119 -
 120
120 -
 121
121 -
 122
122 -
 123
123 -
 124
124 -
 125
125 -
 126
126 -
127
-
128
-
129
-
130
-
131
-
132
-
133
-
134
-
135
-
136
-
137
-
138
-
139
-
140
-
141
-
142
-
143
-
144
-
145
-
146
-
147
-
148
-
149
-
150
-
151
-
152
-
153
-
154
-
155
-
156
-
157
-
158
-
159
-
160
-
161
-
162
-
163
-
164
-
165
-
166
-
167
-
168
-
169
-
170
-
171
-
172
-
173
-
174
-
175
-
176
-
177
-
178
-
179
-
180
-
181
-
182
-
183
-
184
 |
 |
