HP LaserJet 9000 HP LaserJet 9000 Series - Software Technical Reference - Page 33
ADJUST TRAY 2, and then press the select button, Registration side 2
 |
View all HP LaserJet 9000 manuals
Add to My Manuals
Save this manual to your list of manuals |
Page 33 highlights
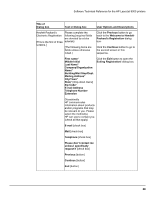
Software Technical Reference for the HP LaserJet 9000 printers Figure 9: Registration page, side 2 The following instructions, adapted from the registration page shown in the following two illustrations, assist you in shifting the printed area in the desired direction: 1. Examine the borders on the top and bottom of the registration page. 2. Note the Y SHIFT value necessary to move the border in the desired direction, either up or down on the page. 3. Examine the borders on the left and right of the registration page. 4. Note the X1 SHIFT value necessary to move the border in the desired direction, either to the left or the right on the page. 5. Press the select button on the control panel display to enter the menus. 6. Use the up and down arrows to highlight CONFIGURE DEVICE, and then press the select button to select. 7. Use the up and down arrows to highlight PRINT QUALITY, and then press the select button to select. 8. Use the up and down arrows to highlight SET REGISTRATION, and then press the select button to select. 9. Use the up and down arrows to highlight the name of the desired tray (ADJUST TRAY 1, ADJUST TRAY 2, ADJUST TRAY 3, OR ADJUST TRAY 4), and then press the select button to select. 10. Use the up and down arrows to highlight Y SHIFT, and then press the select button to select. 11. Use the up and down arrows to locate the value you identified in step 2, and then press the select button to save the new value. 12. Use the up and down arrows to highlight X1 SHIFT, and then press the select button to select. 13. Use the up and down arrows to locate the value you identified in step 4, and then press the select button to save the new value. 14. Print another test page (See "Printing a registration page") and repeat these steps (1 through 14) to verify that the border is properly placed. 25
-
 1
1 -
2
-
3
-
4
-
5
-
6
-
7
-
8
-
9
-
10
-
11
-
12
-
13
-
14
-
15
-
16
-
17
-
18
-
19
-
20
-
21
-
22
-
23
-
24
-
25
-
26
-
27
-
 28
28 -
 29
29 -
 30
30 -
 31
31 -
 32
32 -
 33
33 -
 34
34 -
 35
35 -
 36
36 -
 37
37 -
 38
38 -
39
-
40
-
41
-
42
-
43
-
44
-
45
-
46
-
47
-
48
-
49
-
50
-
51
-
52
-
53
-
54
-
55
-
56
-
57
-
58
-
59
-
60
-
61
-
62
-
63
-
64
-
65
-
66
-
67
-
68
-
69
-
70
-
71
-
72
-
73
-
74
-
75
-
76
-
77
-
78
-
79
-
80
-
81
-
82
-
83
-
84
-
85
-
86
-
87
-
88
-
89
-
90
-
91
-
92
-
93
-
94
-
95
-
96
-
97
-
98
-
99
-
100
-
101
-
102
-
103
-
104
-
105
-
106
-
107
-
108
-
109
-
110
-
111
-
112
-
113
-
114
-
115
-
116
-
117
-
118
-
119
-
120
-
121
-
122
-
123
-
124
-
125
-
126
-
127
-
128
-
129
-
130
-
131
-
132
-
133
-
134
-
135
-
136
-
137
-
138
-
139
-
140
-
141
-
142
-
143
-
144
-
145
-
146
-
147
-
148
-
149
-
150
-
151
-
152
-
153
-
154
-
155
-
156
-
157
-
158
-
159
-
160
-
161
-
162
-
163
-
164
-
165
-
166
-
167
-
168
-
169
-
170
-
171
-
172
-
173
-
174
-
175
-
176
-
177
-
178
-
179
-
180
-
181
-
182
-
183
-
184
 |
 |
