HP Officejet 6600 User Guide - Page 132
Clear jams, Clear paper jams
 |
View all HP Officejet 6600 manuals
Add to My Manuals
Save this manual to your list of manuals |
Page 132 highlights
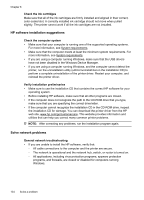
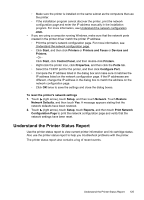
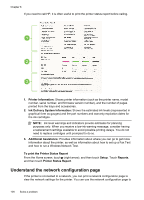
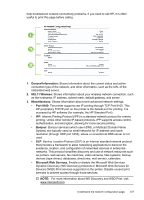
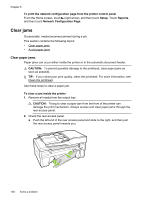
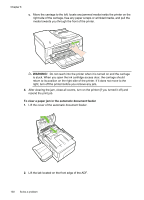
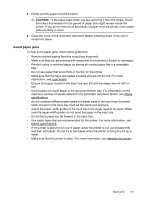
Chapter 8 To print the network configuration page from the printer control panel From the Home screen, touch (right arrow), and then touch Setup. Touch Reports, and then touch Network Configuration Page. Clear jams Occasionally, media becomes jammed during a job. This section contains the following topics: • Clear paper jams • Avoid paper jams Clear paper jams Paper jams can occur either inside the printer or in the automatic document feeder. CAUTION: To prevent possible damage to the printhead, clear paper jams as soon as possible. TIP: If you notice poor print quality, clean the printhead. For more information, see Clean the printhead. Use these steps to clear a paper jam. To clear a jam inside the printer 1. Remove all media from the output tray. CAUTION: Trying to clear a paper jam from the front of the printer can damage the print mechanism. Always access and clear paper jams through the rear access panel. 2. Check the rear access panel. a. Push the left end of the rear access panel and slide to the right, and then pull the rear access panel towards you. 2 1 128 Solve a problem
-
 1
1 -
2
-
3
-
4
-
5
-
6
-
7
-
8
-
9
-
10
-
11
-
12
-
13
-
14
-
15
-
16
-
17
-
18
-
19
-
20
-
21
-
22
-
23
-
24
-
25
-
26
-
27
-
28
-
29
-
30
-
31
-
32
-
33
-
34
-
35
-
36
-
37
-
38
-
39
-
40
-
41
-
42
-
43
-
44
-
45
-
46
-
47
-
48
-
49
-
50
-
51
-
52
-
53
-
54
-
55
-
56
-
57
-
58
-
59
-
60
-
61
-
62
-
63
-
64
-
65
-
66
-
67
-
68
-
69
-
70
-
71
-
72
-
73
-
74
-
75
-
76
-
77
-
78
-
79
-
80
-
81
-
82
-
83
-
84
-
85
-
86
-
87
-
88
-
89
-
90
-
91
-
92
-
93
-
94
-
95
-
96
-
97
-
98
-
99
-
100
-
101
-
102
-
103
-
104
-
105
-
106
-
107
-
108
-
109
-
110
-
111
-
112
-
113
-
114
-
115
-
116
-
117
-
118
-
119
-
120
-
121
-
122
-
123
-
124
-
125
-
126
-
 127
127 -
 128
128 -
 129
129 -
 130
130 -
 131
131 -
 132
132 -
 133
133 -
 134
134 -
 135
135 -
 136
136 -
 137
137 -
138
-
139
-
140
-
141
-
142
-
143
-
144
-
145
-
146
-
147
-
148
-
149
-
150
-
151
-
152
-
153
-
154
-
155
-
156
-
157
-
158
-
159
-
160
-
161
-
162
-
163
-
164
-
165
-
166
-
167
-
168
-
169
-
170
-
171
-
172
-
173
-
174
-
175
-
176
-
177
-
178
-
179
-
180
-
181
-
182
-
183
-
184
-
185
-
186
-
187
-
188
-
189
-
190
-
191
-
192
-
193
-
194
-
195
-
196
-
197
-
198
-
199
-
200
-
201
-
202
-
203
-
204
-
205
-
206
-
207
-
208
-
209
-
210
-
211
-
212
-
213
-
214
-
215
-
216
-
217
-
218
-
219
-
220
 |
 |