HP Officejet Pro K5300 User Manual - Page 61
Blank or partial printed, Something on the is missing or incorrect, Check the media settings
 |
View all HP Officejet Pro K5300 manuals
Add to My Manuals
Save this manual to your list of manuals |
Page 61 highlights
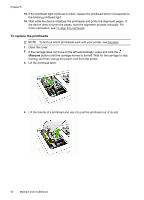
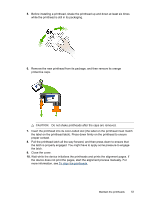
Check the device software settings Print speed is slower when Best or Maximum dpi is selected as the print quality. To increase the print speed, select different print settings in the device driver. For more information, see Change print settings. Blank or partial page printed Check for empty ink cartridges Check the control panel or the embedded Web server (see Embedded Web server) to see which cartridge is low or empty. The Toolbox (Windows), HP Printer Utility (Mac OS), and the self-test diagnostic page (see Understand the self-test diagnostic page) provide information about ink levels. If you are printing black text and a blank page prints, the black cartridge might be empty. For more information, see Replace the ink cartridges. Check the printhead latch Make sure the printhead latch is properly closed. Check the printhead • Make sure the printhead is inserted into its correct color-coded slot. For more information, see To replace the printheads. • Remove the printhead, and check to make sure the orange protective caps have been removed from the printhead. Clean the printhead Complete the printhead cleaning procedure. For more information, see Maintain the printheads. Turn off the device after removing the printhead Remove the printhead. Place the printhead on a sheet of paper or paper towel. Make sure the nozzle is facing up and not in contact with the paper. Turn off the device, wait about 20 seconds, and turn it on again without the printhead installed. After it has restarted, reinsert the printhead. Check the media settings • Make sure you select the correct print quality settings in the printer driver for the media loaded in the trays. • Make sure the page settings in the printer driver match the page size of media loaded in the tray. Something on the page is missing or incorrect Check the printheads Print the print quality diagnostic page on a clean sheet of white paper. Evaluate any problem areas, and perform the recommended actions. For more information, see To print the print quality diagnostic page. Solve printing problems 57
-
 1
1 -
2
-
3
-
4
-
5
-
6
-
7
-
8
-
9
-
10
-
11
-
12
-
13
-
14
-
15
-
16
-
17
-
18
-
19
-
20
-
21
-
22
-
23
-
24
-
25
-
26
-
27
-
28
-
29
-
30
-
31
-
32
-
33
-
34
-
35
-
36
-
37
-
38
-
39
-
40
-
41
-
42
-
43
-
44
-
45
-
46
-
47
-
48
-
49
-
50
-
51
-
52
-
53
-
54
-
55
-
 56
56 -
 57
57 -
 58
58 -
 59
59 -
 60
60 -
 61
61 -
 62
62 -
 63
63 -
 64
64 -
 65
65 -
 66
66 -
67
-
68
-
69
-
70
-
71
-
72
-
73
-
74
-
75
-
76
-
77
-
78
-
79
-
80
-
81
-
82
-
83
-
84
-
85
-
86
-
87
-
88
-
89
-
90
-
91
-
92
-
93
-
94
-
95
-
96
-
97
-
98
-
99
-
100
-
101
-
102
-
103
 |
 |