HP Officejet Pro K5300 User Manual - Page 71
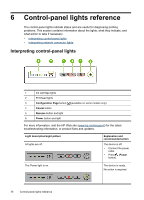
Clear jams, button to print the network configuration
 |
View all HP Officejet Pro K5300 manuals
Add to My Manuals
Save this manual to your list of manuals |
Page 71 highlights
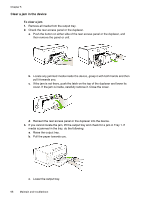
• Compare the IP address listed in the dialog box and make sure it matches the IP address listed on the network configuration page. If the IP addresses are different, change the IP address in the dialog box to match the address on the network configuration page. • Click OK twice to save the settings and close the dialog boxes. Problems connecting to a wired network • If the Link light on the network connector does not turn on, make sure that all of the "General network troubleshooting" conditions are met. • Though it is not recommended that you assign the device with a static IP address, you might resolve some installation problems (such as a conflict with a personal firewall) by doing so. To reset the device's network settings (available with some models) 1. Press and hold (Configuration Page button), press (Resume button) three times, and release (Configuration Page button). The Power light blinks for a few seconds. Wait until the Power light is on. 2. Press (Configuration Page button) to print the network configuration page and verify that the network settings have been reset. By default, the network name (SSID) is "hpsetup" and the communication mode is "ad hoc." Clear jams Occasionally, media becomes jammed during a job. Try the following remedies before you attempt to clear the jam. • Make sure that you are printing with media that meets specifications. For more information, see Select print media. • Make sure that you are printing with media that is not wrinkled, folded, or damaged. • Make sure that the input trays are loaded correctly and are not too full. For more information, see Load media. • Clear a jam in the device • Tips for avoiding jams Clear jams 67
-
 1
1 -
2
-
3
-
4
-
5
-
6
-
7
-
8
-
9
-
10
-
11
-
12
-
13
-
14
-
15
-
16
-
17
-
18
-
19
-
20
-
21
-
22
-
23
-
24
-
25
-
26
-
27
-
28
-
29
-
30
-
31
-
32
-
33
-
34
-
35
-
36
-
37
-
38
-
39
-
40
-
41
-
42
-
43
-
44
-
45
-
46
-
47
-
48
-
49
-
50
-
51
-
52
-
53
-
54
-
55
-
56
-
57
-
58
-
59
-
60
-
61
-
62
-
63
-
64
-
65
-
 66
66 -
 67
67 -
 68
68 -
 69
69 -
 70
70 -
 71
71 -
 72
72 -
 73
73 -
 74
74 -
 75
75 -
 76
76 -
77
-
78
-
79
-
80
-
81
-
82
-
83
-
84
-
85
-
86
-
87
-
88
-
89
-
90
-
91
-
92
-
93
-
94
-
95
-
96
-
97
-
98
-
99
-
100
-
101
-
102
-
103
 |
 |