HP Officejet Pro K5300 User Manual - Page 69
Troubleshoot installation issues, Hardware installation suggestions, C:\Ping 123.123.123.123
 |
View all HP Officejet Pro K5300 manuals
Add to My Manuals
Save this manual to your list of manuals |
Page 69 highlights
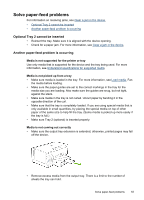
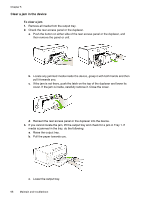
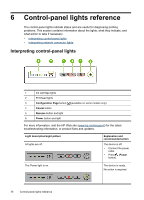
Check the device IP address • To check the IP address of the device from the control panel, print the network configuration page. For more information, see Understand the network configuration page. • Ping the device using the IP address from the command prompt. For example, if the IP address is 123.123.123.123, type the following at the MSDOS prompt: C:\Ping 123.123.123.123 If a reply appears, the IP address is correct. If a time-out response appears, the IP address is incorrect. Troubleshoot installation issues If the following topics do not help, see Support and warranty for information about HP support. • Hardware installation suggestions • Software installation suggestions • Solve network problems Hardware installation suggestions Check the device • Make sure that all packing tape and material have been removed from outside and inside the device. • Make sure that the device is loaded with paper. • Make sure that no lights are on or blinking except the Power light, which should be on. If a light other than the Power light is on or blinking, there is an error. For more information, see Control-panel lights reference. • Make sure that the device can print a self-test diagnostic page. • Rear access panel or duplexer is locked into place. Check the hardware connections • Make sure that any cords and cables that you are using are in good working order. • Make sure that the power cord is connected securely to both the device and to a working power outlet. Check the printheads and ink cartridges • Make sure that all of the printheads and ink cartridges are firmly installed in their correct, colorcoded slot. Press down firmly on each one to ensure proper contact. The device cannot work if they are not all installed. • Make sure that all latches and covers are closed properly. Troubleshoot installation issues 65
-
 1
1 -
2
-
3
-
4
-
5
-
6
-
7
-
8
-
9
-
10
-
11
-
12
-
13
-
14
-
15
-
16
-
17
-
18
-
19
-
20
-
21
-
22
-
23
-
24
-
25
-
26
-
27
-
28
-
29
-
30
-
31
-
32
-
33
-
34
-
35
-
36
-
37
-
38
-
39
-
40
-
41
-
42
-
43
-
44
-
45
-
46
-
47
-
48
-
49
-
50
-
51
-
52
-
53
-
54
-
55
-
56
-
57
-
58
-
59
-
60
-
61
-
62
-
63
-
 64
64 -
 65
65 -
 66
66 -
 67
67 -
 68
68 -
 69
69 -
 70
70 -
 71
71 -
 72
72 -
 73
73 -
 74
74 -
75
-
76
-
77
-
78
-
79
-
80
-
81
-
82
-
83
-
84
-
85
-
86
-
87
-
88
-
89
-
90
-
91
-
92
-
93
-
94
-
95
-
96
-
97
-
98
-
99
-
100
-
101
-
102
-
103
 |
 |