HP Rp2430 rp24xx A180 User Manual - Page 102
Removable Components, Move the Components to the EBU, Unpack the EBU, Step 5., HSC Cards, PCI Cards
 |
View all HP Rp2430 manuals
Add to My Manuals
Save this manual to your list of manuals |
Page 102 highlights
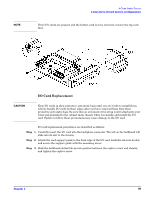
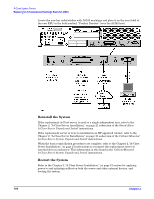
A-Class System Service Replacing an A-Class Server Exchange Base Unit (EBU) Step 5. Remove the top of the server by unscrewing the knurled captive screws on each side of the rear of the server. Slide the top back, lift it off, and set it aside. Removable Components The components listed below must be removed from the defective server prior to exchanging it for an operational unit. Click on each name to link to the remove/replace instructions for that item. • A-Class Server RAM Removal and Replacement • A-Class Server Cache Memory Removal and Replacement • A-Class Server Disk Drive Removal and Replacement NOTE Do not remove disk drives from the bracket. • A-Class Server I/O Card Removal and Replacement NOTE As you remove the memory and I/O cards from the original system, note the slots from which they came. They must be installed in the same slots in the EBU to ensure that the system operates properly. If you don't know the order in which the I/O cards were removed, refer to a recent ioscan (or other mapping utility) output. The information shown below can be used to match a path with an I/O card slot: HSC Cards PCI Cards Path Slot Path Slot 8/4.x 8/8.x Slot 1 Slot 2 8/0/1.x 8/0/2.x Slot 1 Slot 2 Slot 1 is the TOP slot and slot 2 is the BOTTOM slot, when looking at the server from the rear. The "x" is an operator-input variable. If you don't know the order of memory card removal, refer to the Memory Loading Rules on the label located under the server lid, attached to the top. Move the Components to the EBU The following paragraphs discuss how to transfer the components from the server to the EBU. Unpack the EBU When the new EBU is received, follow the directions in the A-Class Server Unpacking Instructions section. 102 Chapter 3
-
 1
1 -
2
-
3
-
4
-
5
-
6
-
7
-
8
-
9
-
10
-
11
-
12
-
13
-
14
-
15
-
16
-
17
-
18
-
19
-
20
-
21
-
22
-
23
-
24
-
25
-
26
-
27
-
28
-
29
-
30
-
31
-
32
-
33
-
34
-
35
-
36
-
37
-
38
-
39
-
40
-
41
-
42
-
43
-
44
-
45
-
46
-
47
-
48
-
49
-
50
-
51
-
52
-
53
-
54
-
55
-
56
-
57
-
58
-
59
-
60
-
61
-
62
-
63
-
64
-
65
-
66
-
67
-
68
-
69
-
70
-
71
-
72
-
73
-
74
-
75
-
76
-
77
-
78
-
79
-
80
-
81
-
82
-
83
-
84
-
85
-
86
-
87
-
88
-
89
-
90
-
91
-
92
-
93
-
94
-
95
-
96
-
 97
97 -
 98
98 -
 99
99 -
 100
100 -
 101
101 -
 102
102 -
 103
103 -
 104
104 -
 105
105 -
 106
106
 |
 |
