HP Rp2430 rp24xx A180 User Manual - Page 28
Unpack the Server, Open the Accessory Kit
 |
View all HP Rp2430 manuals
Add to My Manuals
Save this manual to your list of manuals |
Page 28 highlights
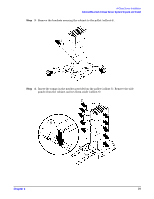
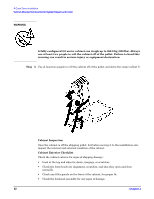
A-Class Server Installation Stand-Alone A-Class Server Unpack and Install Instructions Unpack the Server CAUTION NOTE Do not set the server on its side, or in any position other than upright on its rubber "feet," for operation. Failure to observe this precaution may result in component damage or loss of system reliability. Carefully unwrap the server and set it upright on the work surface. Open the Accessory Kit Open the Accessory Kit and verify that the contents agree with the packing list. Plastic Front Anchor Bracket end caps are included in each kit. Do not discard them. They will be needed if the server is installed in a cabinet. Open the Installation Instructions and Regulatory Information Packet The Installation Instructions/Regulatory Information Packet contains the following information: • Installation Instruction Sheet (A5182-96002), which includes: Basic cable connection information necessary to power on and boot the server to the Firmware Main Menu screen. The Universal Resource Locator (URL) for the A-Class Server home page on the World Wide Web. • Regulatory Information. Contains consumer safety and regulatory statements for the United States and for those countries that require publishing and dissemination of their own consumer safety and regulatory data. Installing a Stand-alone System A-Class servers are compact in design and can be installed on table or desk tops in the same manner as any standard Personal Computer (PC). Heating and cooling conditions must be met for the system to function at peak efficiency. Attention must be paid to system access. There must be room for external connections on the rear of the server and there must be ready access to an electrical outlet with the correct electrical output. These environmental requirements are found in the section titled, A-Class Server Site Preparation. When you have installed the server and are ready to connect external devices, refer to the,External Connections section. To power up and boot the server, refer to the section titled, A-Class Server Power Up and Boot Procedures. 28 Chapter 2
-
 1
1 -
2
-
3
-
4
-
5
-
6
-
7
-
8
-
9
-
10
-
11
-
12
-
13
-
14
-
15
-
16
-
17
-
18
-
19
-
20
-
21
-
22
-
 23
23 -
 24
24 -
 25
25 -
 26
26 -
 27
27 -
 28
28 -
 29
29 -
 30
30 -
 31
31 -
 32
32 -
 33
33 -
34
-
35
-
36
-
37
-
38
-
39
-
40
-
41
-
42
-
43
-
44
-
45
-
46
-
47
-
48
-
49
-
50
-
51
-
52
-
53
-
54
-
55
-
56
-
57
-
58
-
59
-
60
-
61
-
62
-
63
-
64
-
65
-
66
-
67
-
68
-
69
-
70
-
71
-
72
-
73
-
74
-
75
-
76
-
77
-
78
-
79
-
80
-
81
-
82
-
83
-
84
-
85
-
86
-
87
-
88
-
89
-
90
-
91
-
92
-
93
-
94
-
95
-
96
-
97
-
98
-
99
-
100
-
101
-
102
-
103
-
104
-
105
-
106
 |
 |