HP Rp2430 rp24xx A180 User Manual - Page 42
Electrostatic Discharge Precautions., Installing Cache Memory SIMMs., Step 1.
 |
View all HP Rp2430 manuals
Add to My Manuals
Save this manual to your list of manuals |
Page 42 highlights
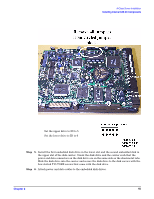
A-Class Server Installation Installing Internal Add-On Components Electrostatic Discharge Precautions. The procedures in this section require opening the server and exposing the system to electrostatic discharge. Always observe all electrostatic precautions when working with components inside or out of the server. Failure to follow these precautions may result in component damage or loss of system reliability. • Use a grounding mat and an anti-static wrist strap. • Wear the anti-static wrist strap to ensure that any accumulated electrostatic charge is discharged from your body to ground. Before You Do Anything... • Power down the system. • Unplug the server. NOTE Cabinet-mounted servers must be removed from the cabinet before proceeding. • Remove the top of the server by unscrewing the knurled captive screws on each side of the rear of the server. Slide the top back, lift it off, and set it aside. Step 1. Document which size SIMMs are already installed and in which slots. Step 2. Determine the size of the memory SIMMs to be installed. Step 3. If the capacity of the memory SIMMs to be installed is less than or equal to existing memory, install the new SIMMs in the next available slots. Step 4. If the capacity of the memory SIMMs to be installed is greater than existing memory, remove all existing memory RAM Removal, install RAM Replacement, the largest capacity SIMMs first beginning with slot 0a/b. Continue to add SIMMs in this manner. Step 5. Proceed to A-Class Server Power Up and Boot Procedures. Installing Cache Memory SIMMs. This section describes how to install Cache Memory SIMMs into A-Class servers. Abbreviated Cache Memory SIMM installation instructions also appear on the 11" x 14" maintenance label adhered to the bottom of the top cover. A-Class Cache Memory is sold as a module. A module is defined as two SIMMs. A-Class servers support a single 1MB Cache Memory module. The 1MB Cache Memory module consists of two 512MB SIMMs. A Cache Memory module occupies two slots. The size (or capacity) of the Cache Memory SIMM is printed along the top edge of the SIMM. NOTE SIMM is an acronym for Single Inline Memory Module. A SIMM has components on one side of the card, only.DIMM is an acronym for Dual Inline Memory Module. A DIMM has components on both sides of the card.The acronym SIMM will be used throughout this section to refer to either SIMM or DIMM. 42 Chapter 2
-
 1
1 -
2
-
3
-
4
-
5
-
6
-
7
-
8
-
9
-
10
-
11
-
12
-
13
-
14
-
15
-
16
-
17
-
18
-
19
-
20
-
21
-
22
-
23
-
24
-
25
-
26
-
27
-
28
-
29
-
30
-
31
-
32
-
33
-
34
-
35
-
36
-
 37
37 -
 38
38 -
 39
39 -
 40
40 -
 41
41 -
 42
42 -
 43
43 -
 44
44 -
 45
45 -
 46
46 -
 47
47 -
48
-
49
-
50
-
51
-
52
-
53
-
54
-
55
-
56
-
57
-
58
-
59
-
60
-
61
-
62
-
63
-
64
-
65
-
66
-
67
-
68
-
69
-
70
-
71
-
72
-
73
-
74
-
75
-
76
-
77
-
78
-
79
-
80
-
81
-
82
-
83
-
84
-
85
-
86
-
87
-
88
-
89
-
90
-
91
-
92
-
93
-
94
-
95
-
96
-
97
-
98
-
99
-
100
-
101
-
102
-
103
-
104
-
105
-
106
 |
 |