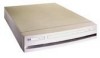
HP Rp2430 rp24xx A180 User Manual - Page 33
Cabinet Installation, observe this precaution could result in personal injury or equipment damage.
 |
View all HP Rp2430 manuals
Add to My Manuals
Save this manual to your list of manuals |
Page 33 highlights
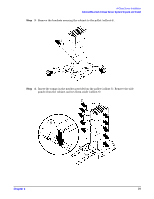
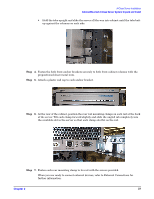
NOTE A-Class Server Installation Cabinet-Mounted A-Class Server System Unpack and Install • Check the rear door for dents, scratches, proper fit when its closed, and operation. Cabinet Interior Checklist: Open the rear door and inspect the inside of the cabinet: • Inspect all cables, make sure they are secure. • Inspect all rails for signs of damage. • Check all mounting screws for tightness. • Check all components for signs of shifting during shipment or any signs of damage. If the shipment is incomplete, or if the equipment is damaged or fails to meet specifications, notify the nearest Hewlett-Packard Sales and Support Office. If damage occurred in transit, notify the carrier as well. Hewlett-Packard will arrange for replacement or repair without waiting for settlement of claims against the carrier. If the shipment was damaged in transit, keep the shipping containers and packaging material for inspection. If extensive damage is found, it may be necessary to return the entire cabinet to HP. Refer to the Repacking instructions. Cabinet Installation Installation of a factory-loaded cabinet consists of the following steps: Step 1. Move the cabinet to installation site. Step 2. Lower the leveling feet. (This will prevent excessive wear on the casters.) CAUTION Extend the cabinet stabilizers, located at the bottom of the front of the cabinet, as an additional safeguard against overturning the cabinet during installation. Failure to observe this precaution could result in personal injury or equipment damage. Step 3. Connect the console and system peripherals to the server. For information about connecting external devices, refer to External Connections at the end of this section. NOTE Attaching cables while the rails are extended fully forward will ensure that sufficient slack is available for later maintenance. Step 4. Connect the cabinet power cord to the appropriate wall outlet. NOTE If the cabinet being installed contains a PowerTrust Uninterruptible Power Supply (UPS), perform the steps shown under the PowerTrust UPS OptionOption subsection. Step 5. Be sure all peripherals outside the cabinet are connected to wall outlets. Chapter 2 33
-
 1
1 -
2
-
3
-
4
-
5
-
6
-
7
-
8
-
9
-
10
-
11
-
12
-
13
-
14
-
15
-
16
-
17
-
18
-
19
-
20
-
21
-
22
-
23
-
24
-
25
-
26
-
27
-
 28
28 -
 29
29 -
 30
30 -
 31
31 -
 32
32 -
 33
33 -
 34
34 -
 35
35 -
 36
36 -
 37
37 -
 38
38 -
39
-
40
-
41
-
42
-
43
-
44
-
45
-
46
-
47
-
48
-
49
-
50
-
51
-
52
-
53
-
54
-
55
-
56
-
57
-
58
-
59
-
60
-
61
-
62
-
63
-
64
-
65
-
66
-
67
-
68
-
69
-
70
-
71
-
72
-
73
-
74
-
75
-
76
-
77
-
78
-
79
-
80
-
81
-
82
-
83
-
84
-
85
-
86
-
87
-
88
-
89
-
90
-
91
-
92
-
93
-
94
-
95
-
96
-
97
-
98
-
99
-
100
-
101
-
102
-
103
-
104
-
105
-
106
 |
 |
