HP Rp2430 rp24xx A180 User Manual - Page 34
PowerTrust UPS Option, Repackaging the Cabinet for Shipment
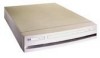 |
View all HP Rp2430 manuals
Add to My Manuals
Save this manual to your list of manuals |
Page 34 highlights
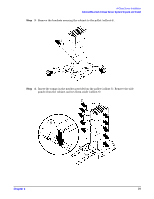
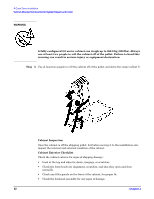
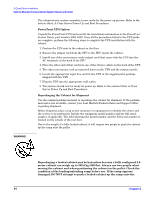
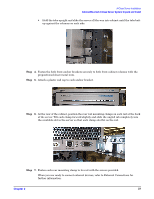
A-Class Server Installation Cabinet-Mounted A-Class Server System Unpack and Install The cabinet/server system assembly is now ready for the power up process. Refer to the section titled, A-Class Server Power Up and Boot Procedures. PowerTrust UPS Option Unpack the PowerTrust UPS and read all the installation information in the PowerTrust System Guide, part number 5961-8383. Once all the procedures listed in the UPS guide are complete, perform the following steps to complete the UPS installation with the cabinet. 1. Position the UPS next to the cabinet on the floor. 2. Remove the jumper cord from the SPU to the PDU inside the cabinet. 3. Install one of the convenience cords (output cord) that came with the UPS into the AC receptacle in the back of the SPU. 4. Place the other end of that cord into one of the Output outlets in the back of the UPS. 5. The other convenience cord is connected between the UPS and the system console. 6. Locate the appropriate input line cord for the UPS in the supplemental package shipped with the UPS. 7. Plug the UPS into the appropriate wall outlet. 8. The system should now be ready for power up. Refer to the section titled, A-Class Server Power Up and Boot Procedures. Repackaging the Cabinet for Shipment Use the original packing material to repackage the cabinet for shipment. If the packing material is not available, contact your local Hewlett-Packard Sales and Support Office regarding shipment. Before shipment, place a tag on the container (or equipment) to identify the owner and the service to be performed. Include the equipment model number and the full serial number, if applicable. The label showing the model number and the full serial number is located on the outside of the rear door. Due to the weight of a fully loaded cabinet, it will require two people to push the cabinet up the ramp onto the pallet. WARNING Repackaging a loaded cabinet may be hazardous because a fully configured 2.0 meter cabinet can weigh up to 362.8 kg (800 lbs). Always use two people when moving the cabinet and when positioning the cabinet on the pallet. Check the condition of the loading/unloading ramp before use. If the ramp appears damaged, DO NOT attempt to push a loaded cabinet up the ramp onto the 34 Chapter 2
-
 1
1 -
2
-
3
-
4
-
5
-
6
-
7
-
8
-
9
-
10
-
11
-
12
-
13
-
14
-
15
-
16
-
17
-
18
-
19
-
20
-
21
-
22
-
23
-
24
-
25
-
26
-
27
-
28
-
 29
29 -
 30
30 -
 31
31 -
 32
32 -
 33
33 -
 34
34 -
 35
35 -
 36
36 -
 37
37 -
 38
38 -
 39
39 -
40
-
41
-
42
-
43
-
44
-
45
-
46
-
47
-
48
-
49
-
50
-
51
-
52
-
53
-
54
-
55
-
56
-
57
-
58
-
59
-
60
-
61
-
62
-
63
-
64
-
65
-
66
-
67
-
68
-
69
-
70
-
71
-
72
-
73
-
74
-
75
-
76
-
77
-
78
-
79
-
80
-
81
-
82
-
83
-
84
-
85
-
86
-
87
-
88
-
89
-
90
-
91
-
92
-
93
-
94
-
95
-
96
-
97
-
98
-
99
-
100
-
101
-
102
-
103
-
104
-
105
-
106
 |
 |
