HP Rp2430 rp24xx A180 User Manual - Page 48
If necessary, remove I/O card brackets. Refer to A-Class Server I/O Card Removal
 |
View all HP Rp2430 manuals
Add to My Manuals
Save this manual to your list of manuals |
Page 48 highlights
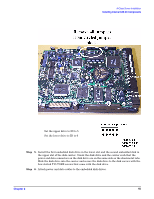
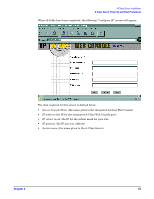
A-Class Server Installation Installing Internal Add-On Components • Use a grounding mat and an anti-static wrist strap. • Wear the anti-static wrist strap to ensure that any accumulated electrostatic charge is discharged from your body to ground. Before You Do Anything... • Power down the system. • Unplug the server. NOTE Cabinet-mounted servers must be removed from the cabinet before proceeding. • Remove the top of the server by unscrewing the knurled captive screws on each side of the rear of the server. Slide the top back, lift it off, and set it aside. Step 1. If necessary, remove I/O card brackets. Refer to A-Class Server I/O Card Removal and Replacement. Step 2. Carefully insert the I/O card into the backplane connector. The tab on the bulkhead will slide into its slot in the chassis. Step 3. Attach the card support guide to the front edge of the I/O card, hook the tab into its slot, and secure the support guide with the mounting screw. Step 4. Slide the bulkhead slotted tab up into position between the captive screw and chassis, and tighten the captive screw. 48 Chapter 2
-
 1
1 -
2
-
3
-
4
-
5
-
6
-
7
-
8
-
9
-
10
-
11
-
12
-
13
-
14
-
15
-
16
-
17
-
18
-
19
-
20
-
21
-
22
-
23
-
24
-
25
-
26
-
27
-
28
-
29
-
30
-
31
-
32
-
33
-
34
-
35
-
36
-
37
-
38
-
39
-
40
-
41
-
42
-
 43
43 -
 44
44 -
 45
45 -
 46
46 -
 47
47 -
 48
48 -
 49
49 -
 50
50 -
 51
51 -
 52
52 -
 53
53 -
54
-
55
-
56
-
57
-
58
-
59
-
60
-
61
-
62
-
63
-
64
-
65
-
66
-
67
-
68
-
69
-
70
-
71
-
72
-
73
-
74
-
75
-
76
-
77
-
78
-
79
-
80
-
81
-
82
-
83
-
84
-
85
-
86
-
87
-
88
-
89
-
90
-
91
-
92
-
93
-
94
-
95
-
96
-
97
-
98
-
99
-
100
-
101
-
102
-
103
-
104
-
105
-
106
 |
 |