LG LGLN510 Brochure - Page 69
Assigning a Picture to an Entry, Creating a Group
 |
View all LG LGLN510 manuals
Add to My Manuals
Save this manual to your list of manuals |
Page 69 highlights
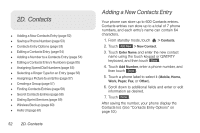
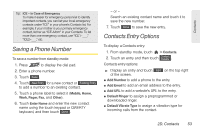
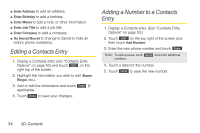
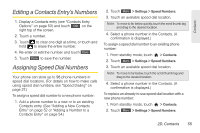
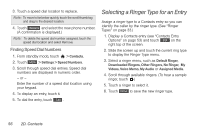
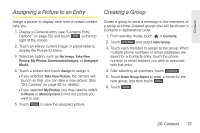
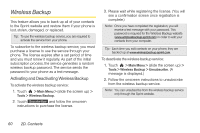
Contacts Assigning a Picture to an Entry Creating a Group Assign a picture to display each time a certain contact calls you. 1. Display a Contacts entry (see "Contacts Entry Options" on page 53) and touch Edit at the top right of the screen. 2. Touch an entry's current image or placeholder to display the Picture ID menu. 3. Select an option, such as No Image, Take New Picture, My Photos, Downloaded Images, or Assigned Media. 4. Touch a picture and touch Assign to assign it. Ⅲ If you selected Take New Picture, the camera will launch so that you can take a new picture. (See "2H. Camera" on page 82 for details.) Ⅲ If you selected My Photos, you may need to select In Phone or Memory Card to find the picture you want to use. 5. Touch Done to save the assigned picture. Create a group to send a message to the members of a group at a time. Created groups also will be shown in Contacts in alphabetical order. 1. From standby mode, touch > Contacts. 2. Touch Add New and select New Group. 3. Touch each member to assign to the group. When multiple phone numbers or email addresses are saved for a Contacts entry, touch the phone number or email address you wish to associate with that entry. 4. After selecting all members, touch Continue . 5. Touch Enter Group Name to enter a name for the new group, and then touch Done . 6. Touch Done . 2D. Contacts 57
-
 1
1 -
2
-
3
-
4
-
5
-
6
-
7
-
8
-
9
-
10
-
11
-
12
-
13
-
14
-
15
-
16
-
17
-
18
-
19
-
20
-
21
-
22
-
23
-
24
-
25
-
26
-
27
-
28
-
29
-
30
-
31
-
32
-
33
-
34
-
35
-
36
-
37
-
38
-
39
-
40
-
41
-
42
-
43
-
44
-
45
-
46
-
47
-
48
-
49
-
50
-
51
-
52
-
53
-
54
-
55
-
56
-
57
-
58
-
59
-
60
-
61
-
62
-
63
-
 64
64 -
 65
65 -
 66
66 -
 67
67 -
 68
68 -
 69
69 -
 70
70 -
 71
71 -
 72
72 -
 73
73 -
 74
74 -
75
-
76
-
77
-
78
-
79
-
80
-
81
-
82
-
83
-
84
-
85
-
86
-
87
-
88
-
89
-
90
-
91
-
92
-
93
-
94
-
95
-
96
-
97
-
98
-
99
-
100
-
101
-
102
-
103
-
104
-
105
-
106
-
107
-
108
-
109
-
110
-
111
-
112
-
113
-
114
-
115
-
116
-
117
-
118
-
119
-
120
-
121
-
122
-
123
-
124
-
125
-
126
-
127
-
128
-
129
-
130
-
131
-
132
-
133
-
134
-
135
-
136
-
137
-
138
-
139
-
140
-
141
-
142
-
143
-
144
-
145
-
146
-
147
-
148
-
149
-
150
-
151
-
152
-
153
-
154
-
155
-
156
-
157
-
158
-
159
 |
 |
